开始使用 trace
本指南将指引你把第一个 trace 上报到 Litefuse。如果你想先了解 trace 是什么、为什么重要,请阅读 可观测性概览。如果想了解 trace 在 Litefuse 中的结构以及后台是如何工作的,参考 核心概念。
获取 API Key
- 创建 Litefuse 账号 或自托管 Litefuse。
- 在项目设置中创建新的 API 凭证。
配置你的 AI agent
在编辑器的 agent 模式下使用 Litefuse Skill 来自动为应用接入埋点。它会根据你的具体应用选择最合适的接入方式。
什么是 Skill?这是给 AI 编码 agent 使用的可复用指令包。它能让你的 agent 开箱即用地拥有 Litefuse 相关的工作流和最佳实践。
Install the Litefuse Skill in your coding tool:
Litefuse has a Cursor Plugin that includes the skill automatically.
Claude stores its skills in a .claude/skills directory, you can install skills either globally or per project.
Copy the Litefuse Skill to your local claude skills folder. We’d recommend using a symlink to keep the skill up to date.
You can do this using npm (skills CLI):
npx skills add litefuse/skills --skill "litefuse" --agent "claude-code"Alternatively you can do this manually
- Clone repo somewhere stable
git clone https://github.com/litefuse/skills.git /path/to/litefuse-skills- Make sure Claude skills dir exists (common location)
mkdir -p ~/.claude/skills- Symlink the skill folder
ln -s /path/to/litefuse-skills/skills/litefuse ~/.claude/skills/litefuseCodex stores its skills in a .agents/skills directory, you can install skills either globally or per project. See Codex docs: Where to save skills.
Copy the Litefuse Skill to your local codex skills folder. We’d recommend using a symlink to keep the skill up to date.
You can do this using npm (skills CLI):
npx skills add litefuse/skills --skill "litefuse" --agent "codex"Alternatively you can do this manually
- Clone repo somewhere stable
git clone https://github.com/litefuse/skills.git /path/to/litefuse-skills- Make sure Codex skills dir exists (common location)
mkdir -p ~/.agents/skills- Symlink the skill folder
ln -s /path/to/litefuse-skills/skills/litefuse ~/.agents/skills/litefuseFor other AI coding agents, the skill folder structure is:
<agent-skill-root> depends on your tool. The npm command below installs to the correct location automatically.
For other AI coding agents, install via npm (skills CLI):
npx skills add litefuse/skills --skill "litefuse"If you want to target a specific agent directly:
npx skills add litefuse/skills --skill "litefuse" --agent "<agent-id>"Alternatively you can do this manually
- Clone repo somewhere stable
git clone https://github.com/litefuse/skills.git /path/to/litefuse-skills- Make sure your agent’s skills dir exists
mkdir -p /path/to/<agent-skill-root>/skills- Symlink the skill folder
ln -s /path/to/litefuse-skills/skills/litefuse /path/to/<agent-skill-root>/skills/litefuse启动一个新的 agent 会话,然后让它给你的代码库接入埋点:
"Instrument this application with Litefuse tracing following best practices."在 Litefuse 中查看你的 trace
运行应用之后,访问 Litefuse 界面查看你刚刚创建的 trace。 (Litefuse 中的 LangGraph trace 示例)
获取 API Key
- 创建 Litefuse 账号 或自托管 Litefuse。
- 在项目设置中创建新的 API 凭证。
上报你的第一个 trace
选择你使用的框架或 SDK 开始:
Litefuse 的 OpenAI SDK 是 OpenAI 客户端的直接替代品,可在不改变你写代码方式的前提下自动记录模型调用。如果你已经在使用 OpenAI Python SDK,只需做最小改动即可开始使用 Litefuse。
先安装 Litefuse OpenAI SDK。它包含封装后的 OpenAI 客户端,并在后台发送 trace。
pip install langfuseSet your Litefuse credentials as environment variables so the SDK knows which project to write to.
LANGFUSE_SECRET_KEY = "sk-lf-..."
LANGFUSE_PUBLIC_KEY = "pk-lf-..."
LANGFUSE_BASE_URL = "https://litefuse.cloud"
Swap the regular OpenAI import to Litefuse’s OpenAI drop-in. It behaves like the regular OpenAI client while also recording each call for you.
from langfuse.openai import openaiUse the OpenAI SDK as you normally would. The wrapper captures the prompt, model and output and forwards everything to Litefuse.
completion = openai.chat.completions.create(
  name="test-chat",
  model="gpt-4o",
  messages=[
      {"role": "system", "content": "You are a very accurate calculator. You output only the result of the calculation."},
      {"role": "user", "content": "1 + 1 = "}],
  metadata={"someMetadataKey": "someValue"},
)Litefuse 的 JS/TS OpenAI SDK 封装了官方客户端,使你的模型调用自动被 trace 并发送到 Litefuse。如果你已经在使用 OpenAI JavaScript SDK,只需做最小改动即可开始使用 Litefuse。
先安装 Litefuse OpenAI 封装。它在官方客户端基础上扩展了在后台发送 trace 的能力。
Install package
npm install @langfuse/openaiAdd credentials
Add your Litefuse credentials to your environment variables so the SDK knows which project to write to.
LANGFUSE_SECRET_KEY = "sk-lf-..."
LANGFUSE_PUBLIC_KEY = "pk-lf-..."
LANGFUSE_BASE_URL = "https://litefuse.cloud"
Initialize OpenTelemetry
Install the OpenTelemetry SDK, which the Litefuse integration uses under the hood to capture the data from each OpenAI call.
npm install @opentelemetry/sdk-nodeNext is initializing the Node SDK. You can do that either in a dedicated instrumentation file or directly at the top of your main file.
The inline setup is the simplest way to get started. It works well for projects where your main file is executed first and import order is straightforward.
We can now initialize the LangfuseSpanProcessor and start the SDK. The LangfuseSpanProcessor is the part that takes that collected data and sends it to your Litefuse project.
Important: start the SDK before initializing the logic that needs to be traced to avoid losing data.
import { NodeSDK } from "@opentelemetry/sdk-node";
import { LangfuseSpanProcessor } from "@langfuse/otel";

const sdk = new NodeSDK({
  spanProcessors: [new LangfuseSpanProcessor()],
});

sdk.start();
The instrumentation file often preferred when you’re using frameworks that have complex startup order (Next.js, serverless, bundlers) or if you want a clean, predictable place where tracing is always initialized first.
Create an instrumentation.ts file, which sets up the collector that gathers data about each OpenAI call. The LangfuseSpanProcessor is the part that takes that collected data and sends it to your Litefuse project.
import { NodeSDK } from "@opentelemetry/sdk-node";
import { LangfuseSpanProcessor } from "@langfuse/otel";

const sdk = new NodeSDK({
  spanProcessors: [new LangfuseSpanProcessor()],
});

sdk.start();
Import the instrumentation.ts file first so all later imports run with tracing enabled.
import "./instrumentation"; // Must be the first importWrap your normal OpenAI client. From now on, each OpenAI request is automatically collected and forwarded to Litefuse.
Wrap OpenAI client
import OpenAI from "openai";
import { observeOpenAI } from "@langfuse/openai";

const openai = observeOpenAI(new OpenAI());

const res = await openai.chat.completions.create({
    messages: [{ role: "system", content: "Tell me a story about a dog." }],
    model: "gpt-4o",
    max_tokens: 300,
});Litefuse 的 Vercel AI SDK 集成基于 OpenTelemetry 自动 trace 你的 AI 调用。如果你已经在使用 Vercel AI SDK,只需做最小改动即可开始使用 Litefuse。
Install packages
Install the Vercel AI SDK, OpenTelemetry, and the Litefuse integration packages.
npm install ai @ai-sdk/openai @langfuse/tracing @langfuse/otel @opentelemetry/sdk-nodeAdd credentials
Set your Litefuse credentials as environment variables so the SDK knows which project to write to.
LANGFUSE_SECRET_KEY = "sk-lf-..."
LANGFUSE_PUBLIC_KEY = "pk-lf-..."
LANGFUSE_BASE_URL = "https://litefuse.cloud"
Initialize OpenTelemetry with Litefuse
Set up the OpenTelemetry SDK with the Litefuse span processor. This captures telemetry data from the Vercel AI SDK and sends it to Litefuse.
import { NodeSDK } from "@opentelemetry/sdk-node";
import { LangfuseSpanProcessor } from "@langfuse/otel";

const sdk = new NodeSDK({
  spanProcessors: [new LangfuseSpanProcessor()],
});

sdk.start();
Enable telemetry in your AI SDK calls
Pass experimental_telemetry: { isEnabled: true } to your AI SDK functions. The AI SDK automatically creates telemetry spans, which the LangfuseSpanProcessor captures and sends to Litefuse.
import { generateText } from "ai";
import { openai } from "@ai-sdk/openai";

const { text } = await generateText({
  model: openai("gpt-4o"),
  prompt: "What is the weather like today?",
  experimental_telemetry: { isEnabled: true },
});Litefuse 的 LangChain 集成使用回调处理器来记录并发送 trace 到 Litefuse。如果你已经在使用 LangChain,只需做最小改动即可开始使用 Litefuse。
先安装 Langfuse SDK 和 LangChain SDK。
pip install langfuse langchain-openaiAdd your Litefuse credentials as environment variables so the callback handler knows which project to write to.
LANGFUSE_SECRET_KEY = "sk-lf-..."
LANGFUSE_PUBLIC_KEY = "pk-lf-..."
LANGFUSE_BASE_URL = "https://litefuse.cloud"
Initialize the Langfuse callback handler. LangChain has its own callback system, and Litefuse listens to those callbacks to record what your chains and LLMs are doing.
from langfuse.langchain import CallbackHandler

langfuse_handler = CallbackHandler()
Add the Langfuse callback handler to your chain. The Langfuse callback handler plugs into LangChain’s event system. Every time the chain runs or the LLM is called, LangChain emits events, and the handler turns those into traces and observations in Litefuse.
from langchain_openai import ChatOpenAI
from langchain_core.prompts import ChatPromptTemplate

llm = ChatOpenAI(model_name="gpt-4o")
prompt = ChatPromptTemplate.from_template("Tell me a joke about {topic}")
chain = prompt | llm

response = chain.invoke(
    {"topic": "cats"},
config={"callbacks": [langfuse_handler]})Litefuse 的 LangChain 集成使用回调处理器来记录并发送 trace 到 Litefuse。如果你已经在使用 LangChain,只需做最小改动即可开始使用 Litefuse。
先安装 Litefuse 核心 SDK 和 LangChain 集成包。
npm install @langfuse/core @langfuse/langchainAdd your Litefuse credentials as environment variables so the integration knows which project to send your traces to.
LANGFUSE_SECRET_KEY = "sk-lf-..."
LANGFUSE_PUBLIC_KEY = "pk-lf-..."
LANGFUSE_BASE_URL = "https://litefuse.cloud"
Initialize OpenTelemetry
Install the OpenTelemetry SDK, which the Litefuse integration uses under the hood to capture the data from each OpenAI call.
npm install @opentelemetry/sdk-nodeNext is initializing the Node SDK. You can do that either in a dedicated instrumentation file or directly at the top of your main file.
The inline setup is the simplest way to get started. It works well for projects where your main file is executed first and import order is straightforward.
We can now initialize the LangfuseSpanProcessor and start the SDK. The LangfuseSpanProcessor is the part that takes that collected data and sends it to your Litefuse project.
Important: start the SDK before initializing the logic that needs to be traced to avoid losing data.
import { NodeSDK } from "@opentelemetry/sdk-node";
import { LangfuseSpanProcessor } from "@langfuse/otel";

const sdk = new NodeSDK({
  spanProcessors: [new LangfuseSpanProcessor()],
});

sdk.start();
The instrumentation file often preferred when you’re using frameworks that have complex startup order (Next.js, serverless, bundlers) or if you want a clean, predictable place where tracing is always initialized first.
Create an instrumentation.ts file, which sets up the collector that gathers data about each OpenAI call. The LangfuseSpanProcessor is the part that takes that collected data and sends it to your Litefuse project.
import { NodeSDK } from "@opentelemetry/sdk-node";
import { LangfuseSpanProcessor } from "@langfuse/otel";

const sdk = new NodeSDK({
  spanProcessors: [new LangfuseSpanProcessor()],
});

sdk.start();
Import the instrumentation.ts file first so all later imports run with tracing enabled.
import "./instrumentation"; // Must be the first importFinally, initialize the Litefuse CallbackHandler and add it to your chain. The CallbackHandler listens to the LangChain agent’s actions and prepares that information to be sent to Litefuse.
import { CallbackHandler } from "@langfuse/langchain";

// Initialize the Langfuse CallbackHandler
const langfuseHandler = new CallbackHandler();
The line { callbacks: [langfuseHandler] } is what attaches the CallbackHandler to the agent.
import { createAgent, tool } from "@langchain/core/agents";
import * as z from "zod";

const getWeather = tool(
  (input) => `It's always sunny in ${input.city}!`,
  {
    name: "get_weather",
    description: "Get the weather for a given city",
    schema: z.object({
      city: z.string().describe("The city to get the weather for"),
    }),
  }
);

const agent = createAgent({
  model: "openai:gpt-5-mini",
  tools: [getWeather],
});

console.log(
    await agent.invoke(
        { messages: [{ role: "user", content: "What's the weather in San Francisco?" }] },
        { callbacks: [langfuseHandler] }
    )
);Langfuse Python SDK 让你完全掌控应用的埋点方式,可与任意其他框架配合使用。
1. Install package:
pip install langfuse2. Add credentials:
LANGFUSE_SECRET_KEY = "sk-lf-..."
LANGFUSE_PUBLIC_KEY = "pk-lf-..."
LANGFUSE_BASE_URL = "https://litefuse.cloud"
3. Instrument your application:
Instrumentation means adding code that records what’s happening in your application so it can be sent to Litefuse. There are three main ways of instrumenting your code with the Python SDK.
In this example we will use the context manager. You can also use the decorator or create manual observations.
from langfuse import get_client

langfuse = get_client()

# Create a span using a context manager
with langfuse.start_as_current_observation(as_type="span", name="process-request") as span:
    # Your processing logic here
    span.update(output="Processing complete")

    # Create a nested generation for an LLM call
    with langfuse.start_as_current_observation(as_type="generation", name="llm-response", model="gpt-3.5-turbo") as generation:
        # Your LLM call logic here
        generation.update(output="Generated response")

# All spans are automatically closed when exiting their context blocks


# Flush events in short-lived applications
langfuse.flush()
When should I call langfuse.flush()?
4. Run your application and see the trace in Litefuse:
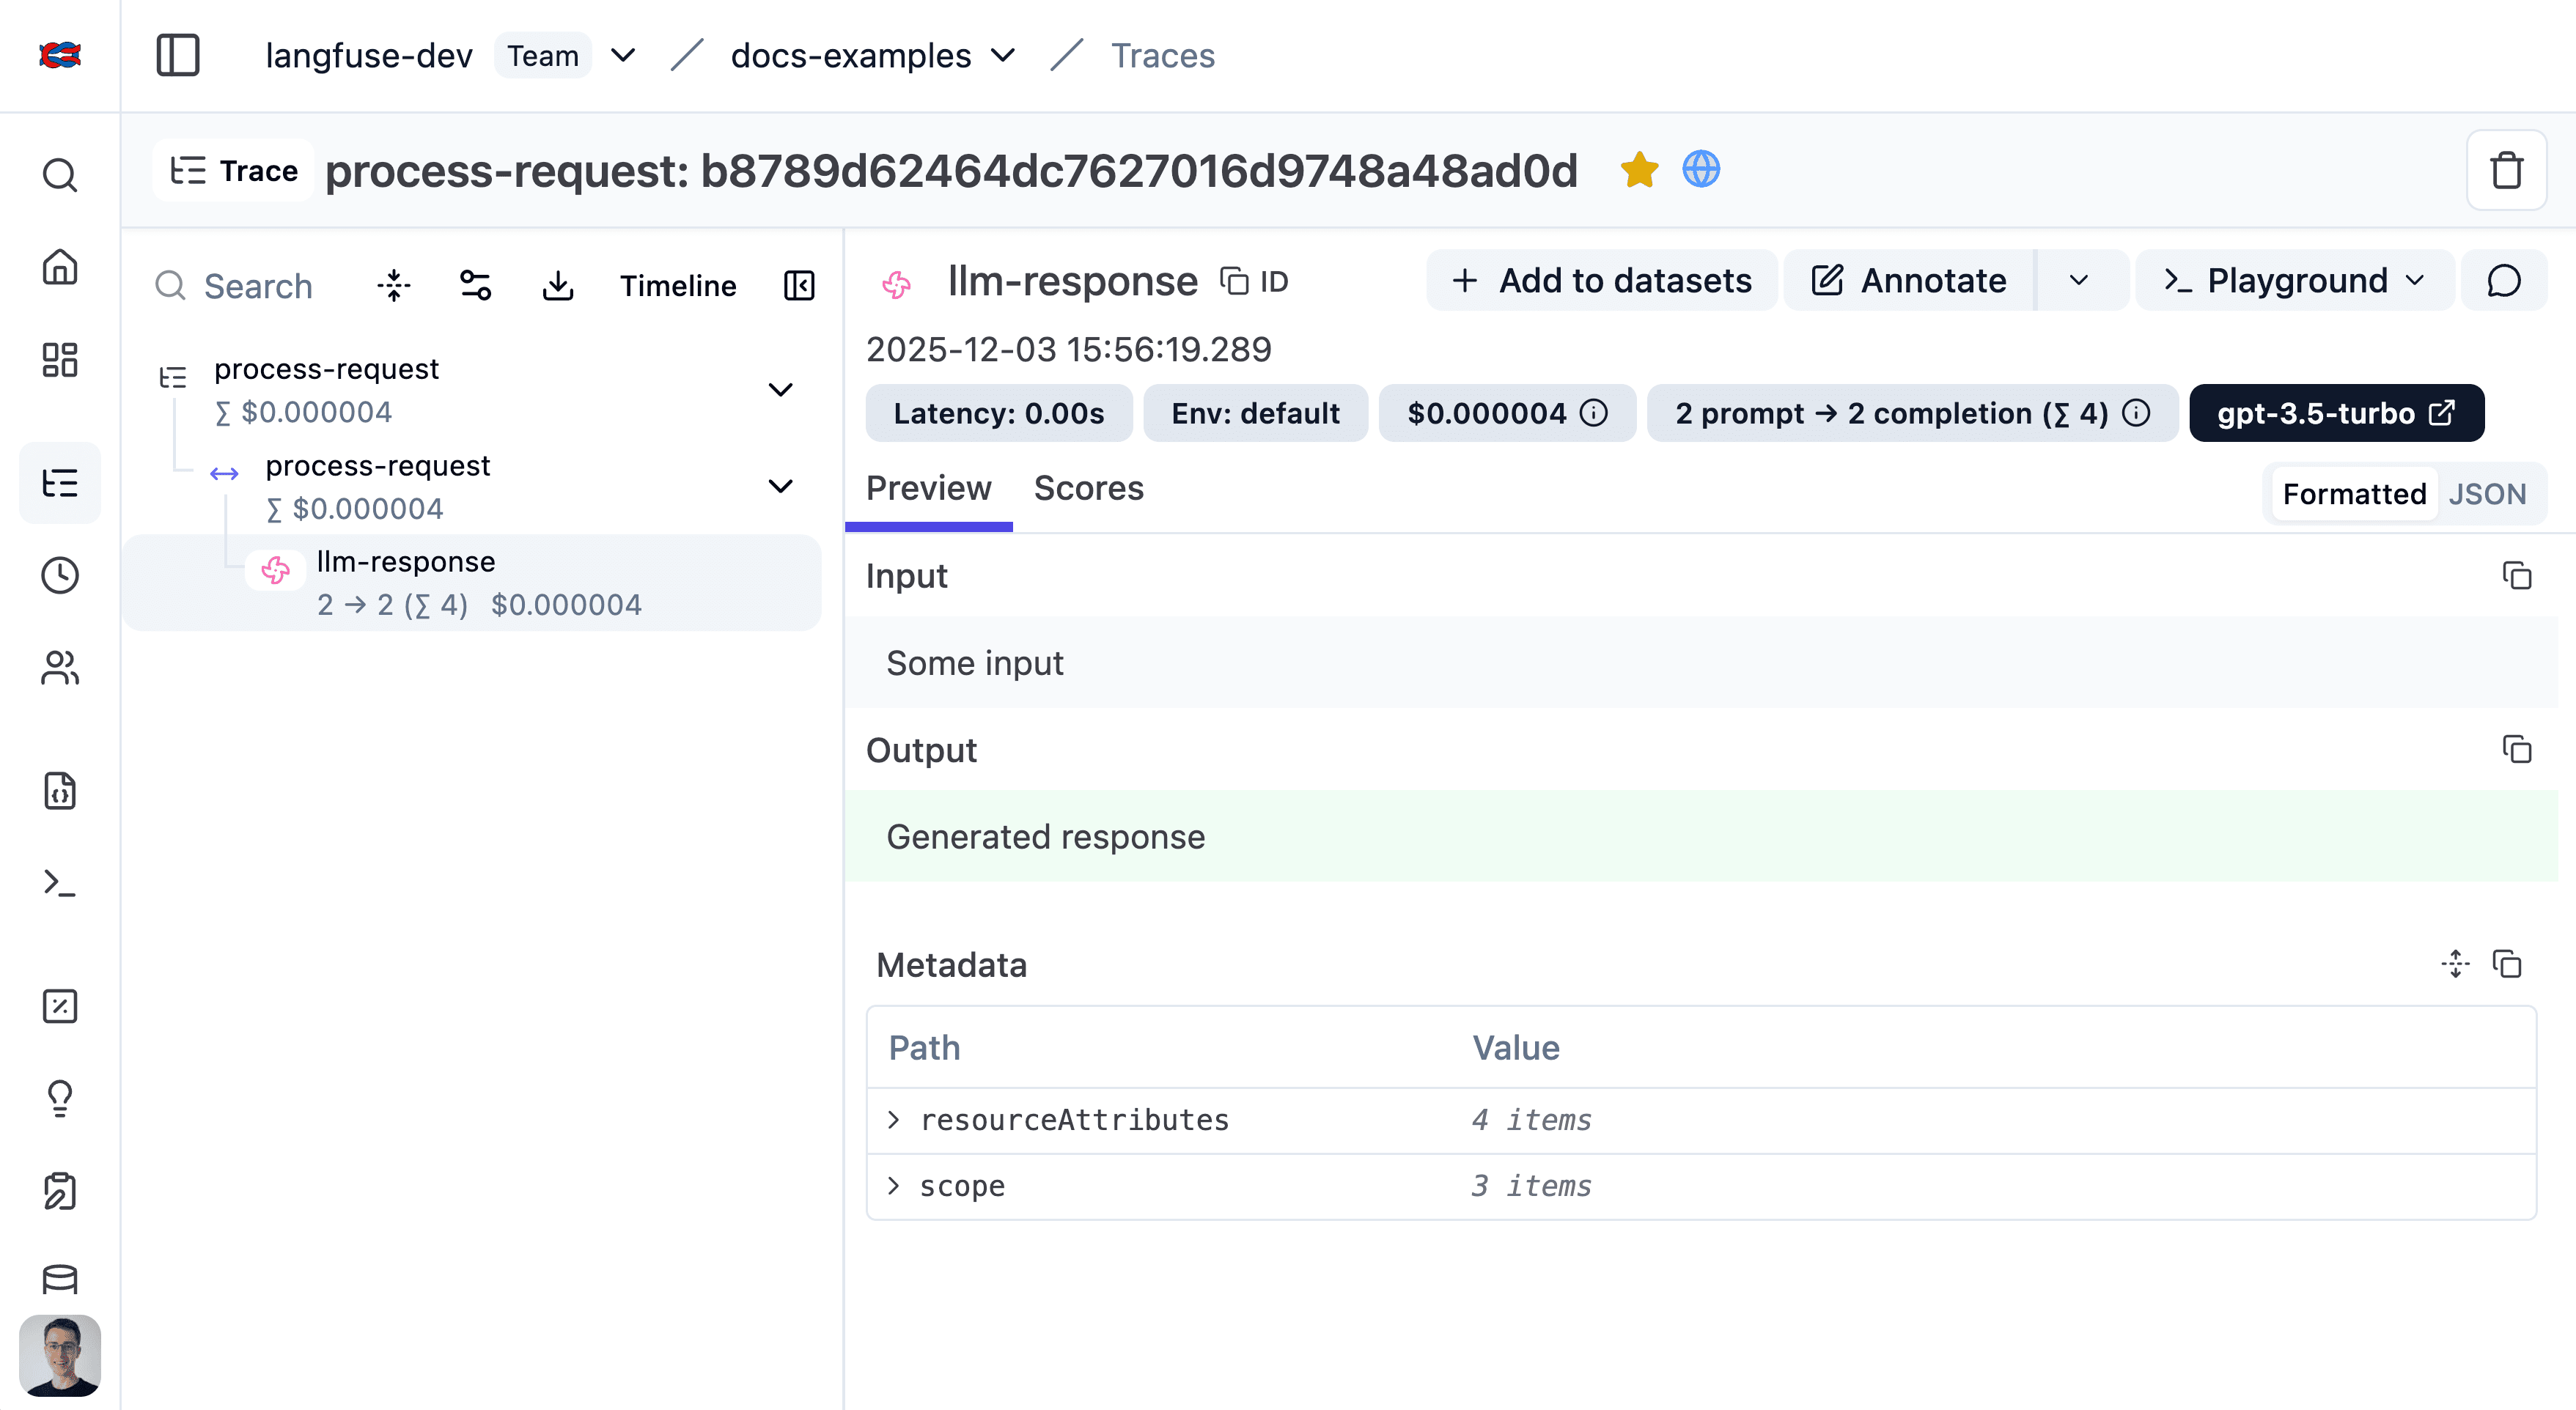
See the trace in Litefuse.
使用 Langfuse JS/TS SDK 包装任意 LLM 或 Agent。
Install packages
Install the Litefuse tracing SDK, the Litefuse OpenTelemetry integration, and the OpenTelemetry Node SDK.
npm install @langfuse/tracing @langfuse/otel @opentelemetry/sdk-nodeAdd credentials
Add your Litefuse credentials to your environment variables so the tracing SDK knows which Litefuse project it should send your recorded data to.
LANGFUSE_SECRET_KEY = "sk-lf-..."
LANGFUSE_PUBLIC_KEY = "pk-lf-..."
LANGFUSE_BASE_URL = "https://litefuse.cloud"
Initialize OpenTelemetry
Install the OpenTelemetry SDK, which the Litefuse integration uses under the hood to capture the data from each OpenAI call.
npm install @opentelemetry/sdk-nodeNext is initializing the Node SDK. You can do that either in a dedicated instrumentation file or directly at the top of your main file.
The inline setup is the simplest way to get started. It works well for projects where your main file is executed first and import order is straightforward.
We can now initialize the LangfuseSpanProcessor and start the SDK. The LangfuseSpanProcessor is the part that takes that collected data and sends it to your Litefuse project.
Important: start the SDK before initializing the logic that needs to be traced to avoid losing data.
import { NodeSDK } from "@opentelemetry/sdk-node";
import { LangfuseSpanProcessor } from "@langfuse/otel";

const sdk = new NodeSDK({
  spanProcessors: [new LangfuseSpanProcessor()],
});

sdk.start();
The instrumentation file often preferred when you’re using frameworks that have complex startup order (Next.js, serverless, bundlers) or if you want a clean, predictable place where tracing is always initialized first.
Create an instrumentation.ts file, which sets up the collector that gathers data about each OpenAI call. The LangfuseSpanProcessor is the part that takes that collected data and sends it to your Litefuse project.
import { NodeSDK } from "@opentelemetry/sdk-node";
import { LangfuseSpanProcessor } from "@langfuse/otel";

const sdk = new NodeSDK({
  spanProcessors: [new LangfuseSpanProcessor()],
});

sdk.start();
Import the instrumentation.ts file first so all later imports run with tracing enabled.
import "./instrumentation"; // Must be the first importInstrument application
Instrumentation means adding code that records what’s happening in your application so it can be sent to Litefuse. Here, OpenTelemetry acts as the system that collects those recordings.
import { startActiveObservation, startObservation } from "@langfuse/tracing";

// startActiveObservation creates a trace for this block of work.
// Everything inside automatically becomes part of that trace.
await startActiveObservation("user-request", async (span) => {
  span.update({
    input: { query: "What is the capital of France?" },
  });

  // This generation will automatically be a child of "user-request" because of the startObservation function.
  const generation = startObservation(
    "llm-call",
    {
      model: "gpt-4",
      input: [{ role: "user", content: "What is the capital of France?" }],
    },
    { asType: "generation" },
  );

  // ... your real LLM call would happen here ...

  generation
    .update({
      output: { content: "The capital of France is Paris." }, // update the output of the generation
    })
    .end(); // mark this nested observation as complete

  // Add final information about the overall request
  span.update({ output: "Successfully answered." });
});浏览 Litefuse 支持的所有集成与框架。
在 Litefuse 中查看你的 trace
运行应用之后,访问 Litefuse 界面查看你刚刚创建的 trace。 (Litefuse 中的 LangGraph trace 示例)
没看到预期的结果?
下一步
完成第一个 trace 的上报后,你可以为 trace 添加更多功能。我们建议从以下内容开始:
已经清楚自己想做什么?看 Features 下面的具体主题指南。