Vercel AI SDK 的可观测性与追踪
本 notebook 演示如何将 Litefuse 与 Vercel AI SDK 集成,用于监控、调试和评估你的 LLM 驱动应用与 AI Agent。
什么是 Vercel AI SDK?:Vercel AI SDK 是一个轻量级工具包,允许开发者通过简单的服务端/客户端函数,在 Web 应用中直接调用 AI 模型(如 OpenAI、Anthropic 或任何兼容的提供商)并以流式方式获取响应。
什么是 Litefuse?:Litefuse 是面向 AI Agent 与 LLM 应用的开源可观测性平台。它帮助你可视化和监控 LLM 调用、工具使用、成本、延迟等指标。
它们如何协同工作? Vercel AI SDK 基于 OpenTelemetry 内置了遥测能力,Litefuse 同样使用 OpenTelemetry,因此两者可以无缝集成。当你在 Vercel AI SDK 中启用遥测并添加 Litefuse 的 span processor 后,AI 调用会自动流入 Litefuse,供你分析。
将 Litefuse 与 Vercel AI SDK 集成的步骤
一图概览
下面是 Litefuse 与 Vercel AI SDK 协同工作的流程:
- 你在 AI SDK 中启用遥测(
experimental_telemetry: { isEnabled: true }) - AI SDK 为每个操作创建 span(模型调用、工具执行等)
- LangfuseSpanProcessor 拦截这些 span 并发送到 Litefuse
- Litefuse 存储并可视化这些数据,形成可探索的 trace
该集成使用了可观测性标准 OpenTelemetry。Vercel AI SDK 的遥测特性在 Vercel AI SDK 的 Telemetry 文档中有详细说明。
下面我们详细走一遍这些步骤。
1. 安装依赖
安装 Vercel AI SDK、OpenTelemetry 以及 Litefuse:
npm install ai
npm install @ai-sdk/openai
npm install @langfuse/tracing @langfuse/otel @opentelemetry/sdk-node
注意: 虽然本示例使用的是 @ai-sdk/openai,但你可以使用 Vercel AI SDK 支持的任何 AI 提供商(Anthropic、Google、Mistral 等)。集成方式都是一样的。
2. 配置环境变量与 API Key
设置你的 Litefuse 与 LLM 提供商凭证(本示例使用 OpenAI)。你可以通过注册免费的 Litefuse Cloud 账号获取 Litefuse Key,或者自托管 Litefuse。
LANGFUSE_SECRET_KEY = "sk-lf-..."
LANGFUSE_PUBLIC_KEY = "pk-lf-..."
LANGFUSE_BASE_URL = "https://litefuse.cloud"

OPENAI_API_KEY = "sk-proj-"
3. 通过 OpenTelemetry 初始化 Litefuse
Litefuse 的追踪基于 OpenTelemetry。要将 Litefuse 与 Vercel AI SDK 连接,你需要配合 LangfuseSpanProcessor 配置 OpenTelemetry SDK。
LangfuseSpanProcessor 是负责捕获遥测数据(在 OpenTelemetry 中称为 “span”)并发送到 Litefuse 进行存储和可视化的组件。
import { NodeSDK } from "@opentelemetry/sdk-node";
import { LangfuseSpanProcessor } from "@langfuse/otel";

const sdk = new NodeSDK({
  spanProcessors: [new LangfuseSpanProcessor()],
});

sdk.start();
4. 在 AI SDK 调用中启用遥测
只需在 AI SDK 函数中传入 { experimental_telemetry: { isEnabled: true }}。AI SDK 会自动创建遥测 span,由步骤 3 中的 LangfuseSpanProcessor 捕获并发送到 Litefuse。
import { generateText, tool } from 'ai';
import { openai } from '@ai-sdk/openai';
import { z } from 'zod';

const { text } = await generateText({
  model: openai("gpt-5.1"),
  prompt: 'What is the weather like today in San Francisco?',
  tools: {
    getWeather: tool({
      description: 'Get the weather in a location',
      inputSchema: z.object({
        location: z.string().describe('The location to get the weather for'),
      }),
      execute: async ({ location }) => ({
        location,
        temperature: 72 + Math.floor(Math.random() * 21) - 10,
      }),
    }),
  },
  experimental_telemetry: { isEnabled: true },
});
就这么简单!这种方式适用于所有的 AI SDK 函数,包括 generateText、streamText、generateObject 以及工具调用。
5. 在 Litefuse 中查看 trace
运行工作流后,你可以在 Litefuse 中查看完整的 trace:
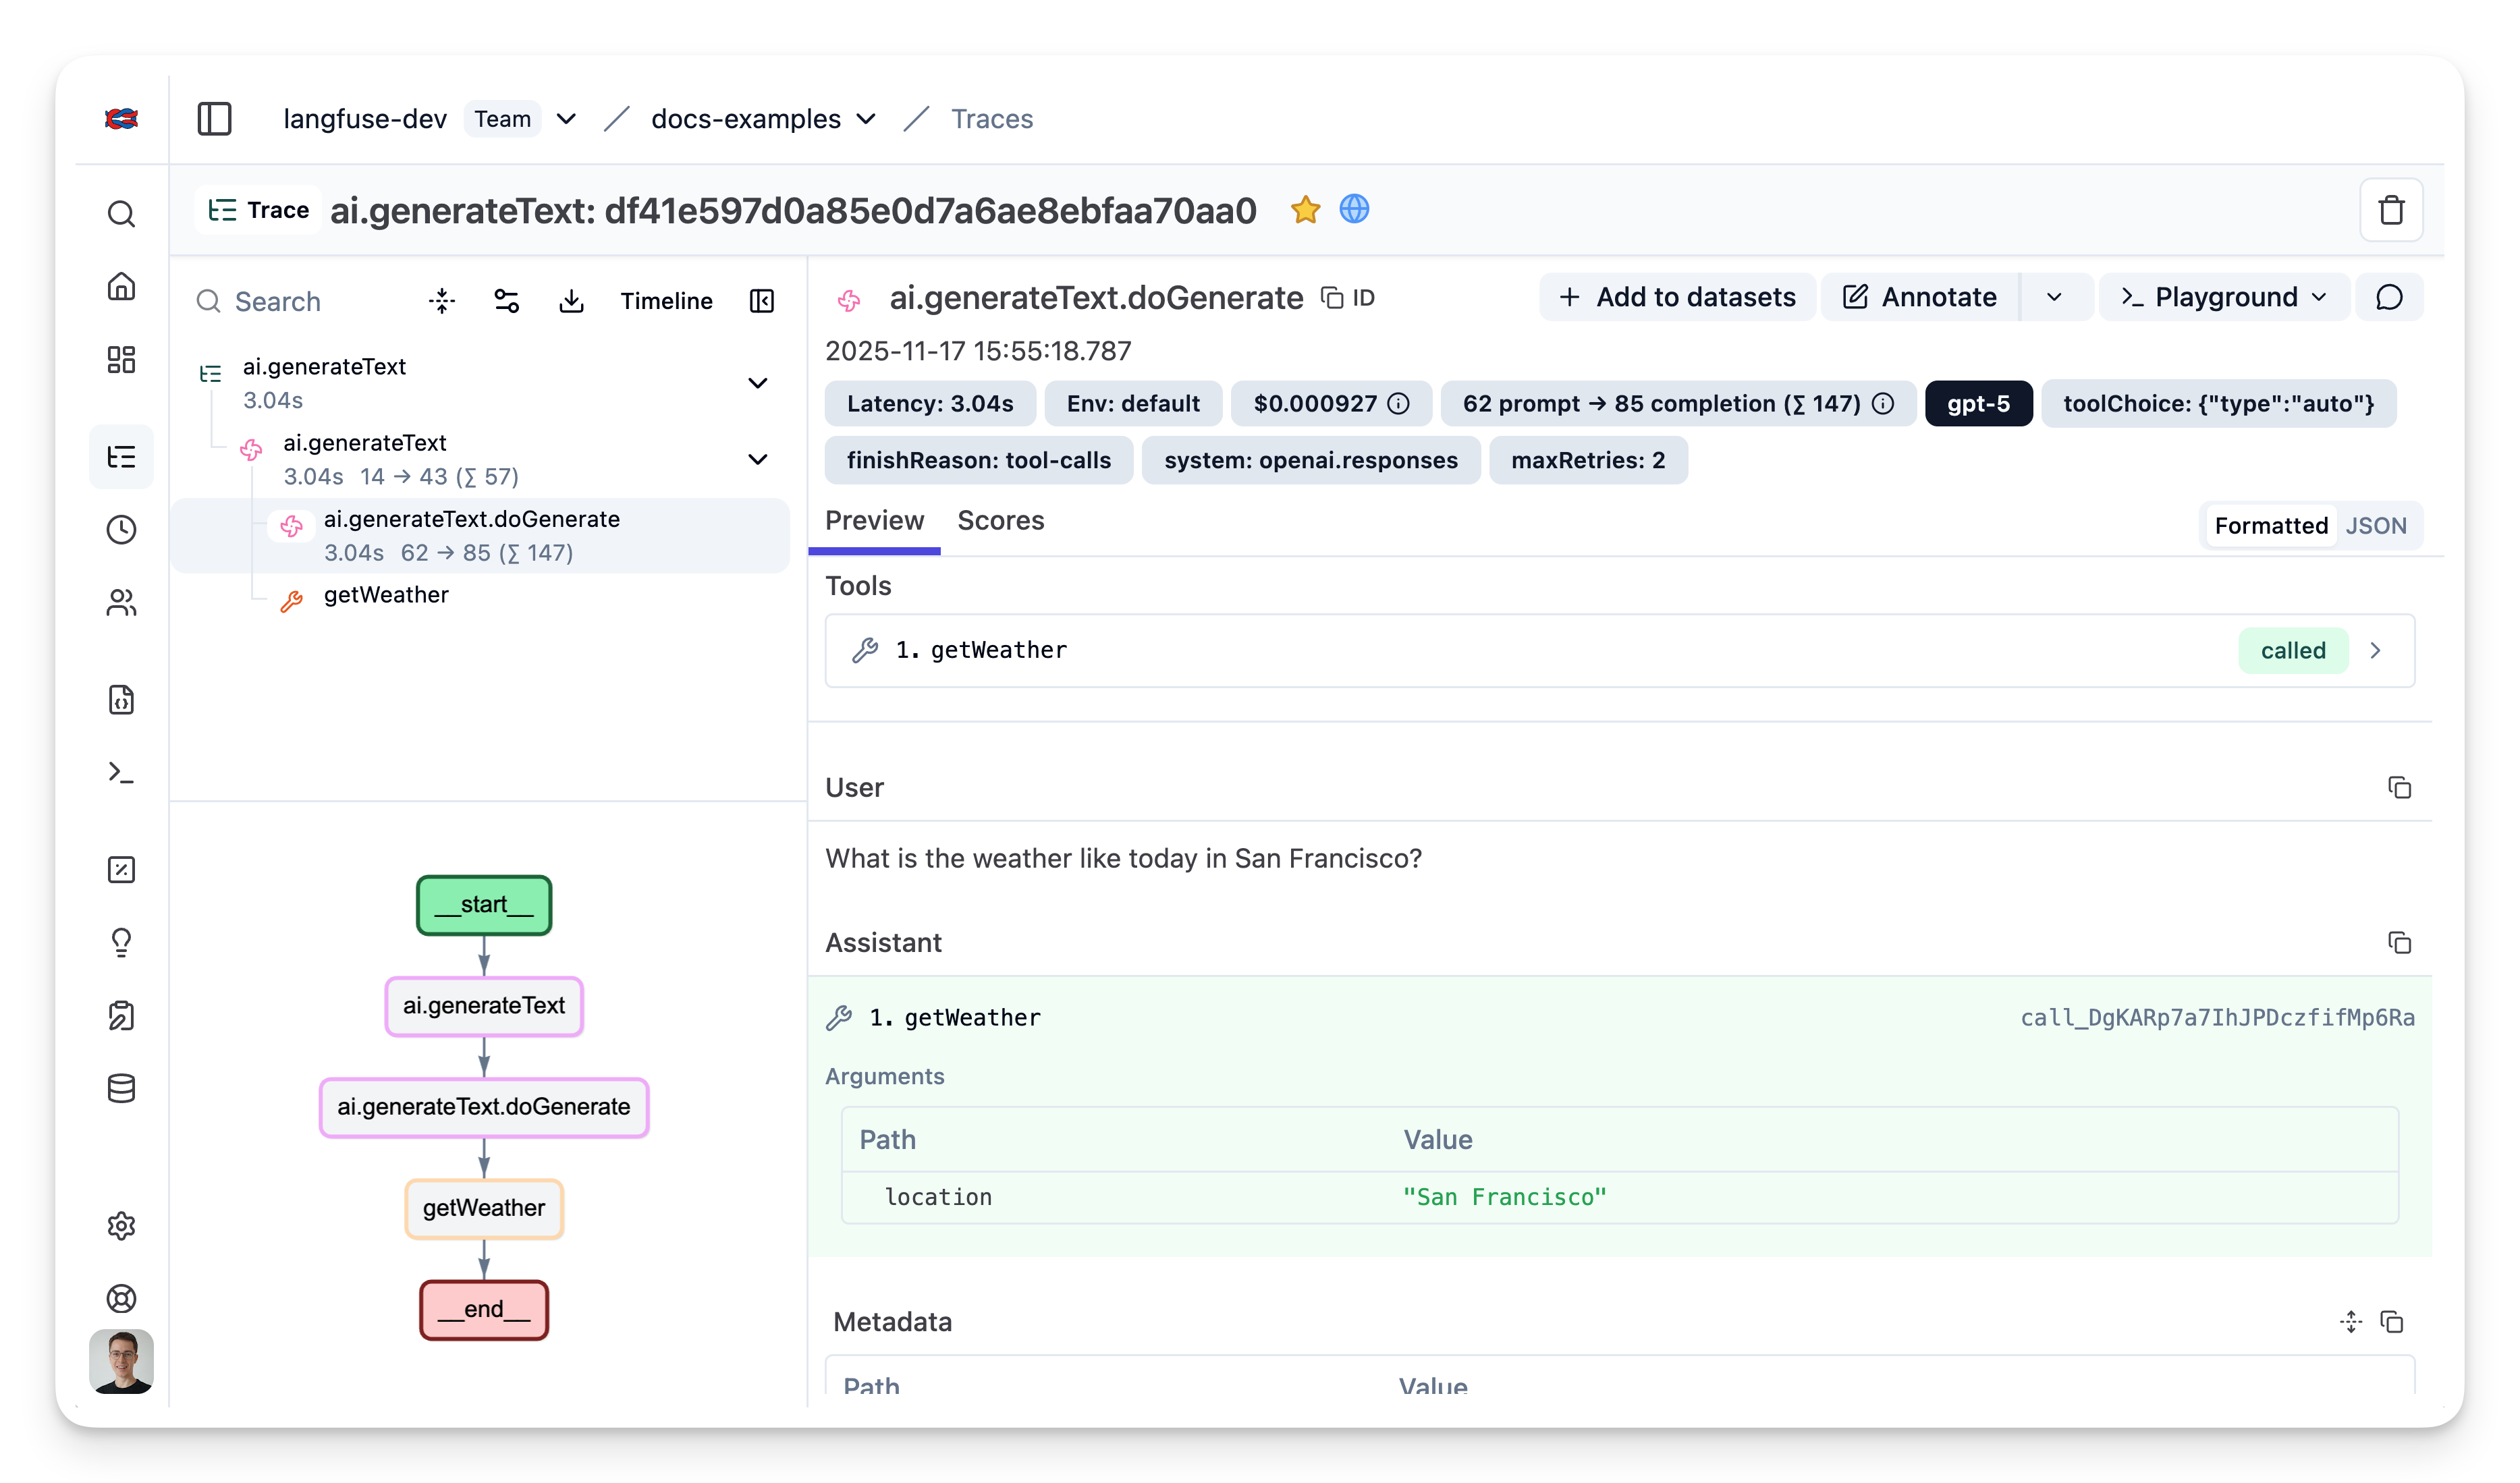
示例 Trace:在 Litefuse 中查看
与 Prompt 管理结合
如果你使用 Litefuse Prompt 管理 来对 prompt 进行版本管理,建议把 prompt 与 trace 关联起来。这样你就可以在 trace 中看到每次生成所使用的 prompt 版本。
要将 prompt 关联到 trace,请在 experimental_telemetry 字段中传入 prompt 元数据:
import { generateText } from "ai";
import { openai } from "@ai-sdk/openai";
import { LangfuseClient } from "@langfuse/client"; // 添加这一行 import

const langfuse = new LangfuseClient();

// 获取当前的 `production` 版本
const prompt = await langfuse.prompt.get("movie-critic");

// 将变量代入 prompt 模板
const compiledPrompt = prompt.compile({
  someVariable: "example-variable",
});

const { text } = await generateText({
  model: openai("gpt-5"),
  prompt: compiledPrompt,
  experimental_telemetry: {
    isEnabled: true,
    metadata: {
      langfusePrompt: prompt.toJSON() // 这会将 Generation 与你在 Langfuse 中的 prompt 关联
    },
  },
});
关联后,你可以在 Litefuse 的 trace 详情中看到所使用的 prompt 版本。
在 Next.js 中的配置
对于生产环境的 Next.js 应用,你还需要做几项额外配置,以便正确处理流式响应,并确保在 serverless 函数终止前 trace 已经发送出去。
本示例展示如何:
- 在 Next.js 中配置 OpenTelemetry instrumentation(使用
instrumentation.ts文件) - 处理流式响应,并管理 span 的生命周期
- 为 trace 添加会话和用户跟踪
- 确保在 serverless 环境中 trace 被刷新
配置 instrumentation
在项目根目录创建一个新文件 instrumentation.ts。该文件会在 Next.js 应用启动时运行,用于初始化 OpenTelemetry 配置:
// instrumentation.ts

import { LangfuseSpanProcessor } from "@langfuse/otel";
import { NodeTracerProvider } from "@opentelemetry/sdk-trace-node";

// 默认的智能过滤会导出 Langfuse + GenAI/LLM 的 span
export const langfuseSpanProcessor = new LangfuseSpanProcessor();

const tracerProvider = new NodeTracerProvider({
  spanProcessors: [langfuseSpanProcessor],
});

tracerProvider.register();如果你使用的是 Next.js,请通过 NodeTracerProvider 手动配置 OpenTelemetry,而不要使用 @vercel/otel 的 registerOTel。这是因为 @vercel/otel 包尚未支持 OpenTelemetry JS SDK v2,而 @langfuse/tracing 和 @langfuse/otel 都依赖该版本。
创建带流式输出的 API 路由
下面的示例展示了一个聊天接口,它使用 Litefuse 的 observe() 包装器创建 trace,添加会话和用户元数据,并妥善处理流式响应。具体来说:
observe()在你的 handler 周围创建一个 Litefuse tracepropagateAttributes()添加会话与用户元数据,便于更好地组织 traceforceFlush()确保在 serverless 函数终止前把 trace 发送出去endOnExit: false保证 observation 一直保持开启状态,直到流式响应完成
// app/api/chat/route.ts

import { streamText } from "ai";
import { after } from "next/server";

import { openai } from "@ai-sdk/openai";
import {
  observe,
  propagateAttributes,
  setActiveTraceIO,
} from "@langfuse/tracing";
import { trace } from "@opentelemetry/api";

import { langfuseSpanProcessor } from "@/src/instrumentation";

const handler = async (req: Request) => {
  const {
    messages,
    chatId,
    userId,
  }: { messages: UIMessage[]; chatId: string; userId: string } =
    await req.json();

  // 在 active trace 上设置 session id 和 user id
  const inputText = messages[messages.length - 1].parts.find(
    (part) => part.type === "text"
  )?.text;

  // 在 active trace 上设置 input
  setActiveTraceIO({
    input: inputText,
  });

  // 为 trace 添加会话和用户上下文
  await propagateAttributes(
    {
      traceName: "chat-message",
      sessionId: chatId,  // 将相关消息组合到一起
      userId,             // 记录是哪位用户发起的请求
    },
    async () => {
      const result = streamText({
        model: openai("gpt-5.1"),
        messages,
        experimental_telemetry: {
          isEnabled: true,
        },
        onFinish: async (result) => {
          // 流结束后用最终输出更新 trace
          setActiveTraceIO({
            output: result.content,
          });

          // 流结束后手动结束 span
          trace.getActiveSpan().end();
        },
        onError: async (error) => {
          setActiveTraceIO({
            output: error,
          });

          // 由于是流式输出,需要手动结束 span
          trace.getActiveSpan()?.end();
        },
      });

      // 对 serverless 至关重要:在函数终止前刷新 trace
      after(async () => await langfuseSpanProcessor.forceFlush());

      return result.toUIMessageStreamResponse();
    }
  );
};

// 用 observe() 包装 handler 来创建 Langfuse trace
export const POST = observe(handler, {
  name: "handle-chat-message",
  endOnExit: false, // 在流完成之前不要结束 observation
});
与其他可观测性工具一起使用
Vercel AI SDK 使用 OpenTelemetry 进行追踪(instrumentation scope:ai)。如果你同时还在使用 Sentry、Datadog 或其他基于 OTEL 的工具,你可能需要做额外配置来避免冲突。参见 在已有 OpenTelemetry 配置中使用 Litefuse。
Interoperability with the JS/TS SDK
You can use this integration together with the Litefuse SDKs to add additional attributes or group observations into a single trace.
The Context Manager allows you to wrap your instrumented code using context managers (with with statements), which allows you to add additional attributes to the trace. Any observation created inside the callback will automatically be nested under the active observation, and the observation will be ended when the callback finishes.
import { startActiveObservation, propagateAttributes } from "npm:@langfuse/tracing";

await startActiveObservation("context-manager", async (span) => {
  span.update({
    input: { query: "What is the capital of France?" },
  });

  // Propagate userId to all child observations
  await propagateAttributes(
    {
      userId: "user-123",
      sessionId: "session-123",
      metadata: {
        source: "api",
        region: "us-east-1",
      },
      tags: ["api", "user"],
      version: "1.0.0",
    },
    async () => {

      // YOUR CODE HERE
      const { text } = await generateText({
        model: openai("gpt-5"),
        prompt: "What is the capital of France?",
        experimental_telemetry: { isEnabled: true },
      });
    }
  );
  span.update({ output: "Paris" });
});
Learn more about using the Context Manager in the Langfuse SDK instrumentation docs.
Troubleshooting
No traces appearing
First, enable debug mode in the JS/TS SDK:
export LANGFUSE_LOG_LEVEL="DEBUG"Then run your application and check the debug logs:
- OTel spans appear in the logs: Your application is instrumented correctly but traces are not reaching Litefuse. To resolve this:
- Call
forceFlush()at the end of your application to ensure all traces are exported. This is especially important in short-lived environments like serverless functions. - Verify that you are using the correct API keys and base URL.
- Call
- No OTel spans in the logs: Your application is not instrumented correctly. Make sure the instrumentation runs before your application code.
Unwanted observations in Litefuse
The Langfuse SDK is based on OpenTelemetry. Other libraries in your application may emit OTel spans that are not relevant to you. These still count toward your billable units, so you should filter them out. See Unwanted spans in Litefuse for details.
Missing attributes
Some attributes may be stored in the metadata object of the observation rather than being mapped to the Litefuse data model. If a mapping or integration does not work as expected, please raise an issue on GitHub.
Next Steps
Once you have instrumented your code, you can manage, evaluate and debug your application: