OpenAI SDK (Python) 的可观测性
在找 JS/TS 版本?请查看这里。
如果你使用 OpenAI Python SDK,可以通过 Litefuse 的替换方案,仅需修改 import 即可获得完整日志。该方式同时适用于 OpenAI 和 Azure OpenAI。
- import openai
+ from langfuse.openai import openai

Alternative imports:
+ from langfuse.openai import OpenAI, AsyncOpenAI, AzureOpenAI, AsyncAzureOpenAI
Litefuse 会自动追踪:
工作原理
安装 Langfuse SDK
该集成与 OpenAI SDK 版本 >=0.27.8 兼容。对于 OpenAI SDK 版本 >=1.0.0,它支持异步函数和流式。
pip install langfuse openai切换到 Litefuse 包装的 OpenAI SDK
将 Litefuse 凭据加入环境变量
LANGFUSE_SECRET_KEY = "sk-lf-..."
LANGFUSE_PUBLIC_KEY = "pk-lf-..."
LANGFUSE_BASE_URL = "https://litefuse.cloud"
修改 import
- import openai
+ from langfuse.openai import openai

Alternative imports:
+ from langfuse.openai import OpenAI, AsyncOpenAI, AzureOpenAI, AsyncAzureOpenAI可选地,检查 SDK 与服务器的连接。不推荐在生产环境中使用。
from langfuse import get_client

get_client().auth_check()
像往常一样使用 OpenAI SDK
无需任何更改。
查看 notebook 获取该集成的端到端示例:
故障排查
事件的排队与批处理
Langfuse SDK 会在后台对事件进行排队和批处理,以减少网络请求数量并提升整体性能。在长时间运行的应用中,无需任何额外配置即可工作。
如果你运行的是短生命周期应用,需要在应用退出前 flush Litefuse,以确保所有事件都已发送。
from langfuse import get_client
from langfuse.openai import openai

# Flush via global client
langfuse = get_client()
langfuse.flush()了解更多关于事件排队与批处理的内容请见这里。
Assistants API
本集成不支持对 Assistants API 进行追踪,因为 OpenAI Assistants 在服务端有状态,难以在不发起额外 API 请求的情况下捕获。我们在这个 FAQ 中提供了一些关于如何更好追踪 Assistants API 用法的信息。
Debug 模式
如果你在集成中遇到问题,可以开启 debug 模式以获取关于请求和响应的更多信息。
from langfuse import Langfuse
from langfuse.openai import openai

# Enable debug via global client
langfuse = Langfuse(debug=True)
或者,你也可以设置环境变量:
export LANGFUSE_DEBUG=true采样
可以使用采样 来控制 Litefuse 服务器收集到的 trace 数量。
from langfuse import Langfuse
from langfuse.openai import openai

# Set sampling via global client (default is 1.0)
langfuse = Langfuse(sample_rate=0.1)
或者,你也可以设置环境变量:
export LANGFUSE_SAMPLE_RATE=0.1禁用追踪
你可以通过设置相应的标志来禁止向 Litefuse 发送 trace。
from langfuse import Langfuse
from langfuse.openai import openai

# Disable via global client
langfuse = Langfuse(tracing_enabled=False)
或者,你也可以设置环境变量:
export LANGFUSE_TRACING_ENABLED=false高级用法
自定义 trace 属性
你可以将以下属性添加到 openai 方法中:
| 属性 | 说明 |
|---|---|
name | 设置 name 以标识特定类型的生成。 |
metadata | 通过 metadata 设置希望在 Litefuse 中看到的额外信息。 |
trace_id | 详见下文 “与 Langfuse Python SDK 的互操作性”。 |
parent_observation_id | 详见下文 “与 Langfuse Python SDK 的互操作性”。 |
设置 trace 属性(session_id、user_id、tags):
你有两个选项:
选项 1:通过 metadata(最简单的方式):
from langfuse.openai import openai

result = openai.chat.completions.create(
    model="gpt-3.5-turbo",
    messages=[
        {"role": "system", "content": "You are a very accurate calculator."},
        {"role": "user", "content": "1 + 1 = "}
    ],
    name="test-chat",
    metadata={
        "langfuse_session_id": "session_123",
        "langfuse_user_id": "user_456",
        "langfuse_tags": ["calculator"],
        "someMetadataKey": "someValue"  # Regular metadata still works
    }
)
选项 2:通过外层 span(获得更多控制):
from langfuse import get_client, propagate_attributes
from langfuse.openai import openai

langfuse = get_client()

with langfuse.start_as_current_observation(as_type="span", name="calculator-request") as span:
    with propagate_attributes(
        session_id="session_123",
        user_id="user_456",
        tags=["calculator"]
    ):
        result = openai.chat.completions.create(
            model="gpt-3.5-turbo",
            messages=[
                {"role": "system", "content": "You are a very accurate calculator."},
                {"role": "user", "content": "1 + 1 = "}
            ],
            name="test-chat",
            metadata={"someMetadataKey": "someValue"},
        )
使用 Trace
Litefuse Tracing 将多个 observation(可以是任何 LLM 或非 LLM 调用)组织到同一个 trace 中。该集成默认为每次 openai 调用创建一个 trace。
- 在 trace 中添加非 OpenAI 相关的 observation。
- 将多次 OpenAI 调用组织到同一个 trace 中,同时自定义 trace。
- 对 trace 结构有更多控制。
- 使用全部 Litefuse Tracing 功能。
Litefuse Tracing 新手?请查看这份基础概念 介绍。
你可以使用以下任意选项:
- Python
@observe()装饰器 - 同时适用于 v2 和 v3 - 使用显式的 span 管理 - 在 v3 和 v2 中有所不同
选项 1:Python 装饰器
from langfuse import observe
from langfuse.openai import openai

@observe()
def capital_poem_generator(country):
  capital = openai.chat.completions.create(
    model="gpt-3.5-turbo",
    messages=[
        {"role": "system", "content": "What is the capital of the country?"},
        {"role": "user", "content": country}],
    name="get-capital",
  ).choices[0].message.content

  poem = openai.chat.completions.create(
    model="gpt-3.5-turbo",
    messages=[
        {"role": "system", "content": "You are a poet. Create a poem about this city."},
        {"role": "user", "content": capital}],
    name="generate-poem",
  ).choices[0].message.content
  return poem

capital_poem_generator("Bulgaria")
选项 2:上下文管理器
from langfuse import get_client, propagate_attributes
from langfuse.openai import openai

langfuse = get_client()

with langfuse.start_as_current_observation(as_type="span", name="capital-poem-generator") as span:
    # Propagate trace attributes to all child observations
    with propagate_attributes(
        user_id="user_123",
        session_id="session_456",
        tags=["poetry", "capital"]
    ):
      capital = openai.chat.completions.create(
          model="gpt-3.5-turbo",
          messages=[
              {"role": "system", "content": "What is the capital of the country?"},
              {"role": "user", "content": "Bulgaria"}],
          name="get-capital",
      ).choices[0].message.content

      poem = openai.chat.completions.create(
          model="gpt-3.5-turbo",
          messages=[
              {"role": "system", "content": "You are a poet. Create a poem about this city."},
              {"role": "user", "content": capital}],
          name="generate-poem",
      ).choices[0].message.content
流式响应中的 OpenAI token 用量
OpenAI 仅在 stream_options 中将 include_usage 参数设为 True 时,才会在流式响应中返回 token 用量。如果你希望直接获得 OpenAI 提供的 token 用量,可以在 stream_options 参数中设置 {"include_usage": True}。
在使用 include_usage=True 的流式响应时,OpenAI 会在最后一个 choices 列表为空的 chunk 中返回
token 用量信息。请确保你的应用正确处理这些空 choices chunk,避免在不检查 choices 列表是否非空
的情况下访问其中某个索引,从而确保准确的 token 用量追踪。
from langfuse import get_client
from langfuse.openai import openai

client = openai.OpenAI()

stream = client.chat.completions.create(
  model="gpt-4o",
  messages=[{"role": "user", "content": "How are you?"}],
  stream=True,
  stream_options={"include_usage": True},
)

result = ""

for chunk in stream:
  # Check if chunk choices are not empty. OpenAI returns token usage in a final chunk with an empty choices list.
  if chunk.choices:
    result += chunk.choices[0].delta.content or ""

# Flush via global client
get_client().flush()
OpenAI Beta API
由于 OpenAI 的 beta API 在各版本之间变动频繁,我们仅完整支持 OpenAI SDK 中的稳定 API。如果你使用的是 beta API,仍然可以通过手动用 @observe() 装饰器 包装 OpenAI SDK 来使用 Langfuse SDK。
结构化输出
对于结构化输出解析,请使用 openai.chat.completions.create() 的 response_format 参数,而不是 Beta API。这样你就可以设置 Litefuse 属性和 metadata。
如果你依赖解析 Pydantic 定义作为 response_format,你可以使用 OpenAI Python SDK 中的 type_to_response_format_param 工具函数,将 Pydantic 定义转换为 response_format 字典。这正是 OpenAI Beta API 用来将 Pydantic 定义转换为 response_format 字典的同一个函数。
from langfuse import get_client
from langfuse.openai import openai
from openai.lib._parsing._completions import type_to_response_format_param
from pydantic import BaseModel

class CalendarEvent(BaseModel):
  name: str
  date: str
  participants: list[str]

completion = openai.chat.completions.create(
    model="gpt-4o-2024-08-06",
    messages=[
        {"role": "system", "content": "Extract the event information."},
        {
            "role": "user",
            "content": "Alice and Bob are going to a science fair on Friday.",
        },
    ],
    response_format=type_to_response_format_param(CalendarEvent),
)

print(completion)

# Flush via global client
get_client().flush()
Assistants API
本集成不支持对 Assistants API 进行追踪,因为 OpenAI Assistants 在服务端有状态,难以在不发起额外 API 请求的情况下捕获。请查看这个 notebook,了解如何在 Litefuse 中最佳地追踪 Assistants API 使用情况的端到端示例。
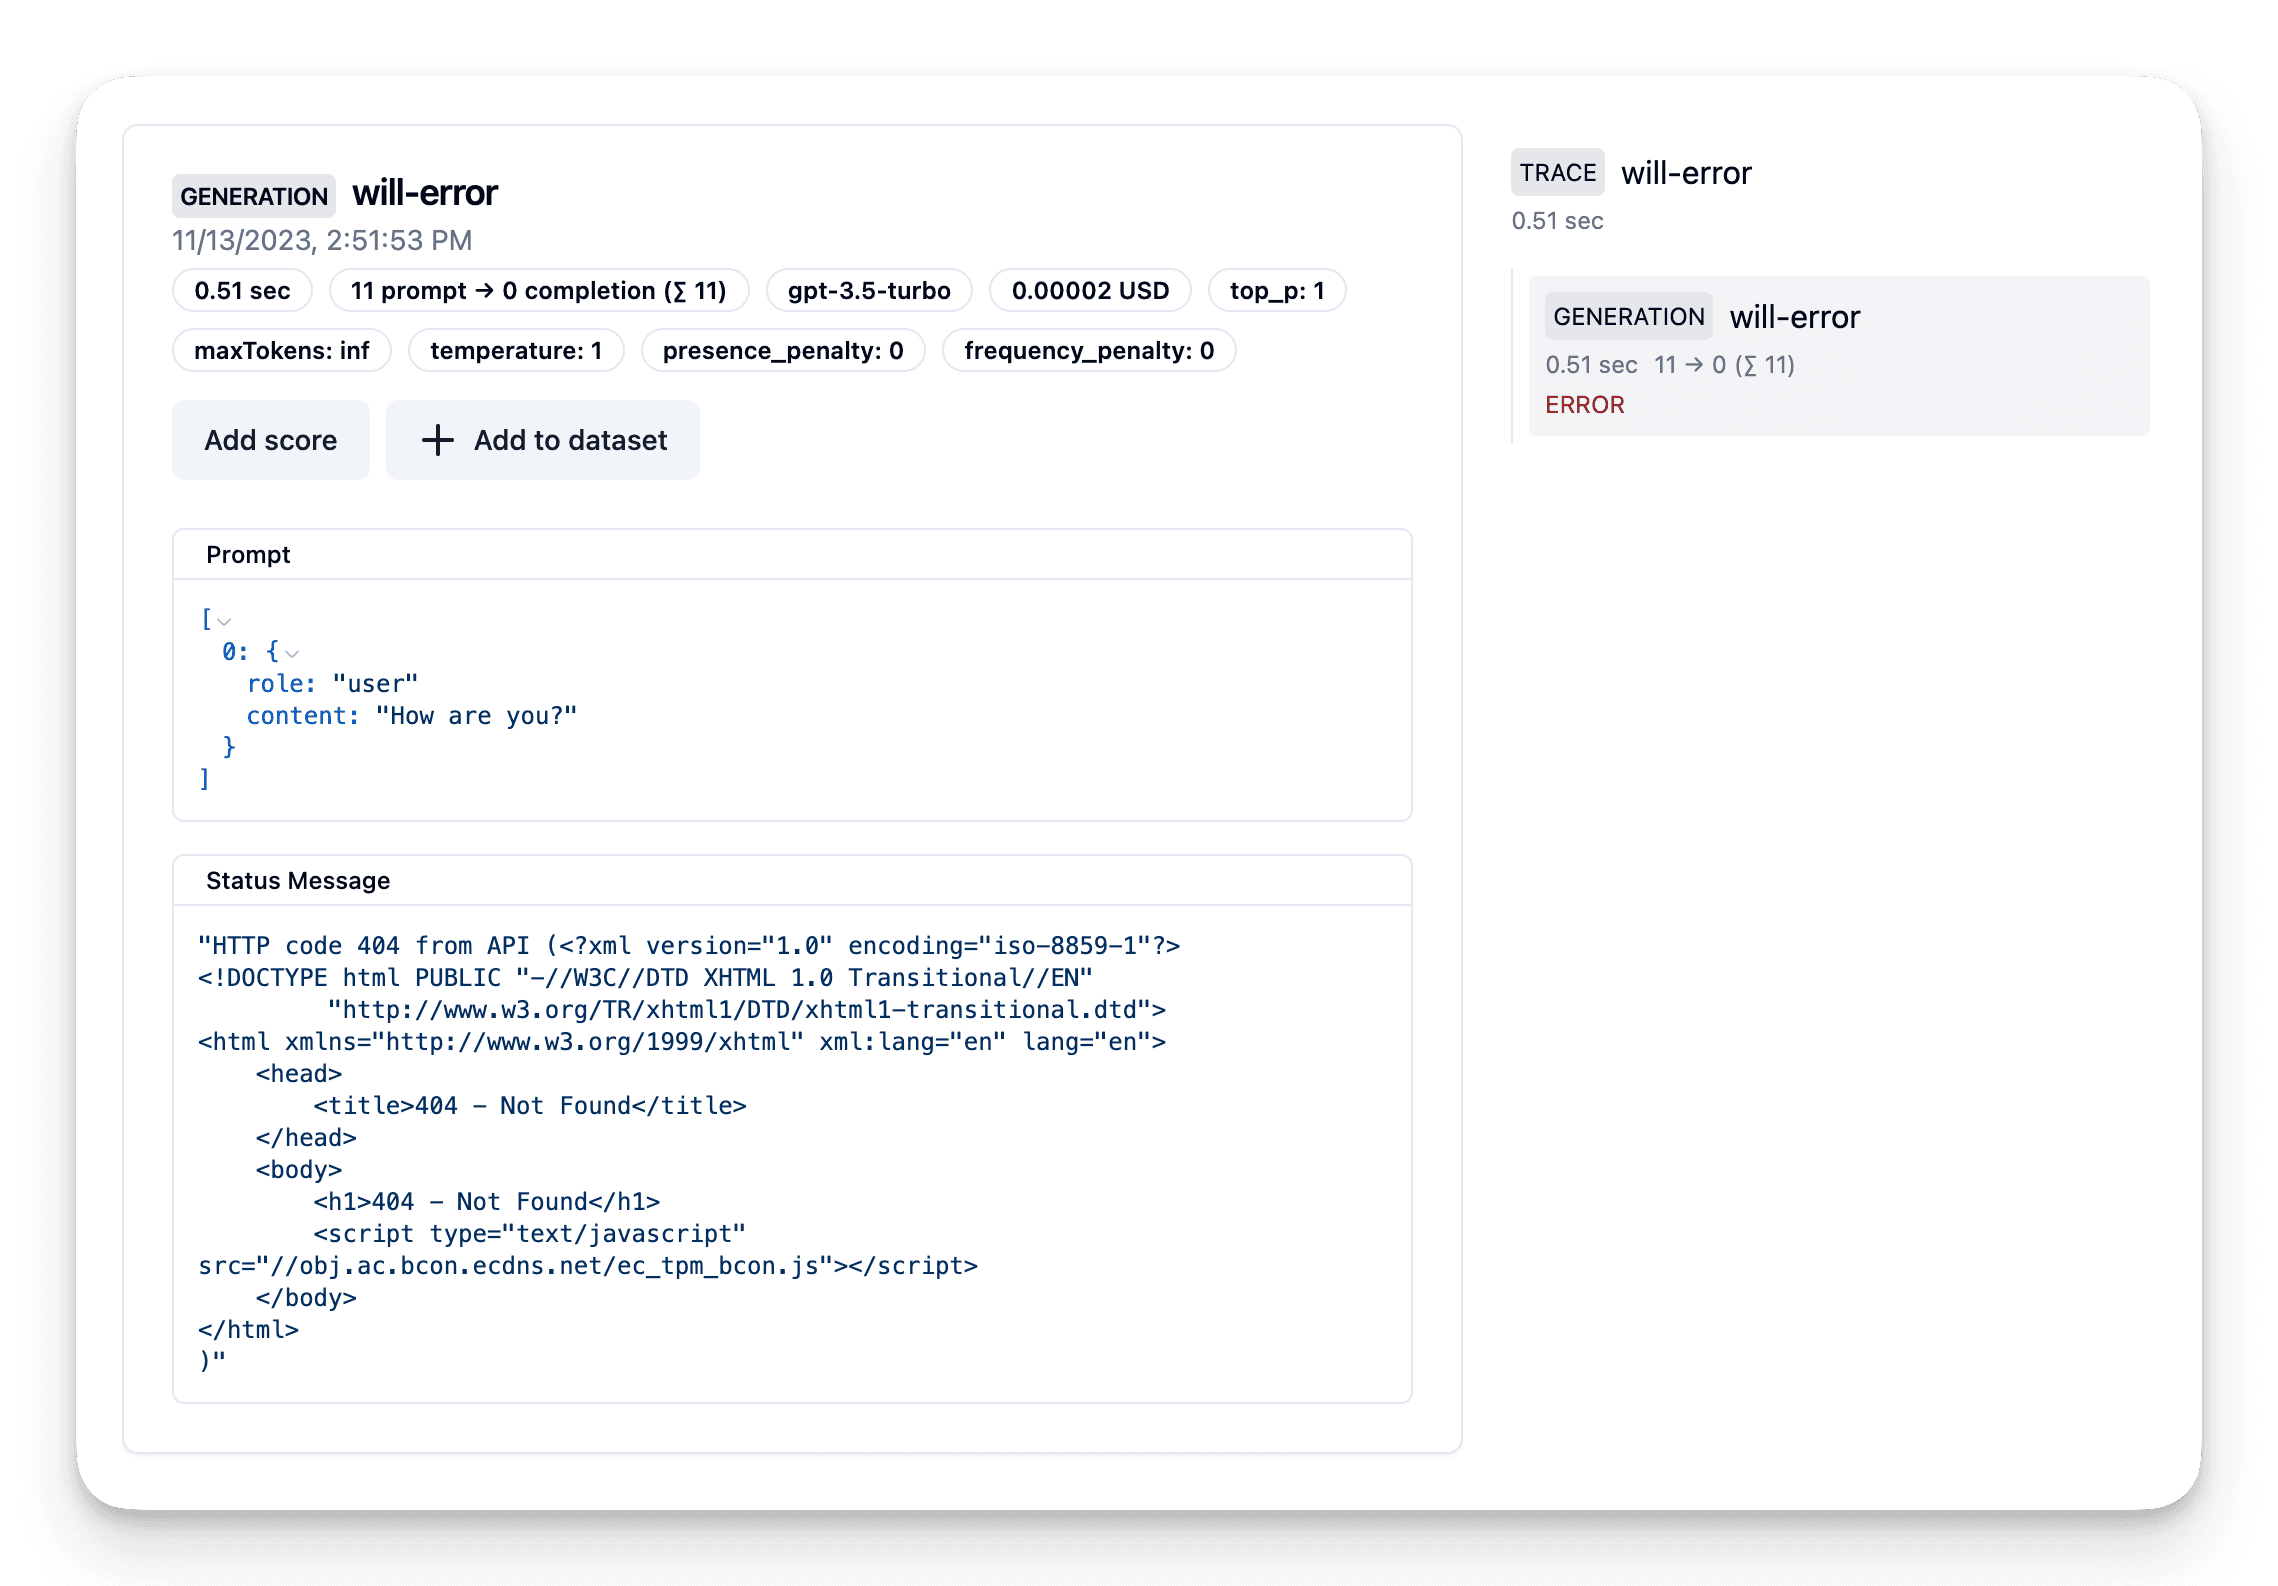
OpenAI API 错误追踪
如果你使用原生集成,Litefuse 会自动追踪和监控 OpenAI API 错误。它们通过 level 和 statusMessage 字段捕获(参见文档)。
了解如何开始请见这里。
- import openai
+ from langfuse.openai import openai
# Cause an error by attempting to use a host that does not exist.
openai.base_url = "https://example.com"
country = openai.chat.completions.create(
name="will-error",
model="gpt-3.5-turbo",
messages=[
{"role": "user", "content": "How are you?"}],
)上方代码会抛出错误