Agent 评估:如何评估 LLM Agent
评估 AI agent 与评估单次 LLM 调用是两回事。Agent 会做出自主的多步决策——调用工具、查询数据库、串联推理——这意味着仅凭最终输出的准确率分数是远远不够的。你需要评估 agent 做了什么(它的轨迹)、它是怎么做的(每一个具体步骤),以及 结果是否正确(最终响应)。
本指南介绍我们在 Litefuse 中是如何思考 agent 评估的。在动手写代码之前,先建立一个清晰的心智模型:我们到底在构建和测试什么。
什么是 LLM Agent?
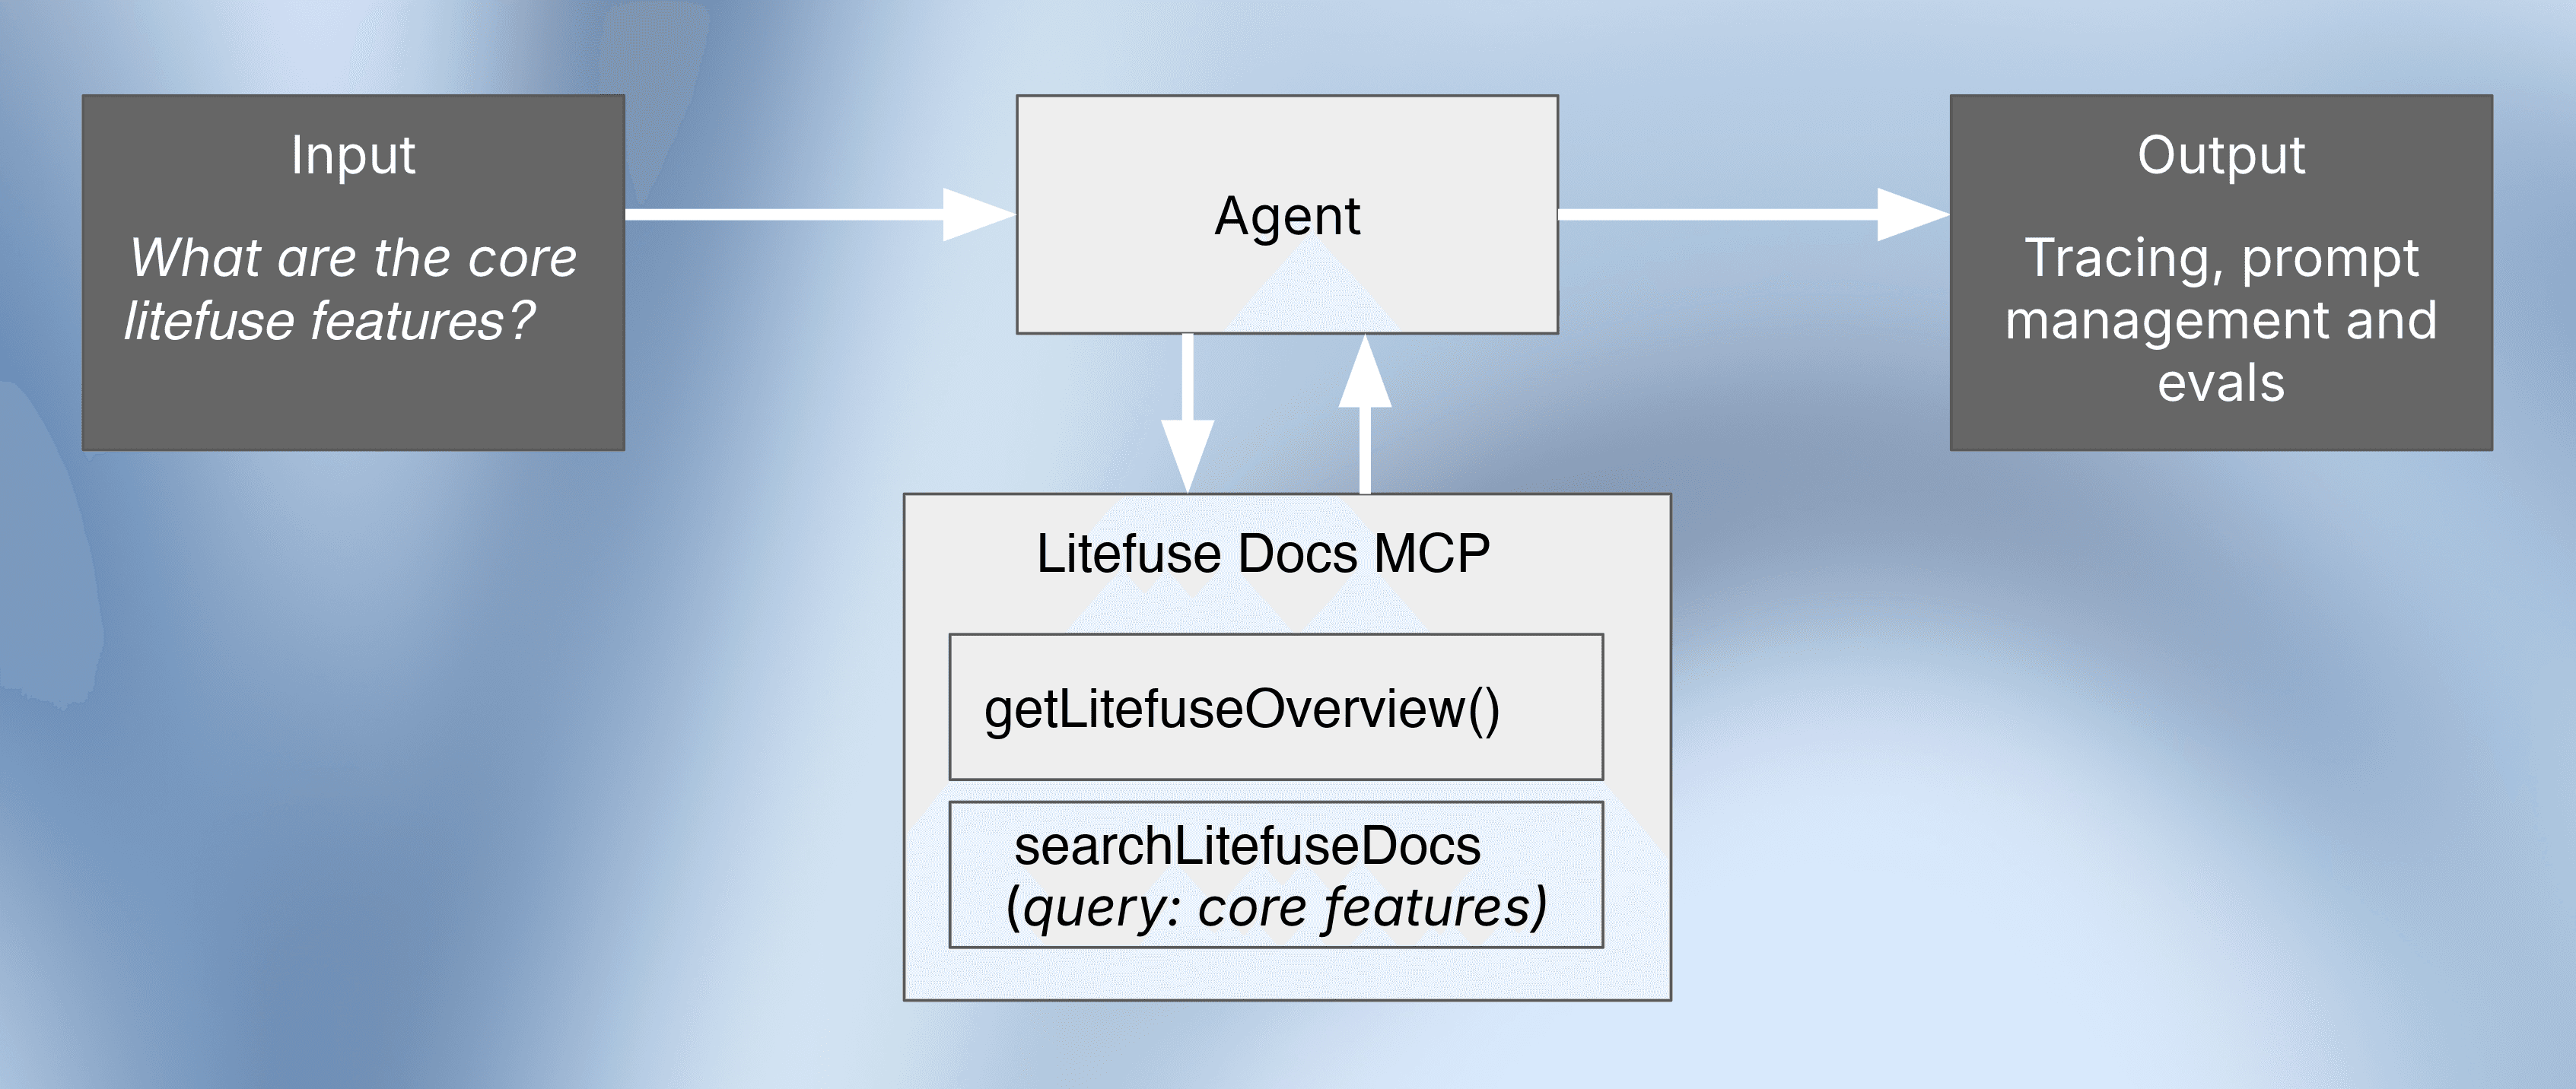
LLM agent 不仅仅是对语言模型的一次调用。它是一个自主系统,在持续的”推理-行动”循环中工作。循环从 LLM 收到输入开始——这个输入既可能来自用户,也可能是上一步的反馈。LLM 基于该输入决定一个 action,通常是调用某个外部工具,比如搜索 API、数据库查询或代码解释器。该 action 与某个 environment 交互,环境随后产生 feedback(比如搜索结果或数据),再被反馈给 LLM。
这个”推理 → 行动 → 与环境交互 → 反馈”的循环会一直持续,直到 agent 决定停下来并生成最终回答。整个事件序列我们称之为 “trace” 或 “trajectory”,这也是 agent 评估相比评估单次 LLM 调用要更具挑战性的根本原因。
为什么 agent 评估很重要
评估这种复杂、多步的轨迹之所以重要,是因为它们可能会以多种方式失败。我们可能没有给 agent 提供足够清晰的指令,或者 LLM 本身无法把推理能力泛化到新的、出乎意料的用户问题上。
更多关于评估的基础概念,请参考 Evaluation Concepts。
常见的 agent 评估挑战
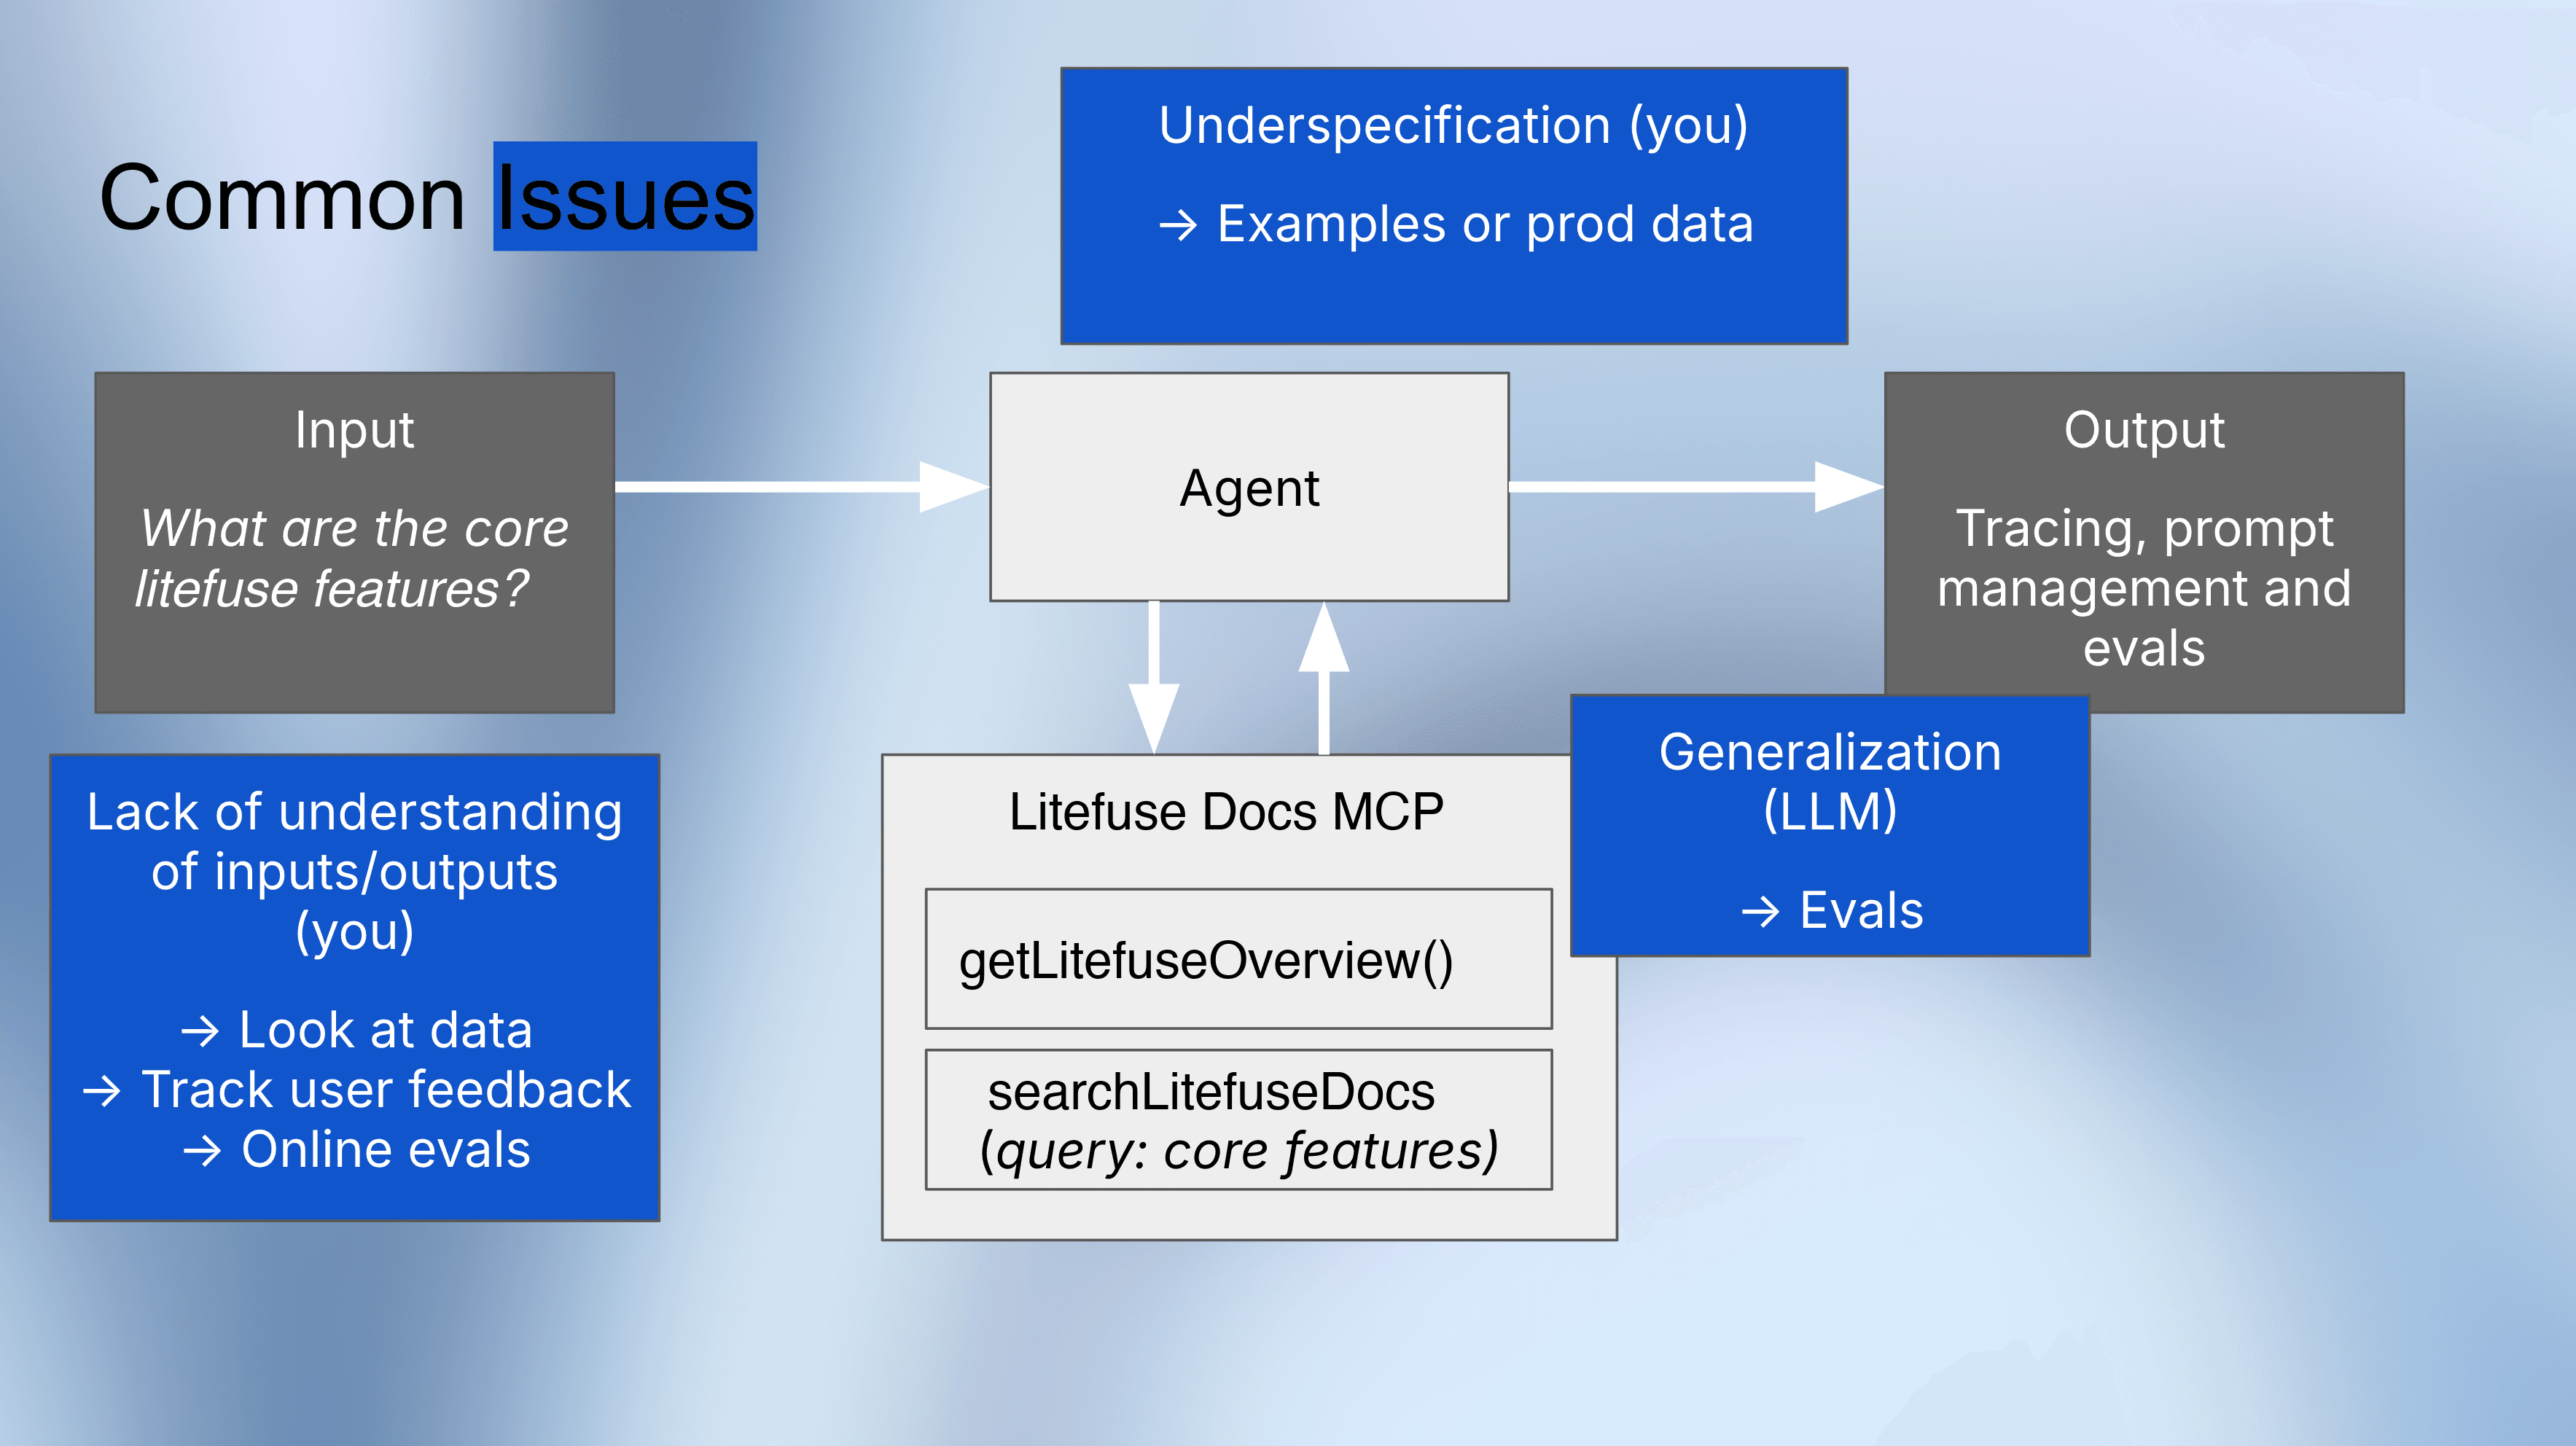
在和 agent 打交道时,总有三类问题反复出现:理解(understanding)、规约(specification) 与 泛化(generalization)。你通常并不真正理解 agent 在真实流量上做了什么、调用了哪些工具、在哪里卡住,因为你并没有系统地审查 trace,也没有把它们和用户反馈关联起来。
任务往往规约不足:prompt 和示例并没有清楚地编码什么才是”好”的行为,于是 agent 会以不可预测的方式自行发挥。即使把规约收紧了,agent 仍可能在泛化上吃力——在少量精挑细选的样例上表现良好,但稍微换一种真实查询就会失败,除非你引入系统化、基于数据集的评估来在规模上检查鲁棒性。
Agent 评估的三个阶段
Agent 评估并不是一次性的活动——它会随着 agent 的成熟不断演进。整个过程可以分为三个清晰的阶段:
阶段 1:早期开发(手动 trace 检查)
在你刚开始构建 agent 时,最有价值的事情就是检查它的 trace。手动检查 trace 能让你立刻洞察 agent 的推理过程、工具调用以及失败点。使用 Litefuse 的 trace 查看器一步步走查 agent 的每个动作。
阶段 2:首批用户(在线评估)
当真实用户开始与 agent 交互时,加入反馈机制——比如点赞/点踩按钮——把有问题的 trace 标出来供审查。你也可以配置自动化的 在线 evaluator,实时对生产环境的 trace 打分。
阶段 3:规模化(离线评估)
最后一个阶段,也是本指南的重点,是构建自动化的离线评估 pipeline。规模上去后,你不可能手动审查每一条 trace。你需要一份”金标准” dataset,包含输入以及对应的预期输出或轨迹。这个基准让你能够 运行实验、防止回归,并放心地迭代 prompt、模型和工具配置。
三种 agent 评估策略
本指南覆盖了三种实用的、可自动化的评估策略。它们在不同粒度上运作,回答关于 agent 行为的不同问题。
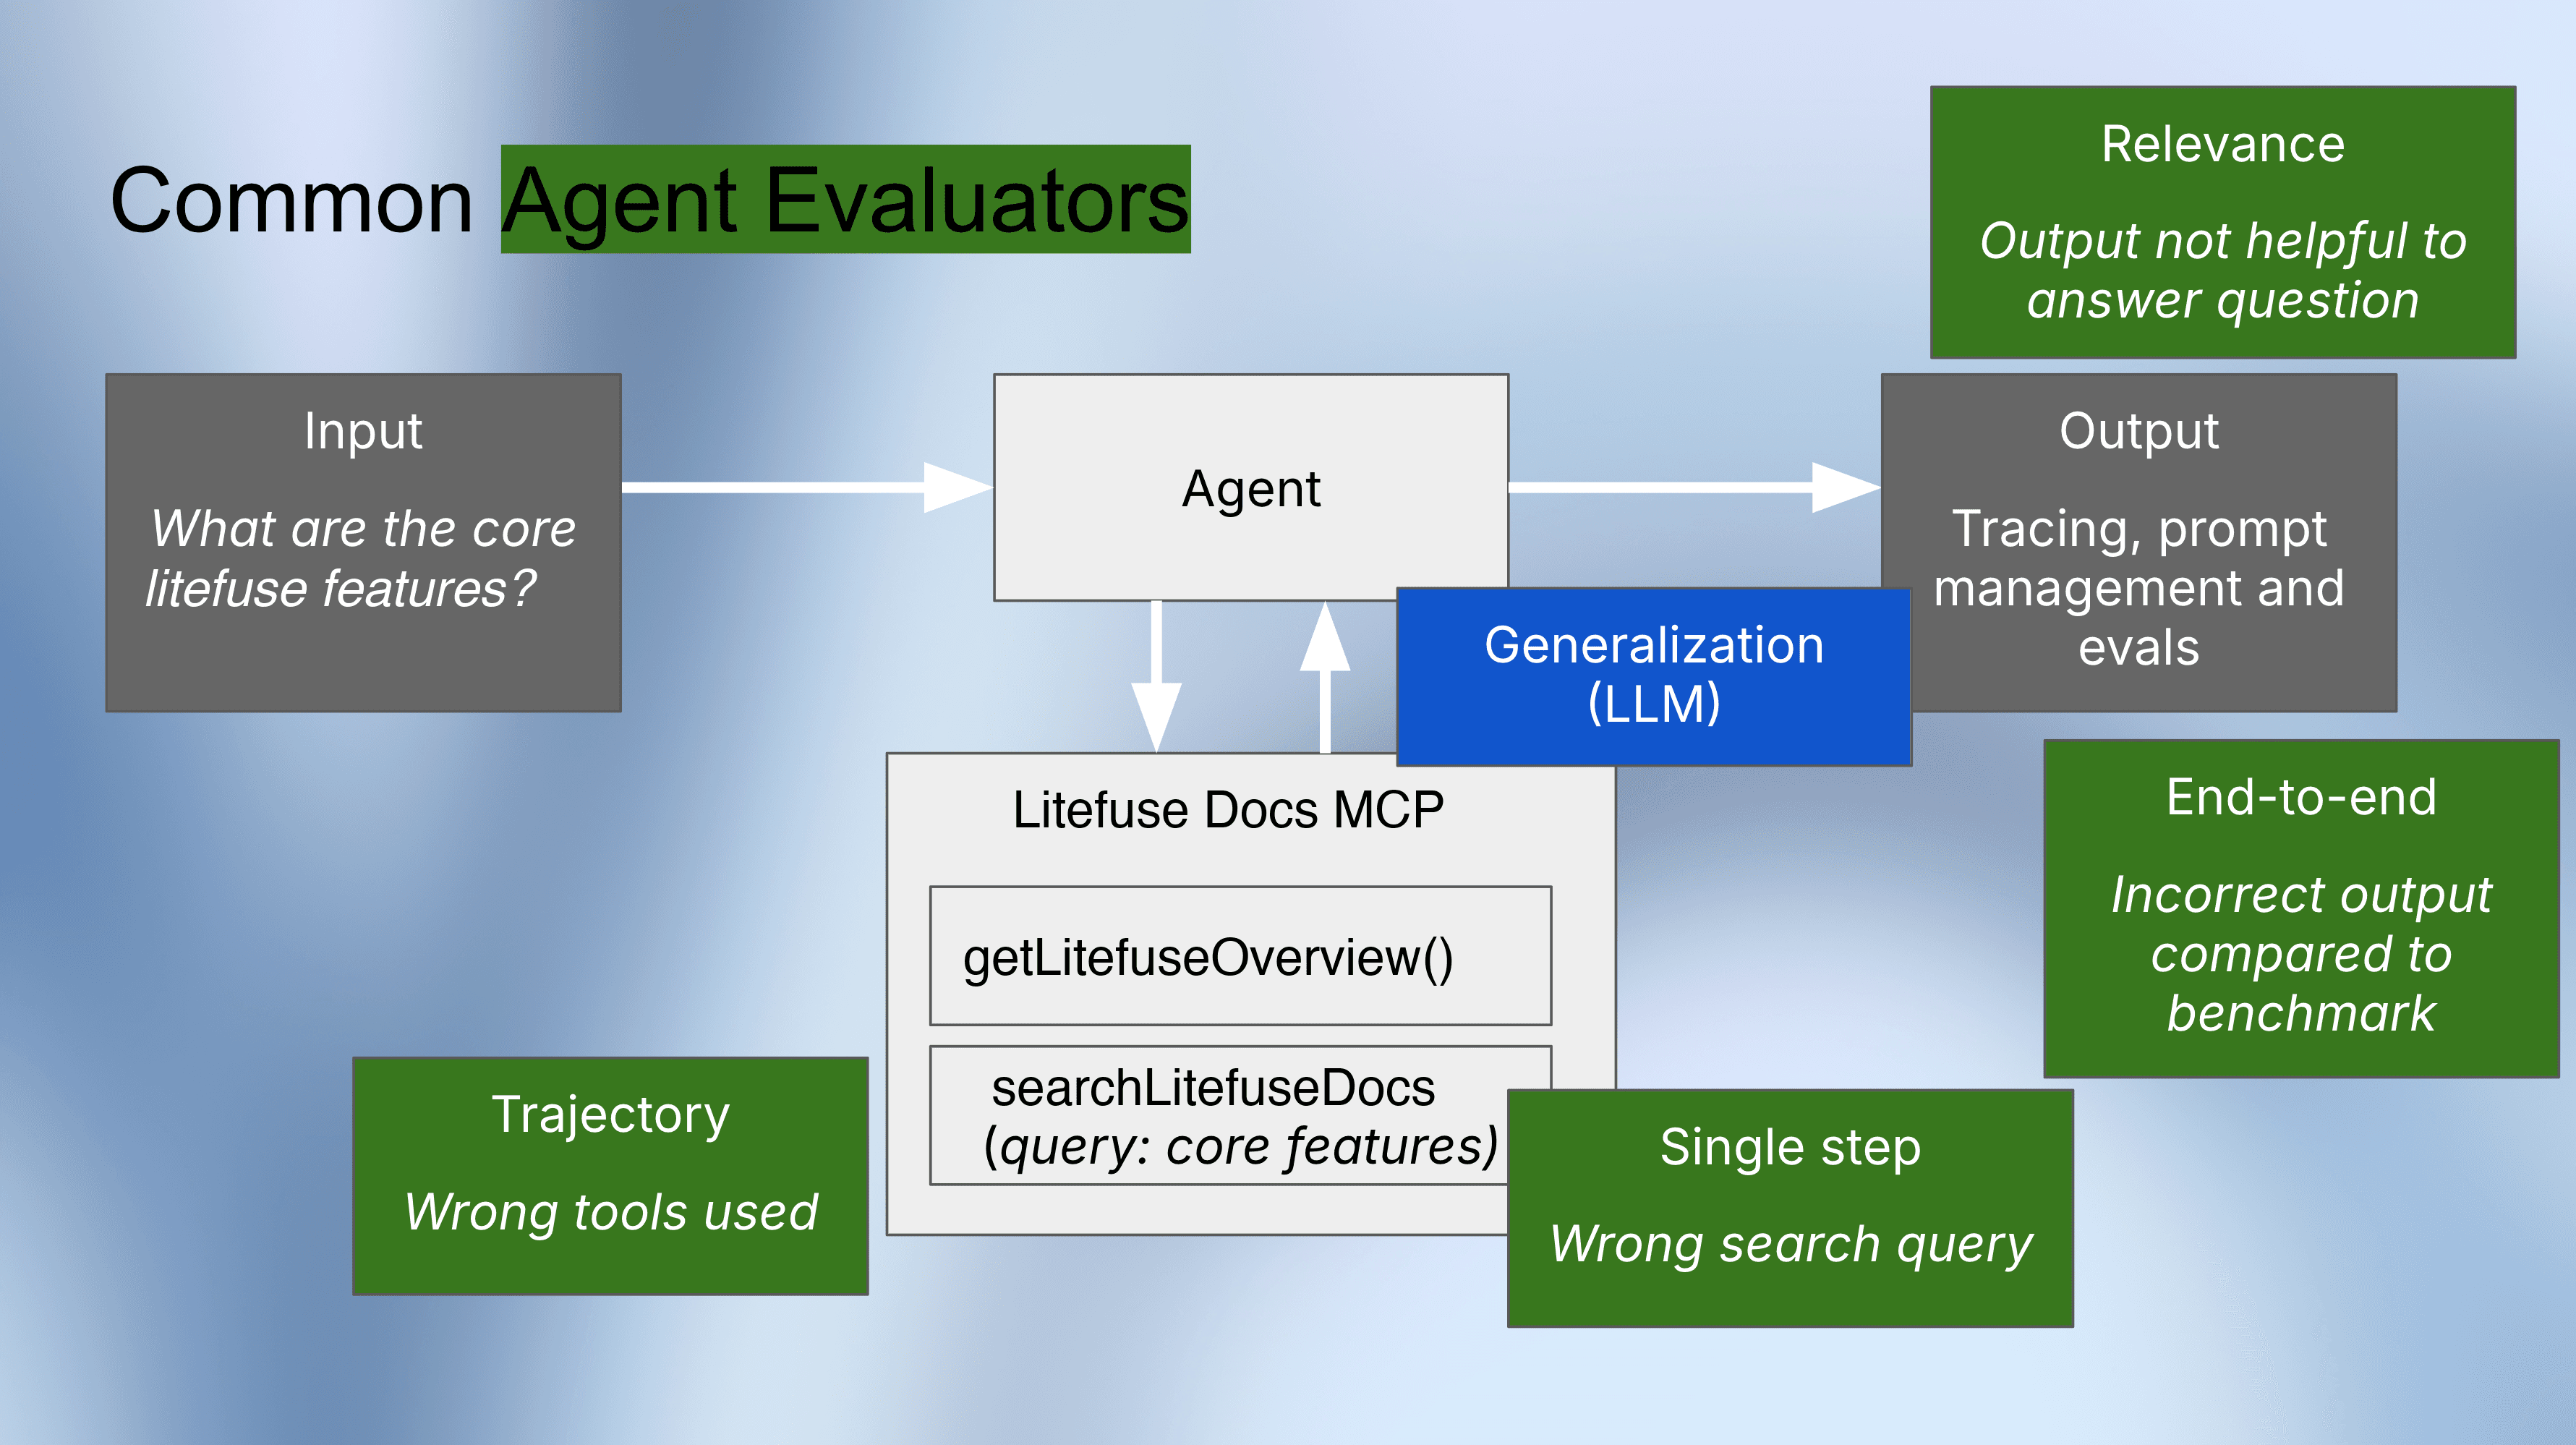
1) 最终响应评估(黑盒):
该方法只评估用户输入和 agent 的最终答案,完全忽略内部步骤。最容易搭建,可以适配任意 agent 框架,但它无法告诉你失败的原因。
2) 轨迹评估(灰盒):
该方法检查 agent 是否走了”正确的路径”。它把 agent 实际调用工具的序列和基准数据集中的预期序列对比。当最终答案出错时,轨迹评估能精确定位推理过程中是在哪一步出了问题。
3) 单步评估(白盒):
这是最细粒度的评估策略,相当于 agent 推理过程的单元测试。它不会运行整个 agent,而是孤立地测试每一个决策步骤,看它是否产生了预期的下一步动作。这对于校验搜索查询、API 参数或工具选择是否正确特别有用。
实现:一步一步评估一个 Agent
下面我们定义一个示例 agent,构建基准数据集,并在 Litefuse 中搭建自动化的 LLM-as-a-judge 评估。虽然代码使用了 Pydantic AI,但这些评估模式可以推广到任意 agent 框架。
想看其它框架下的 agent 评估? 可以参考 LangGraph Agent 评估 指南中针对 LangGraph 的讲解。
步骤 0:安装依赖
%pip install -q --upgrade "pydantic-ai[mcp]" langfuse openai nest_asyncio aiohttp步骤 1:设置环境变量
在 project settings 获取你的 Litefuse API key。
import os

os.environ["LANGFUSE_PUBLIC_KEY"] = "pk-lf-..."
os.environ["LANGFUSE_SECRET_KEY"] = "sk-lf-..."
os.environ["LANGFUSE_HOST"] = "https://litefuse.cloud"

os.environ["OPENAI_API_KEY"] = "sk-proj-..."
步骤 2:启用 Litefuse trace
为 Pydantic AI agent 开启自动 trace。
from langfuse import get_client
from pydantic_ai.agent import Agent

langfuse = get_client()
assert langfuse.auth_check(), "Langfuse auth failed - check your keys"

Agent.instrument_all()
print("✅ Pydantic AI instrumentation enabled")
步骤 3:创建 Agent
构建一个使用 Litefuse Docs MCP Server 检索 Litefuse 文档的 agent。
from typing import Any
from pydantic_ai import Agent, RunContext
from pydantic_ai.mcp import MCPServerStreamableHTTP, CallToolFunc, ToolResult

LITEFUSE_MCP_URL = "https://litefuse.ai/api/mcp"

async def run_agent(item, system_prompt="You are an expert on Litefuse. ", model="openai:gpt-4o-mini"):
    langfuse.update_current_observation(input=item.input)

    tool_call_history = []

    async def process_tool_call(
        ctx: RunContext[Any],
        call_tool: CallToolFunc,
        tool_name: str,
        args: dict[str, Any],
    ) -> ToolResult:
        tool_call_history.append({"tool_name": tool_name, "args": args})
        return await call_tool(tool_name, args)

    litefuse_docs_server = MCPServerStreamableHTTP(
        url=LITEFUSE_MCP_URL,
        process_tool_call=process_tool_call,
    )

    agent = Agent(
        model=model,
        system_prompt=system_prompt,
        toolsets=[litefuse_docs_server],
    )

    async with agent:
        result = await agent.run(item.input["question"])

        langfuse.update_current_observation(
            output=result.output,
            metadata={"tool_call_history": tool_call_history},
        )

        return result.output, tool_call_history
步骤 4:构造评估数据集
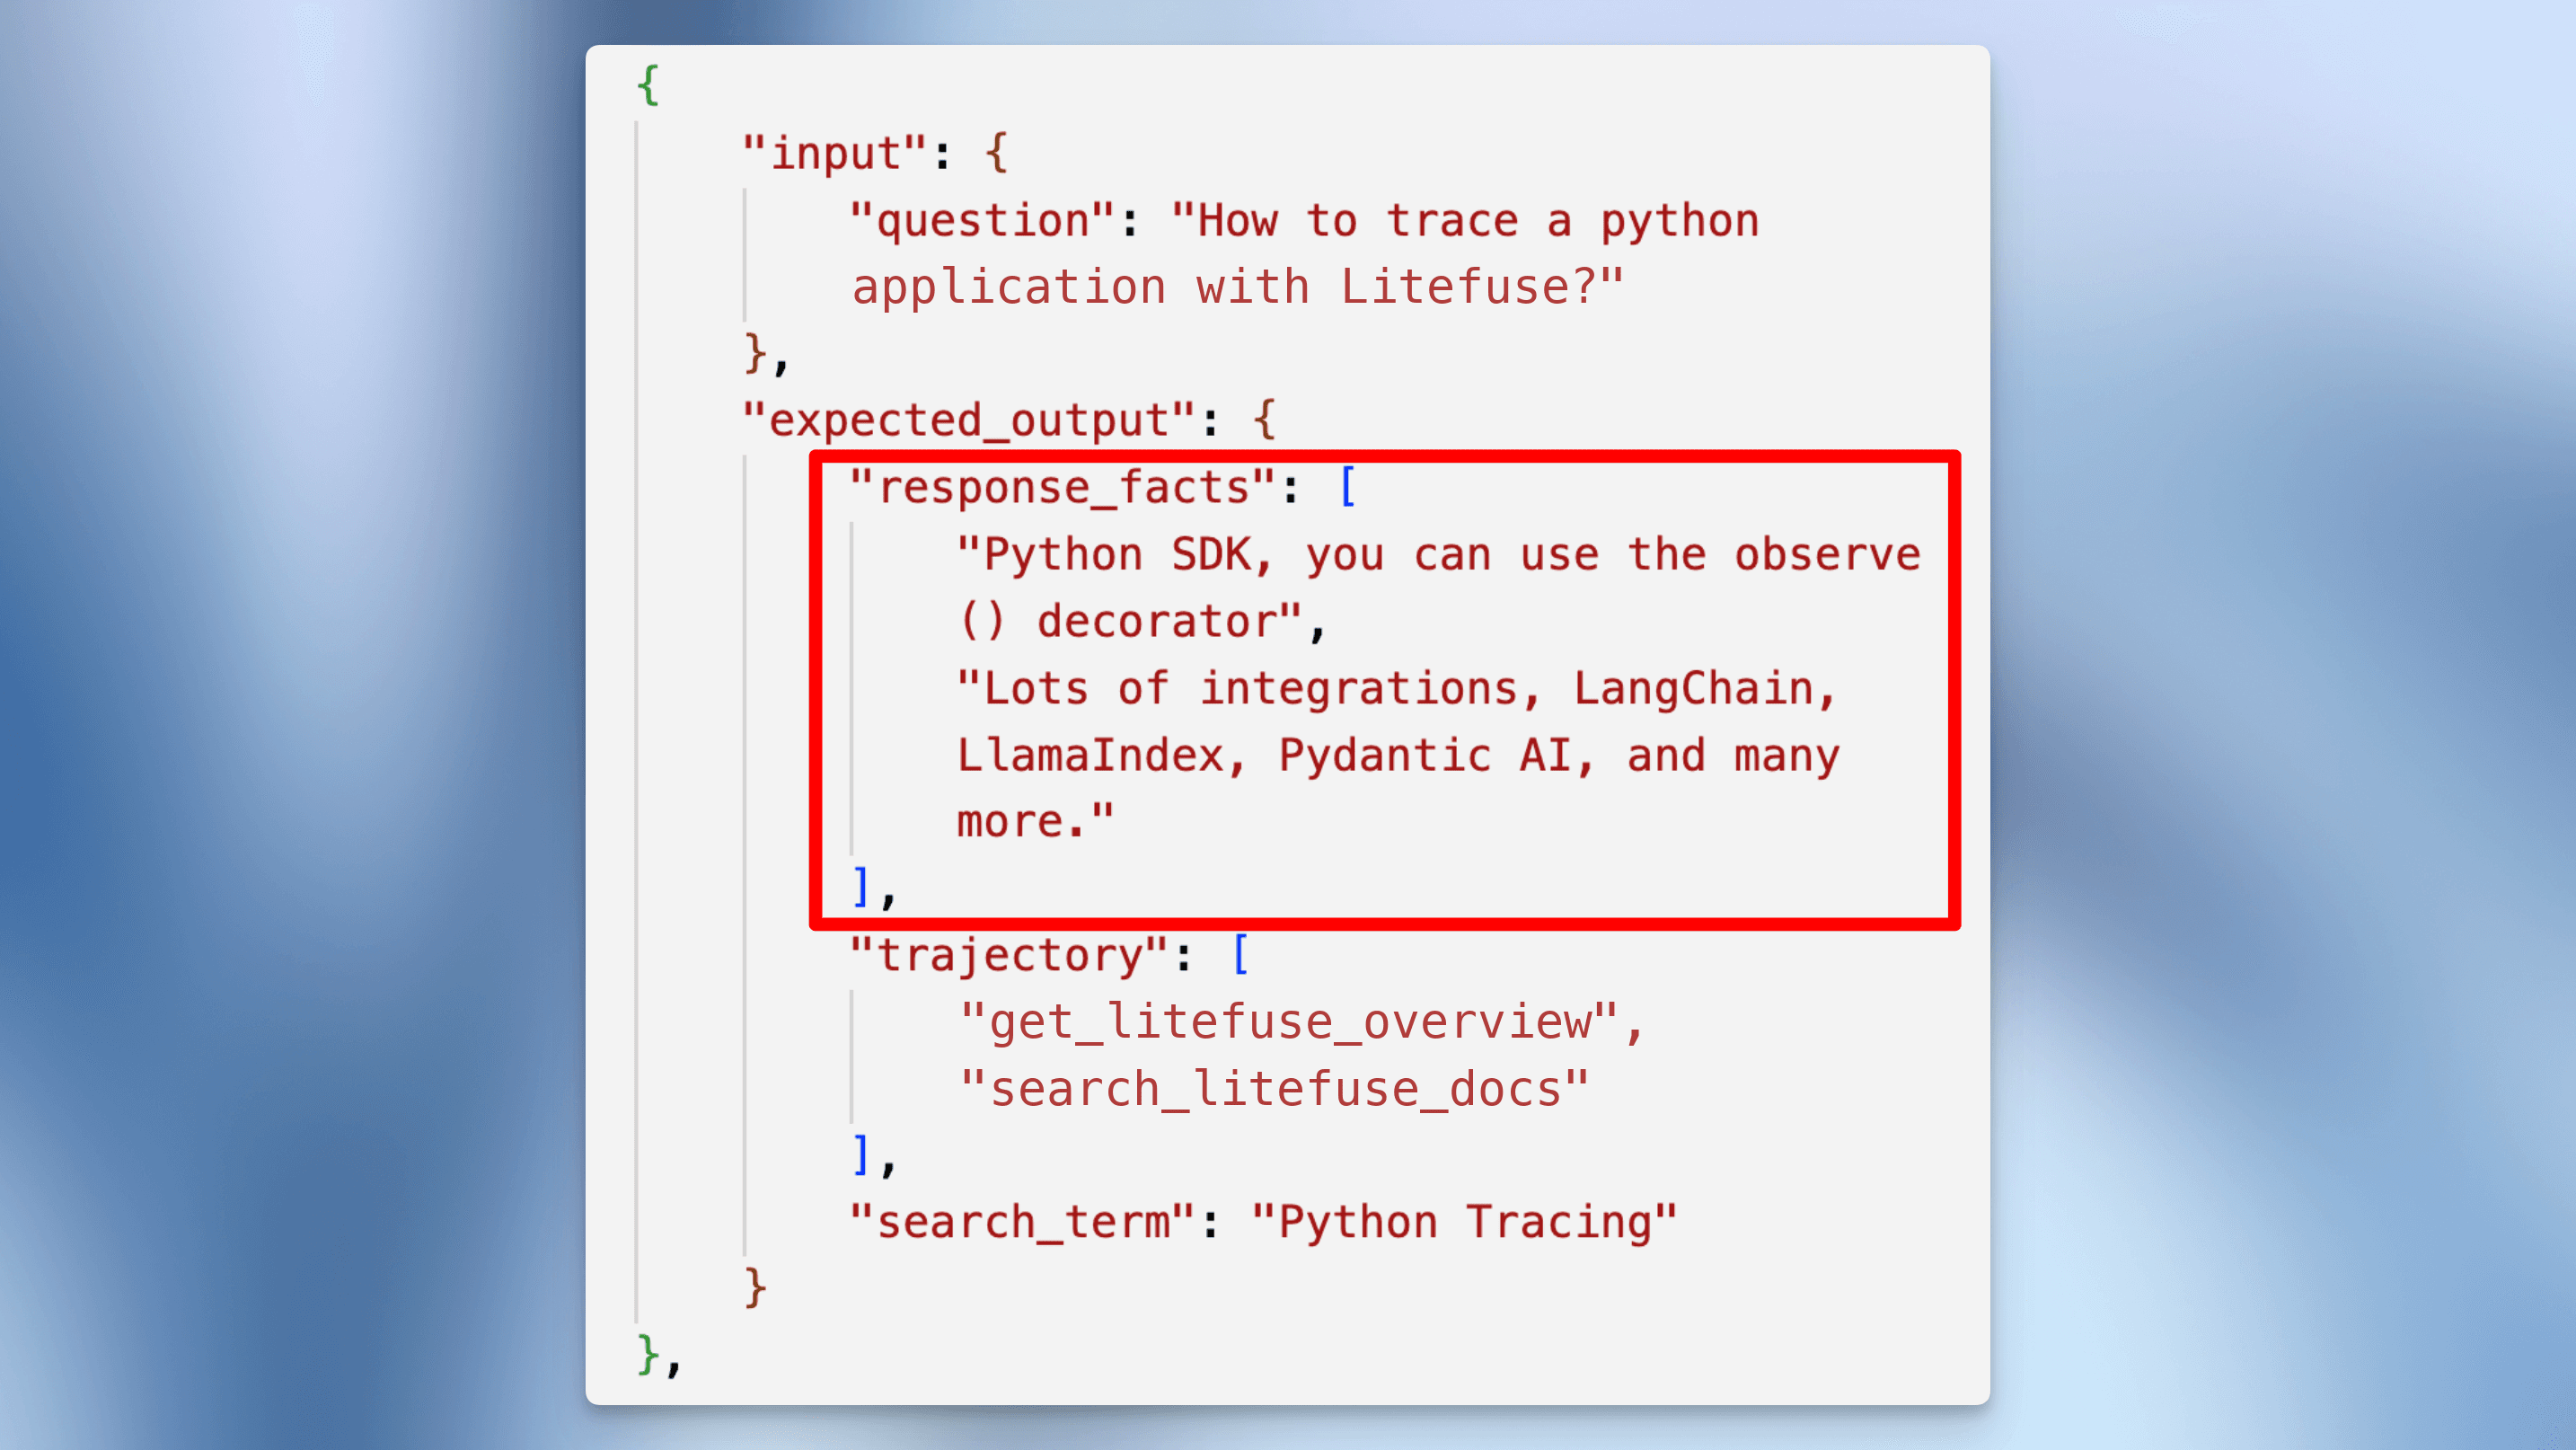
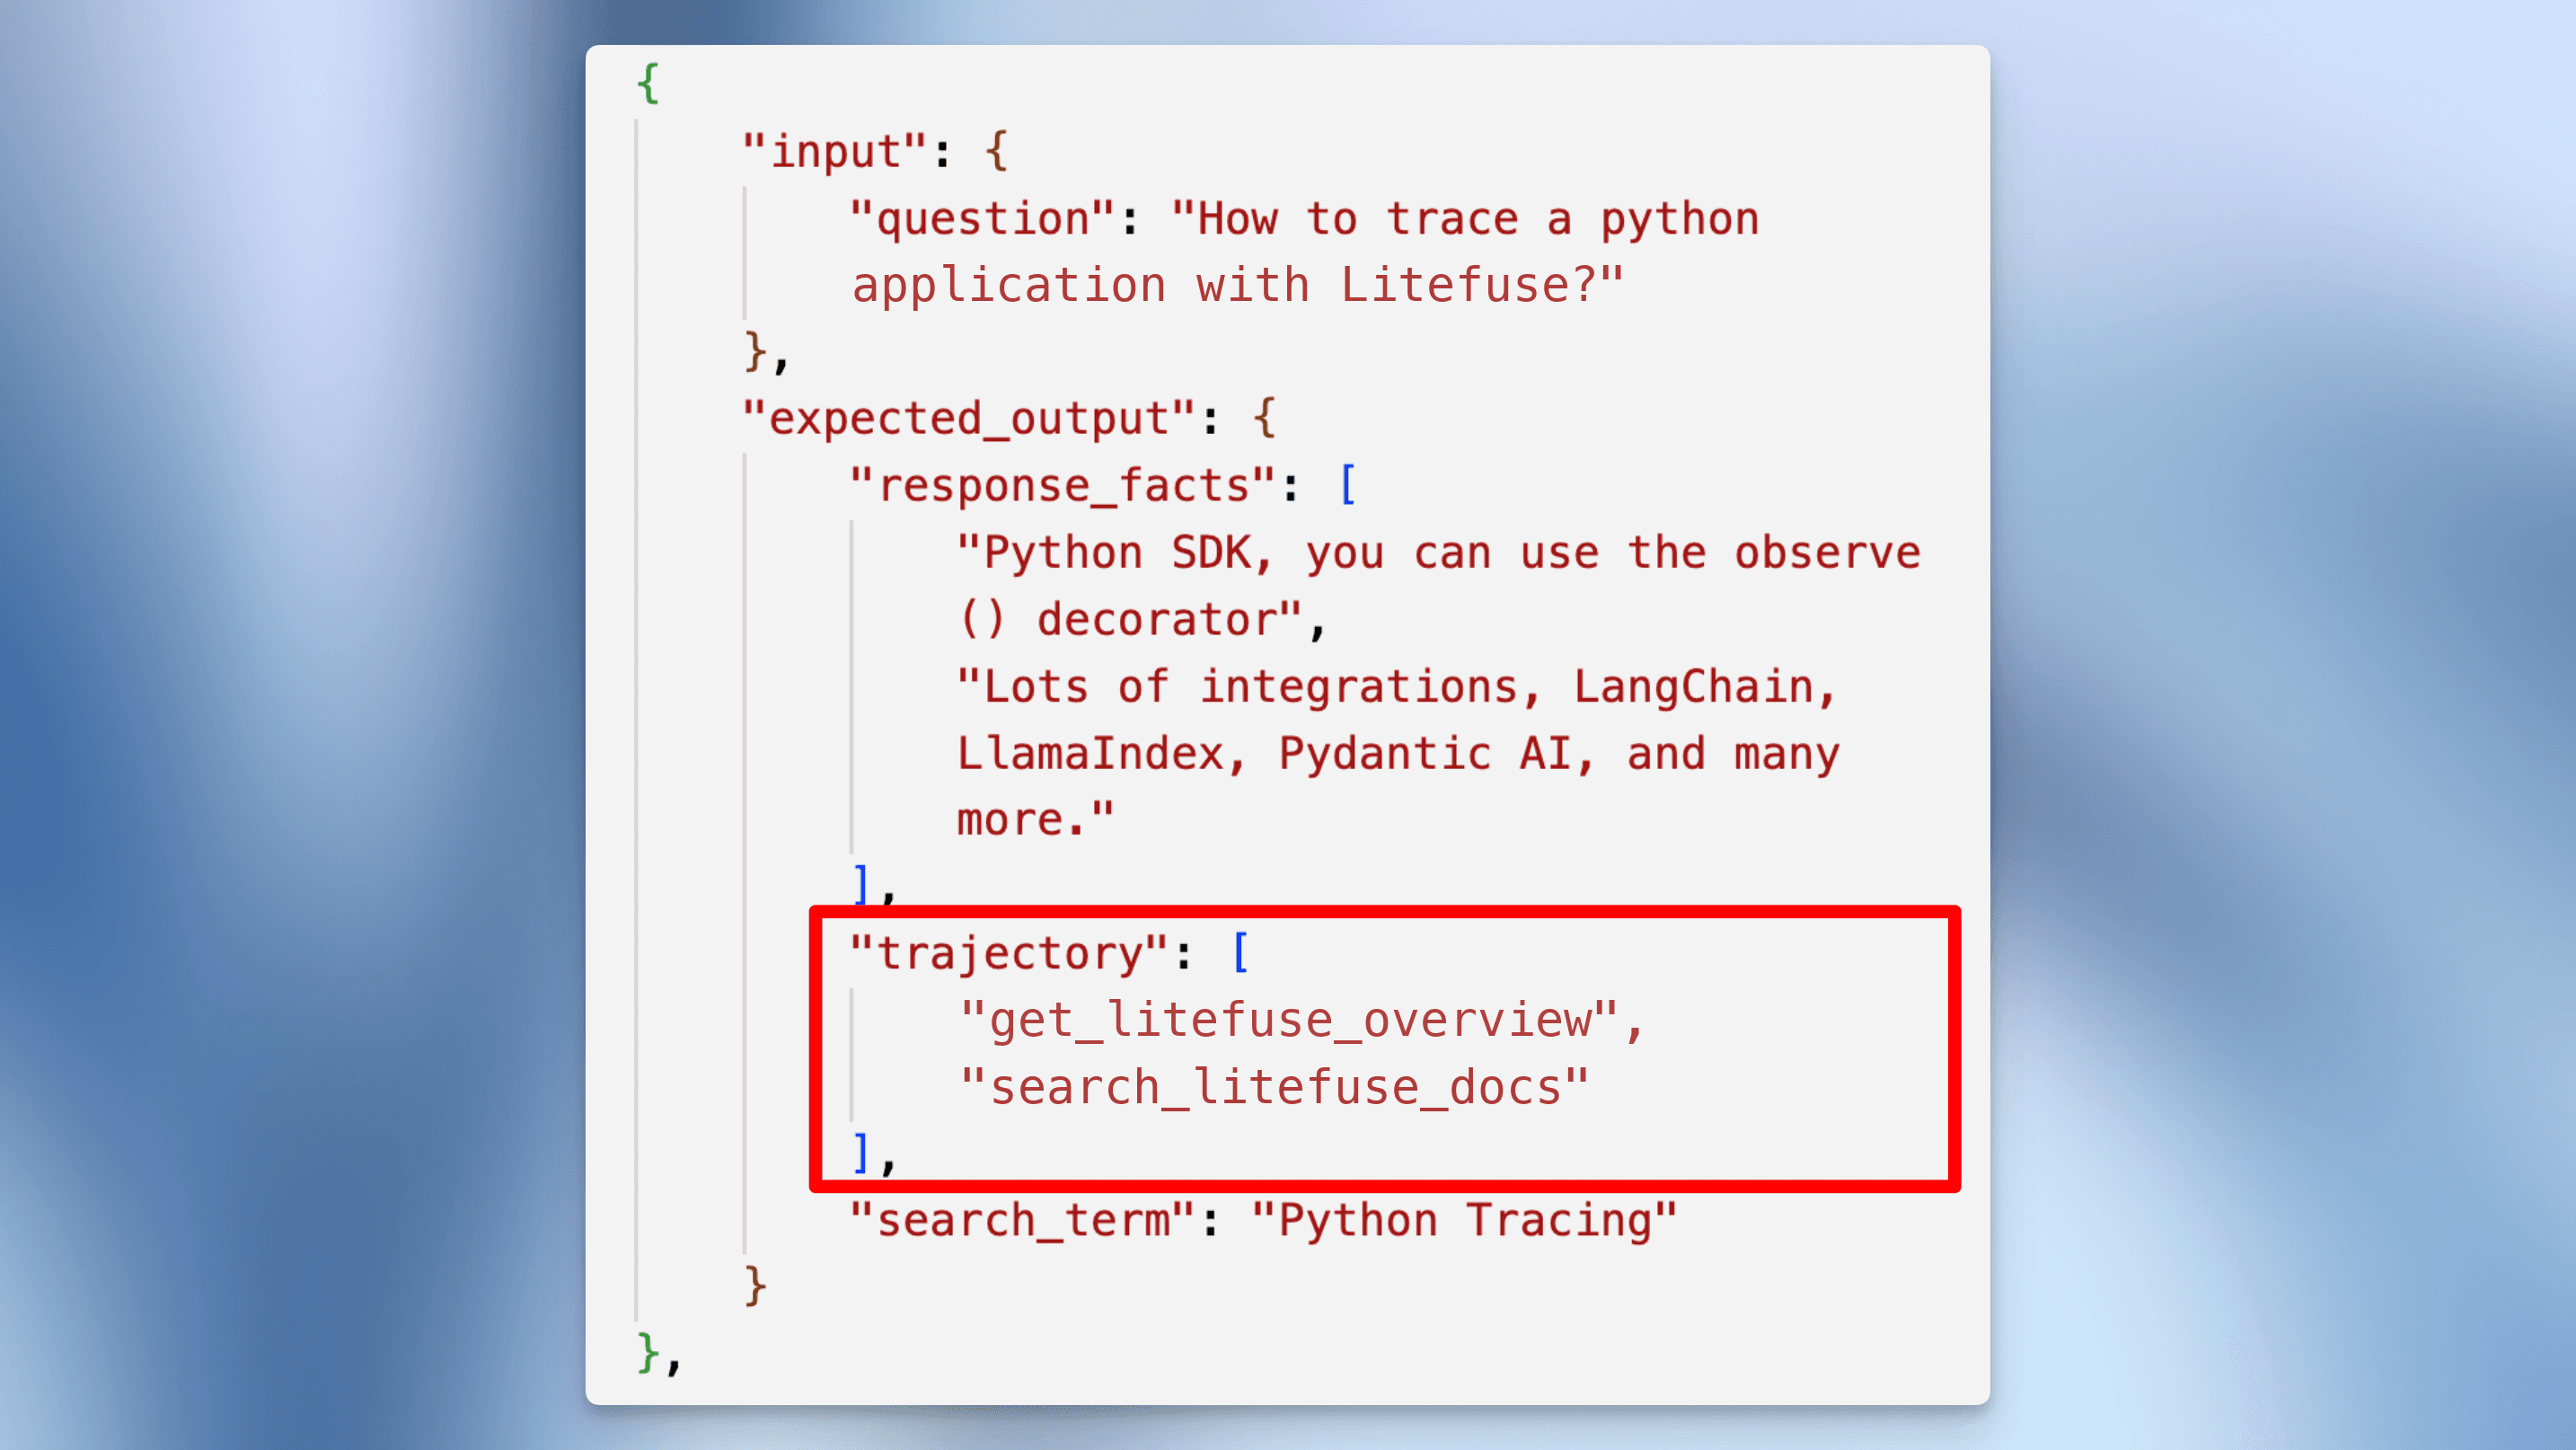
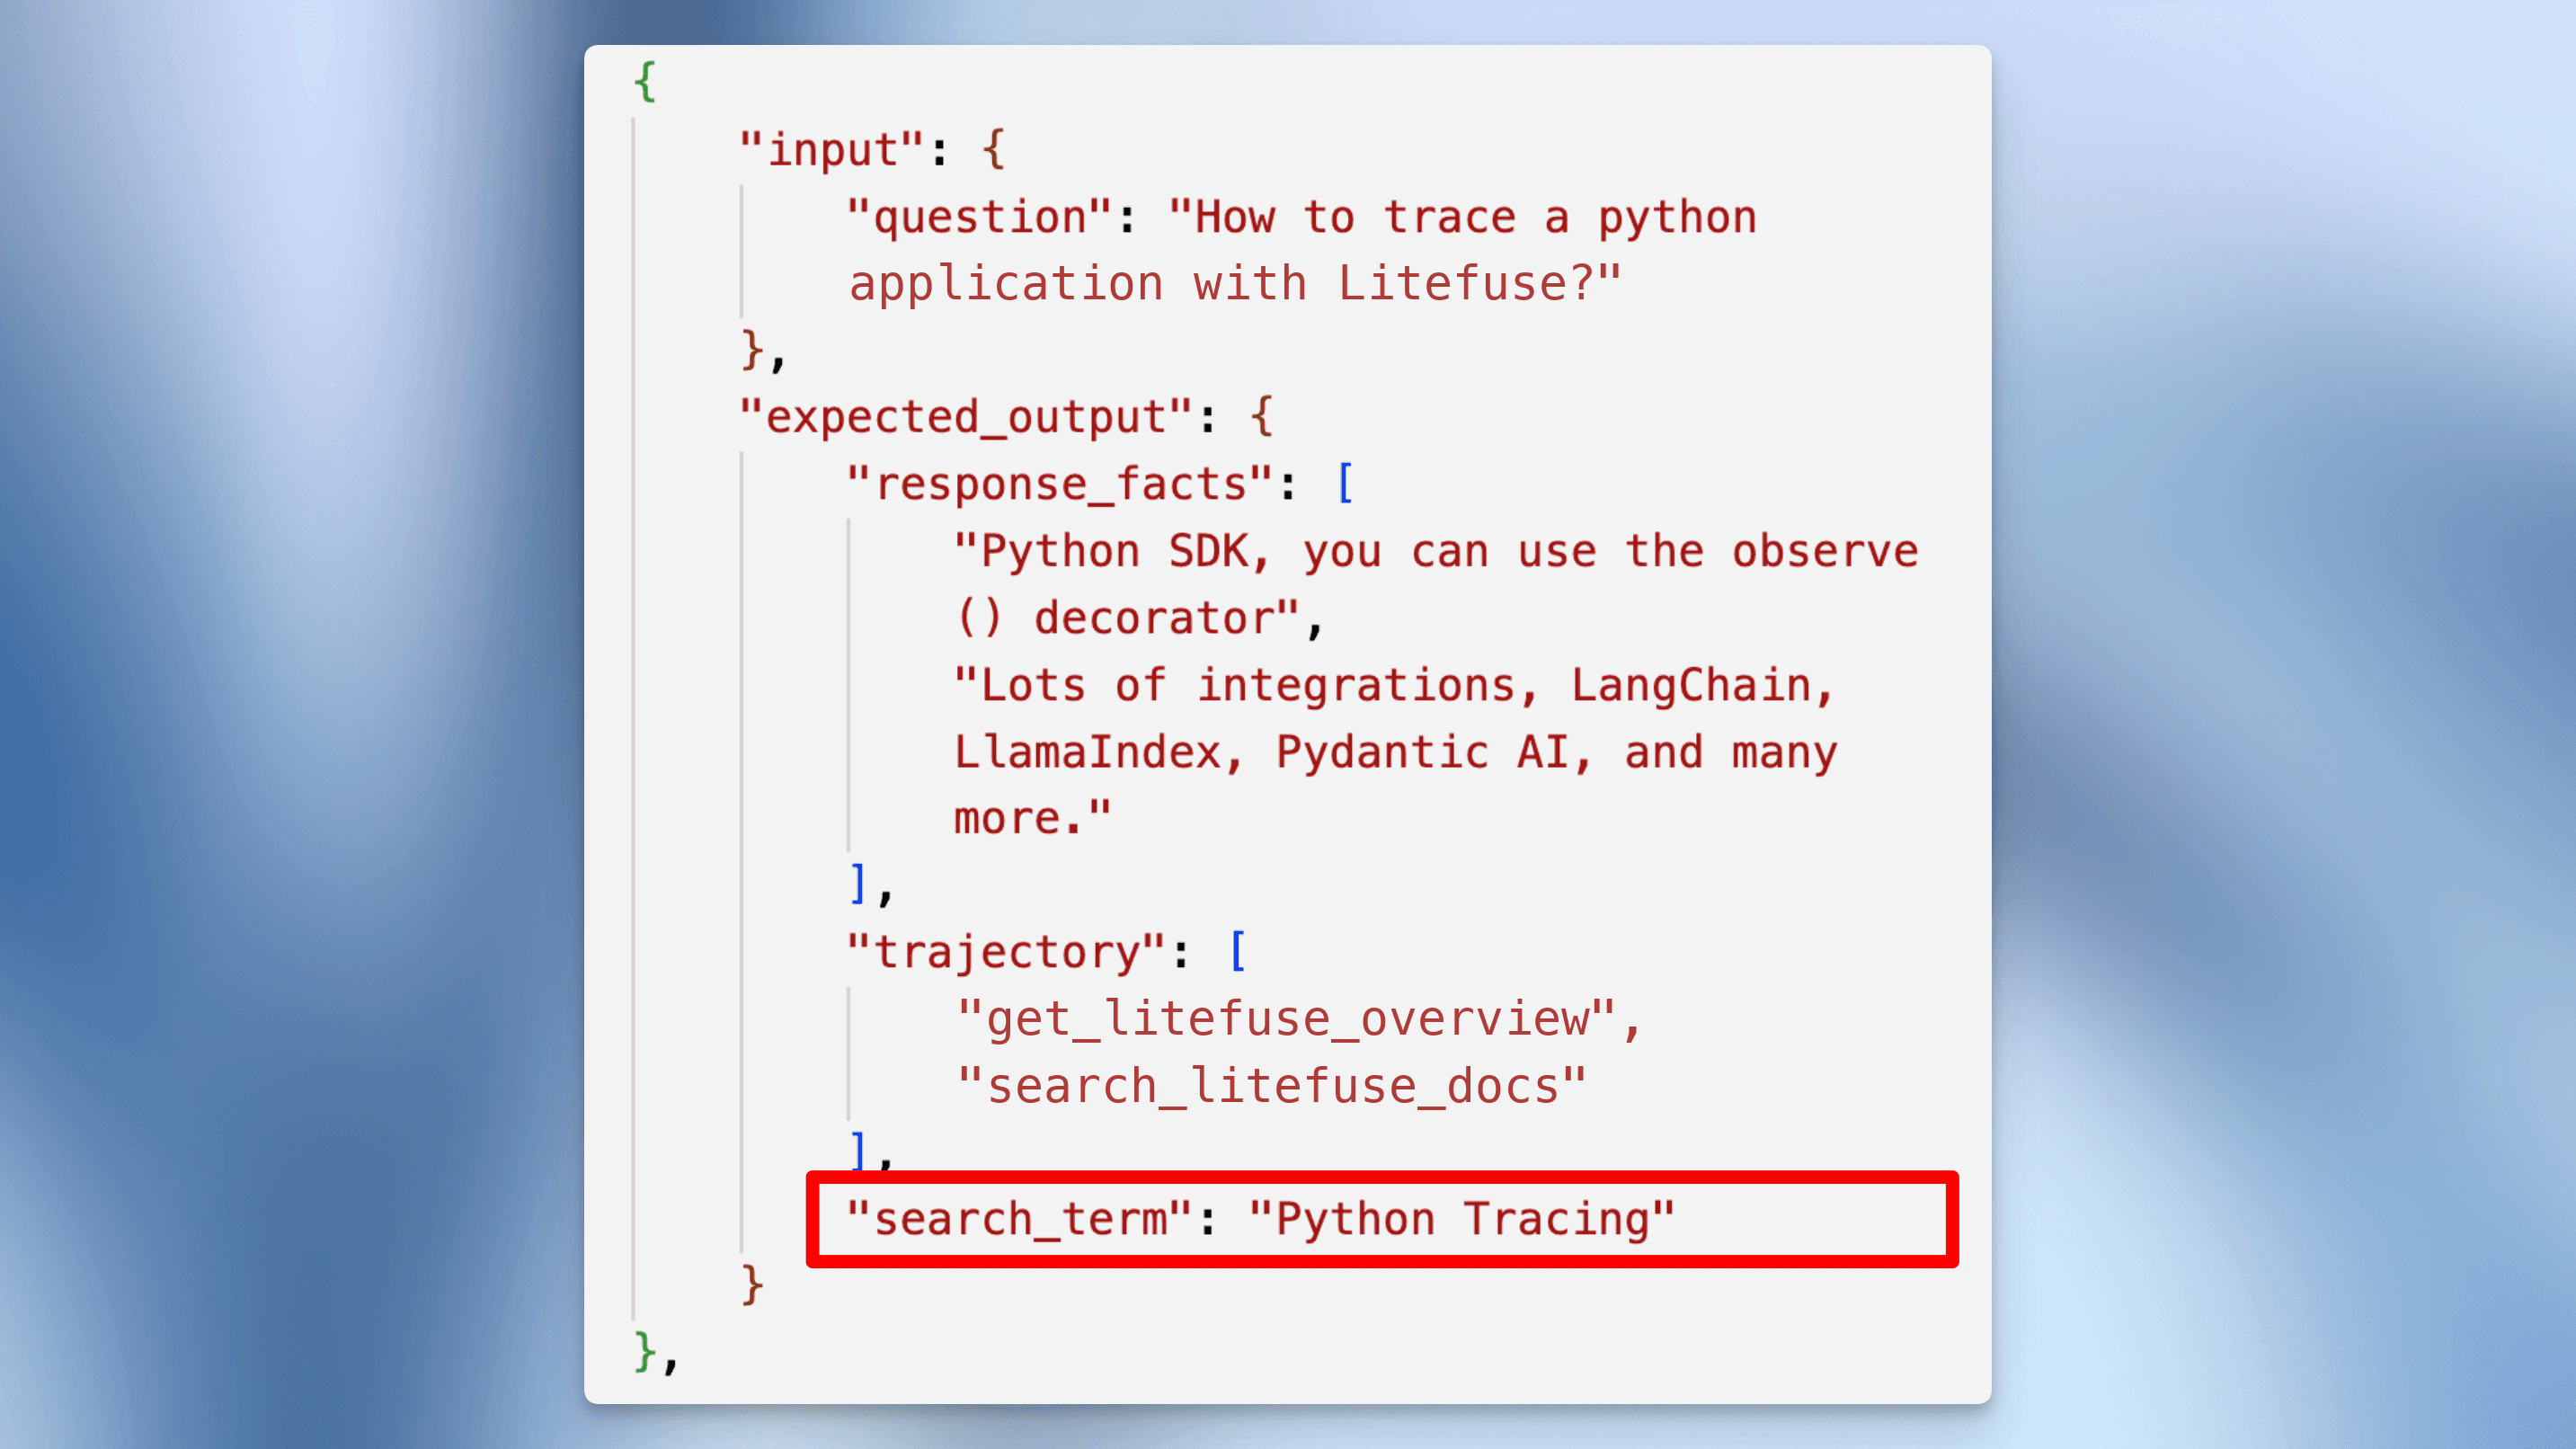
构建包含测试用例的基准数据集。每个用例包含:
input:用户问题expected_output.response_facts:响应中必须包含的关键事实expected_output.trajectory:预期的工具调用序列expected_output.search_term:预期的检索关键词(如适用)
test_cases = [
    {
        "input": {"question": "What is Litefuse?"},
        "expected_output": {
            "response_facts": [
                "Open Source AI agent observability and evaluation platform",
                "Product modules: Tracing, Evaluation and Prompt Management"
            ],
            "trajectory": ["getLitefuseOverview"],
        }
    },
    {
        "input": {"question": "How to trace a python application with Litefuse?"},
        "expected_output": {
            "response_facts": [
                "Python SDK, you can use the observe() decorator",
                "Lots of integrations, LangChain, LlamaIndex, Pydantic AI, and many more."
            ],
            "trajectory": ["getLitefuseOverview", "searchLitefuseDocs"],
            "search_term": "Python Tracing"
        }
    },
    {
        "input": {"question": "How to connect to the Litefuse Docs MCP server?"},
        "expected_output": {
            "response_facts": [
                "Connect via the MCP server endpoint: https://litefuse.ai/api/mcp",
                "Transport protocol: `streamableHttp`"
            ],
            "trajectory": ["getLitefuseOverview"]
        }
    },
    {
        "input": {"question": "How long are traces retained in litefuse?"},
        "expected_output": {
            "response_facts": [
                "By default, traces are retained indefinitely",
                "You can set custom data retention policy in the project settings"
            ],
            "trajectory": ["getLitefuseOverview", "searchLitefuseDocs"],
            "search_term": "Data retention"
        }
    }
]

DATASET_NAME = "pydantic-ai-mcp-agent-evaluation"

dataset = langfuse.create_dataset(name=DATASET_NAME)
for case in test_cases:
    langfuse.create_dataset_item(
        dataset_name=DATASET_NAME,
        input=case["input"],
        expected_output=case["expected_output"]
    )
步骤 5:配置 evaluator
在 Litefuse UI 中创建三个 evaluator,分别测试 agent 行为的不同方面。配置文档见 这里。
1. 最终响应评估(黑盒)
测试输出质量,与内部实现无关。
Prompt 模板:
You are a teacher grading a student based on the factual correctness of their statements.

### Examples

#### Example 1:
- Response: "The sun is shining brightly."
- Facts to verify: ["The sun is up.", "It is a beautiful day."]
- Reasoning: The response includes both facts.
- Score: 1

#### Example 2:
- Response: "When I was in the kitchen, the dog was there"
- Facts to verify: ["The cat is on the table.", "The dog is in the kitchen."]
- Reasoning: The response mentions the dog but not the cat.
- Score: 0

### New Student Response

- Response: {{response}}
- Facts to verify: {{facts_to_verify}}
2. 轨迹评估(灰盒)
校验 agent 是否使用了正确的工具调用序列。
Prompt 模板:
You are comparing two lists of strings. Check whether the lists contain exactly the same items. Order does not matter.

## Examples

Expected: ["searchWeb", "visitWebsite"]
Output: ["searchWeb"]
Reasoning: Output missing "visitWebsite".
Score: 0

Expected: ["drawImage", "visitWebsite", "speak"]
Output: ["visitWebsite", "speak", "drawImage"]
Reasoning: Output matches expected items.
Score: 1

Expected: ["getNews"]
Output: ["getNews", "watchTv"]
Reasoning: Output contains unexpected "watchTv".
Score: 0

## This Exercise

Expected: {{expected}}
Output: {{output}}
3. 检索质量评估
当 agent 检索文档时,校验其检索 query 的质量。
Prompt 模板:
You are grading whether a student searched for the right information. The search term should correspond vaguely with the expected term.

### Examples

Response: "How can I contact support?"
Expected search topics: Support
Reasoning: Response searches for support.
Score: 1

Response: "Deployment"
Expected search topics: Tracing
Reasoning: Response doesn't match expected topic.
Score: 0

Response: (empty)
Expected search topics: (empty)
Reasoning: No search expected, no search done.
Score: 1

### New Student Response

Response: {{search}}
Expected search topics: {{expected_search_topic}}
在 Litefuse UI 的 Prompts → Create Evaluator 中创建上述 evaluator。
步骤 6:运行实验
在你的 dataset 上运行 agent。对比不同模型和 prompt,找出最佳配置。
dataset = langfuse.get_dataset(DATASET_NAME)

result = dataset.run_experiment(
    name="Production Model Test",
    description="Monthly evaluation of our production model",
    task=run_agent
)

print(result.format())
步骤 7:对比多种配置
测试不同的 prompt 和模型,找出最佳配置。
from functools import partial

system_prompts = {
    "simple": (
        "You are an expert on Litefuse. "
        "Answer user questions accurately and concisely using the available MCP tools. "
        "Cite sources when appropriate."
    ),
    "nudge_search": (
        "You are an expert on Litefuse. "
        "Answer user questions accurately and concisely using the available MCP tools. "
        "Always cite sources when appropriate. "
        "When unsure, use getLitefuseOverview then search the docs. You can use these tools multiple times."
    )
}

models = ["openai:gpt-5-mini", "openai:gpt-5-nano"]

dataset = langfuse.get_dataset(DATASET_NAME)

for prompt_name, prompt_content in system_prompts.items():
    for test_model in models:
        task = partial(
            run_agent,
            system_prompt=prompt_content,
            model=test_model,
        )

        result = dataset.run_experiment(
            name=f"Test: {prompt_name} {test_model}",
            description="Comparing prompts and models",
            task=task
        )

        print(result.format())
Agent 评估最佳实践
基于我们帮助团队在生产环境中评估 agent 的经验,下面是一些关键的最佳实践:
-
从 trace 开始,而不是从打分开始。 在构建自动化评估之前,先花时间手动审查 agent 的 trace。你观察到的模式会告诉你哪些指标对你的场景最重要。使用 Litefuse tracing 检查每一次工具调用、推理步骤和中间输出。
-
在编写 evaluator 之前先定义成功标准。 对每个测试用例,明确在每个层面”正确”是什么样的——预期的最终答案、预期的工具调用序列、预期的检索 query。模糊的标准会带来不可靠的评估。
-
三种评估层级要一起使用。 最终响应评估告诉你哪里出错。轨迹评估告诉你错在何处。单步评估告诉你为什么出错。三者结合才能拼出完整图景。
-
基于真实失败构建数据集。 最有价值的测试用例来自 agent 在生产环境中失败的 trace。使用 annotation queue 系统化地审查并标注问题 trace,然后把它们补充到评估数据集里。
-
在 CI/CD 中运行评估。 通过 experiments via SDK 把 agent 评估集成到部署 pipeline 中。当基准数据集上的分数出现回归时,自动阻断部署。
-
系统化地对比不同配置。 当你修改 prompt、模型或工具时,用同一份评估数据集在所有配置上跑一遍,做数据驱动的决策。Litefuse 中的实验对比视图能让这件事变得轻而易举。
下一步
现在你已经有了一个可运行的 agent 评估 pipeline,下面是一些可以继续扩展的方向:
- 使用 synthetic data generation 扩充数据集,覆盖更多边缘场景
- 通过 LLM-as-a-Judge 加入在线评估,实时给生产 trace 打分
- 如果你的 agent 处理 多轮对话,评估多轮对话
- 使用 自定义仪表盘 和 score 分析 跟踪 agent 长期表现
常见问题
什么是 agent 评估?
Agent 评估是系统化地测试和衡量 AI agent 表现的过程——这些 agent 是利用 LLM 做决策、调用工具、完成多步任务的自主系统。与评估单次 LLM 调用不同,agent 评估必须覆盖完整的行动轨迹,而不仅仅是最终输出。
Agent 评估与 LLM 评估有何不同?
标准的 LLM 评估检查模型对给定 prompt 是否产生了正确或高质量的回答。Agent 评估更复杂,因为 agent 会做出一连串决策——决定调用哪些工具、传什么参数、何时停止。你不仅需要评估最终答案,还要评估推理路径(轨迹)以及每一个具体决策(单步)。
Agent 评估主要有哪些类型?
主要有三种:最终响应(黑盒) 只检查最终结果;轨迹(灰盒) 检查 agent 是否走了正确的动作序列;单步(白盒) 孤立测试每个具体决策。大多数生产系统会综合使用三种方式。
如何构建 agent 评估数据集?
先定义代表最常见、最关键用户交互的测试用例。每个用例都应包含用户输入、响应中预期出现的事实、预期的工具调用序列(轨迹),以及关键工具调用预期的参数。随着时间推移,把生产环境中真实失败的用例不断补充到数据集中。
可以在 agent 评估里使用 LLM-as-a-judge 吗?
可以。LLM-as-a-judge 是 agent 评估中最有效的方法之一,因为 agent 的输出往往过于复杂,无法通过简单的规则来校验。你可以为每个评估层级使用不同的 judge prompt——一个用于最终响应质量,一个用于轨迹正确性,一个用于单步质量。配置方法见 LLM-as-a-Judge 文档。
Agent 评估应该多久运行一次?
每次修改 prompt、模型或工具配置后,部署前都应运行离线评估(实验)。对生产 trace 持续运行在线评估,以便及时发现真实流量中的问题。完整的方法论见 evaluation overview。