示例:Litefuse Prompt 管理与 Langchain(JS)
Litefuse Prompt 管理可在一个地方协作地对 prompt 进行版本控制与管理。
本示例演示如何将 Litefuse Prompt 管理与 Langchain JS 一起使用。
环境准备
注册 Litefuse Cloud 或自托管 Litefuse 以获取你的 Litefuse API 密钥。你还需要一个 OpenAI API 密钥。
注意:本 cookbook 使用 Deno.js 运行,导入包与设置环境变量的语法有所不同。对于 Node.js 应用,搭建流程类似,但使用标准的
npm包和process.env。
// Litefuse authentication keys
Deno.env.set("LANGFUSE_PUBLIC_KEY", "pk-lf-***");
Deno.env.set("LANGFUSE_SECRET_KEY", "sk-lf-***");

// Litefuse host configuration
Deno.env.set("LANGFUSE_BASE_URL", "https://litefuse.cloud")

// Set environment variables using Deno-specific syntax
Deno.env.set("OPENAI_API_KEY", "sk-proj-***");
设置好环境变量后,我们就可以初始化 langfuseSpanProcessor,并将其传入用于编排 tracing 的主 OpenTelemetry SDK。
// Import required dependencies
import 'npm:dotenv/config';
import { NodeSDK } from "npm:@opentelemetry/sdk-node";
import { LangfuseSpanProcessor } from "npm:@langfuse/otel";

// Export the processor to be able to flush it later
// This is important for ensuring all spans are sent to Litefuse
export const langfuseSpanProcessor = new LangfuseSpanProcessor({
    publicKey: process.env.LANGFUSE_PUBLIC_KEY!,
    secretKey: process.env.LANGFUSE_SECRET_KEY!,
    baseUrl: process.env.LANGFUSE_BASE_URL ?? 'https://litefuse.cloud', // Default to cloud if not specified
    environment: process.env.NODE_ENV ?? 'development', // Default to development if not specified
  });

// Initialize the OpenTelemetry SDK with Langfuse processor
const sdk = new NodeSDK({
  spanProcessors: [langfuseSpanProcessor],
});

// Start the SDK to begin collecting telemetry
// The warning about crypto module is expected in Deno and doesn't affect basic tracing functionality. Media upload features will be disabled, but all core tracing works normally
sdk.start();
LangfuseClient 提供了 OpenTelemetry tracing 之外的附加能力,例如打分、prompt 管理与数据检索。它会自动使用我们前面设置过的同样的环境变量。
import { LangfuseClient } from "npm:@langfuse/client";

const langfuse = new LangfuseClient();
示例 1:文本 Prompt
添加新 prompt
我们通过 SDK 添加本示例使用的 prompt。你也可以在 Litefuse UI 中编辑并为该 prompt 创建版本。
Name:在 Litefuse Prompt 管理中标识该 prompt- 带
topic变量的 prompt - 包含
modelName、temperature的 config labels中包含production,使该 prompt 立即作为默认版本生效
为了演示,我们在 Litefuse 中添加 prompt 后立即使用它。通常情况下,你会不时在 Litefuse 中更新 prompt,应用则始终拉取当前的 production 版本。
// Create a text prompt
await langfuse.prompt.create({
    name: "jokes",
    type: "text",
    prompt: "Tell me a joke about {{topic}}",
    labels: ["production"], // directly promote to production
    config: {
      model: "gpt-4o",
      temperature: 0.7,
      supported_languages: ["en", "fr"],
    }, // optionally, add configs (e.g. model parameters or model tools) or tags
  });
Litefuse 中的 prompt
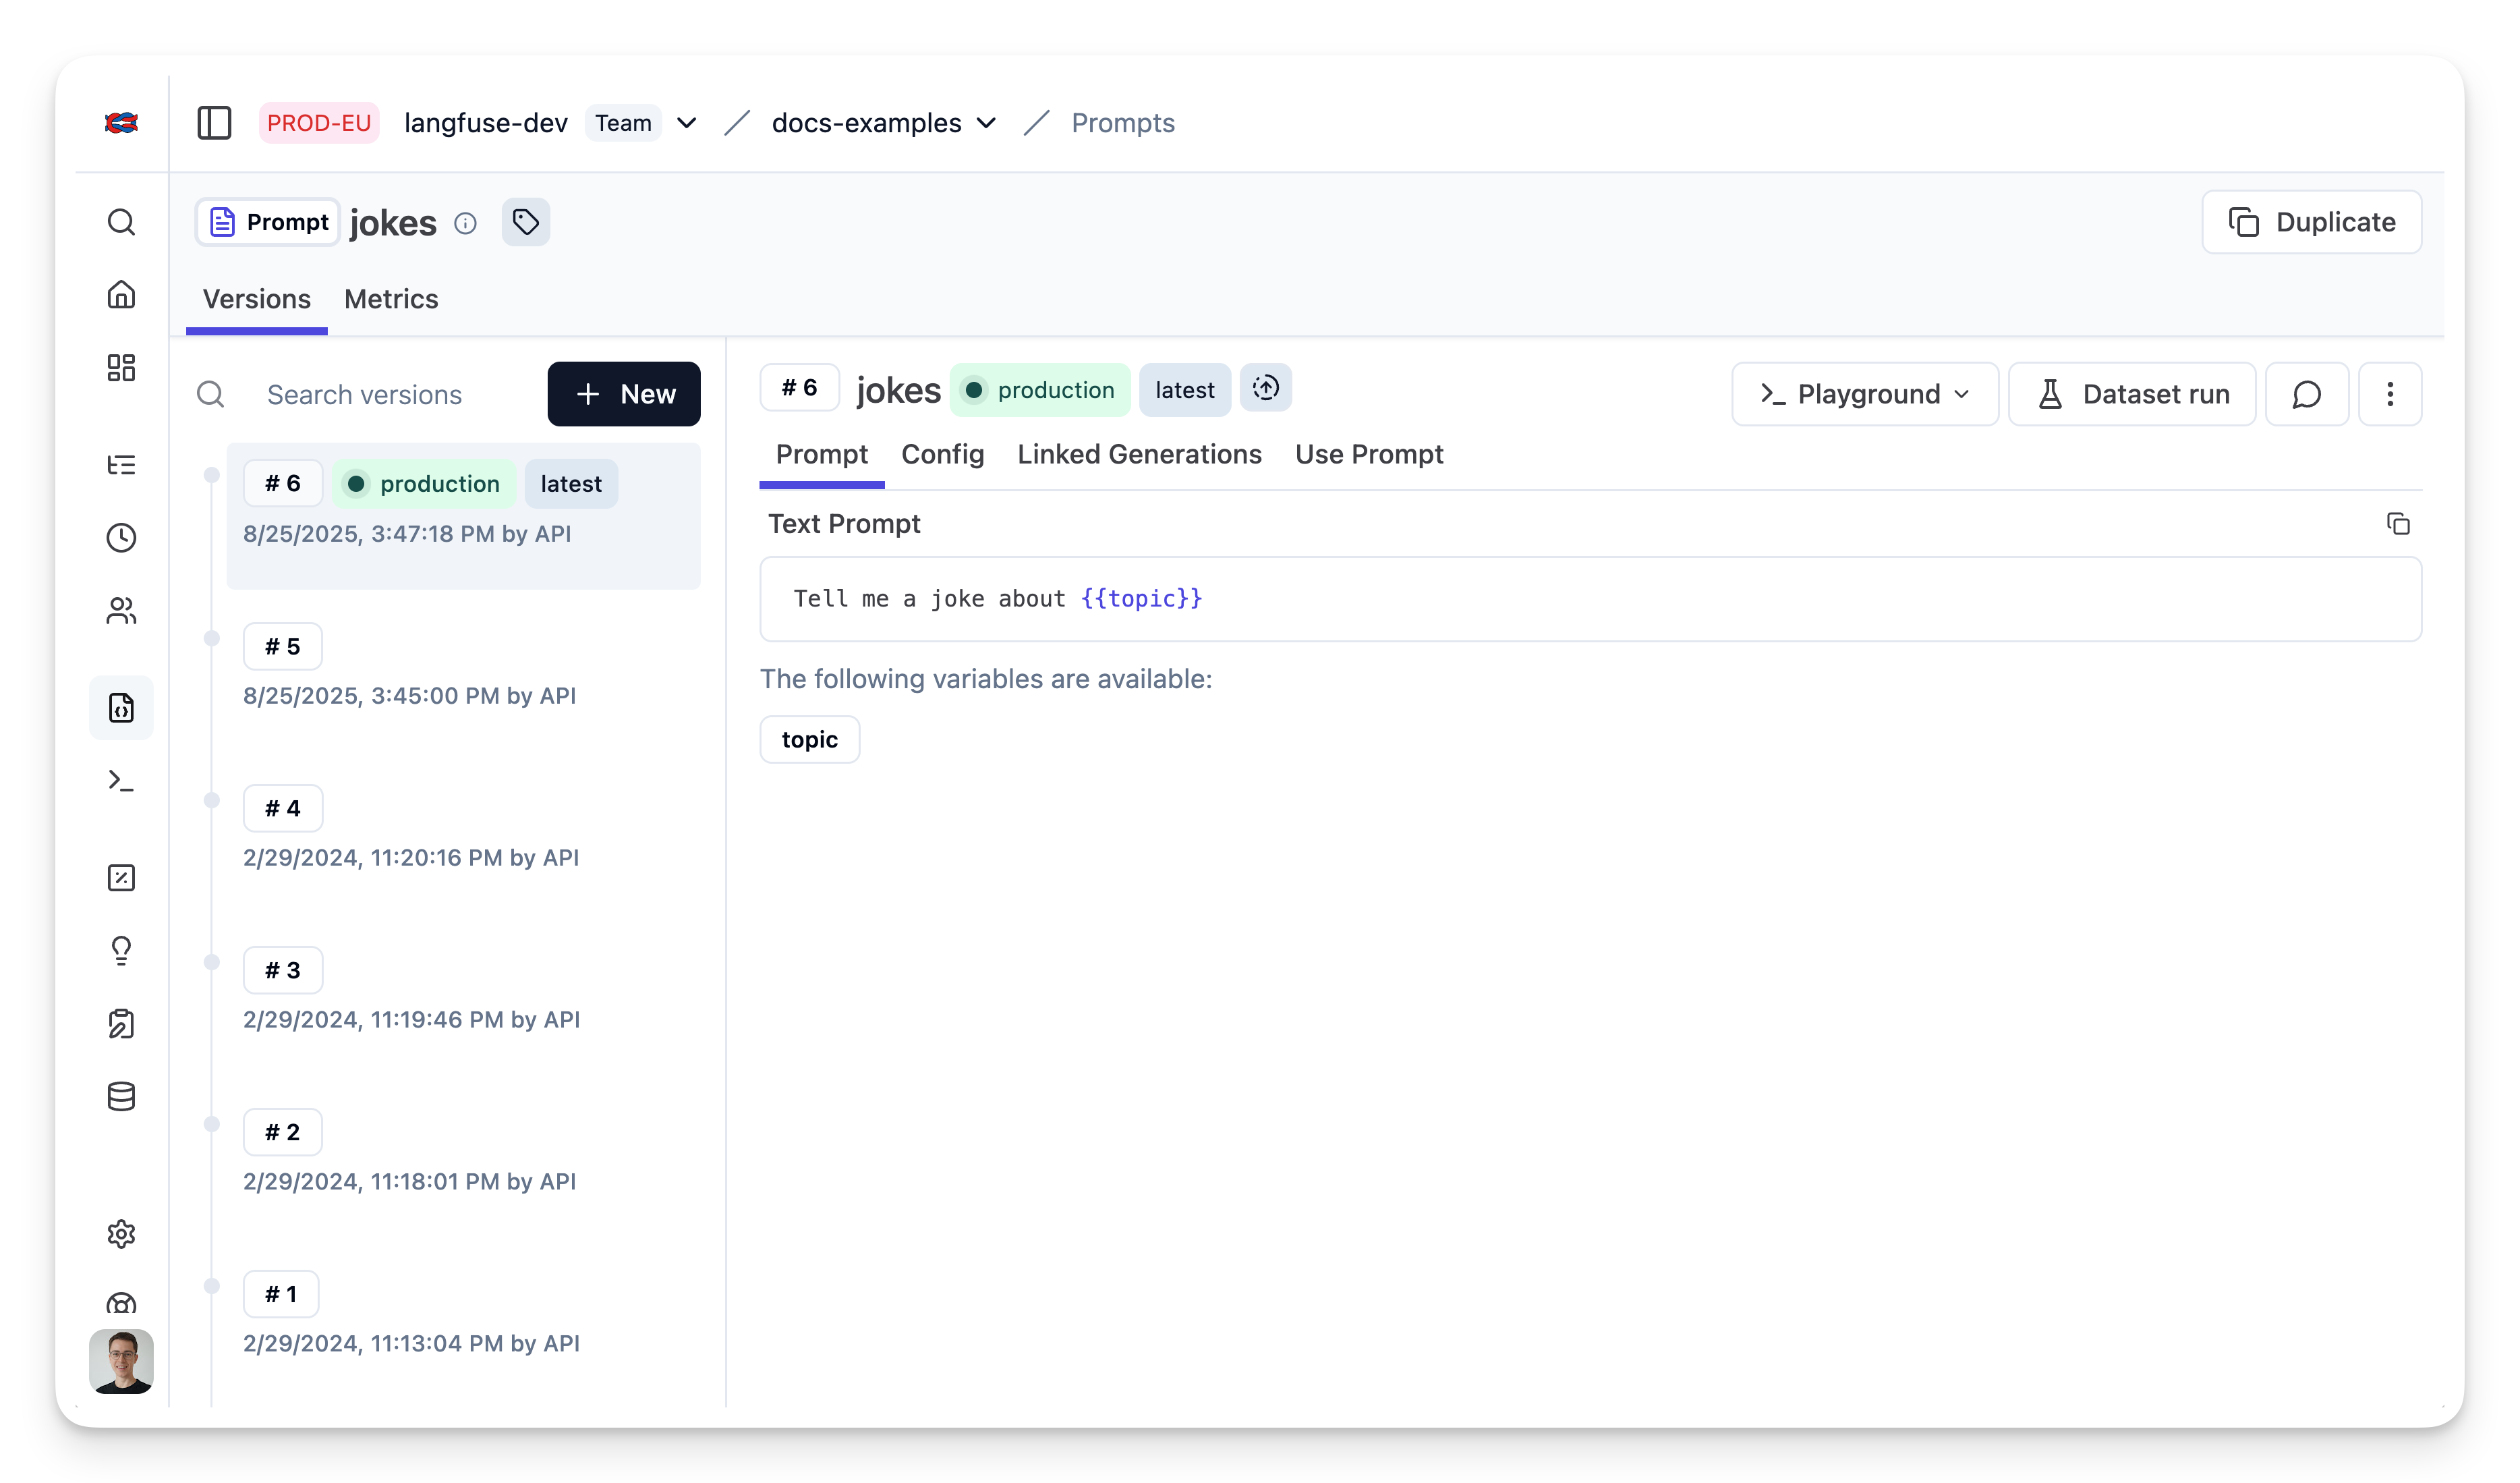
运行示例
从 Litefuse 获取当前 prompt 版本
// Get current `production` version
const prompt = await langfuse.prompt.get("jokes");
该 prompt 包含 prompt 字符串
prompt.prompt以及 config 对象
prompt.config将 prompt 转换为 Langchain PromptTemplate
使用工具方法 .getLangchainPrompt() 将 Litefuse 的 prompt 转换为 Langchain 可用的字符串。
背景:Litefuse 在 prompt 模板中使用双花括号声明输入变量({{input variable}})。Langchain 的 PromptTemplate 则使用单花括号声明输入变量({input variable})。工具方法 .getLangchainPrompt() 会把双花括号替换为单花括号。
同时,将 Litefuse 的 prompt 作为 metadata 传给 PromptTemplate,可以自动将使用该 prompt 的 generation 关联起来。
import { PromptTemplate } from "npm:@langchain/core/prompts"

const langfuseTextPrompt = await langfuse.prompt.get("jokes"); // Fetch a previously created text prompt

// Pass the langfuseTextPrompt to the PromptTemplate as metadata to link it to generations that use it
const langchainTextPrompt = PromptTemplate.fromTemplate(
  langfuseTextPrompt.getLangchainPrompt()
).withConfig({
  metadata: { langfusePrompt: langfuseTextPrompt },
});
为 Langchain JS 配置 Litefuse Tracing
执行此 chain 时我们会使用原生的 Litefuse Tracing for Langchain JS。这一步完全可选,且可与 Prompt 管理独立使用。
import { CallbackHandler } from "npm:@langfuse/langchain";

// 1. Initialize the Langfuse callback handler
const langfuseHandler = new CallbackHandler({
  sessionId: "user-session-123",
  userId: "user-abc",
  tags: ["langchain-test"],
});
创建 chain
我们使用存储在 prompt.config 中的 modelName 与 temperature。
import { ChatOpenAI } from "npm:@langchain/openai"
import { RunnableSequence } from "npm:@langchain/core/runnables";

const model = new ChatOpenAI({
    modelName: prompt.config.model,
    temperature: prompt.config.temperature
});
const chain = RunnableSequence.from([promptTemplate, model]);
调用 chain
const res = await chain.invoke(
{ topic: "developers" },
{ callbacks: [langfuseHandler] }
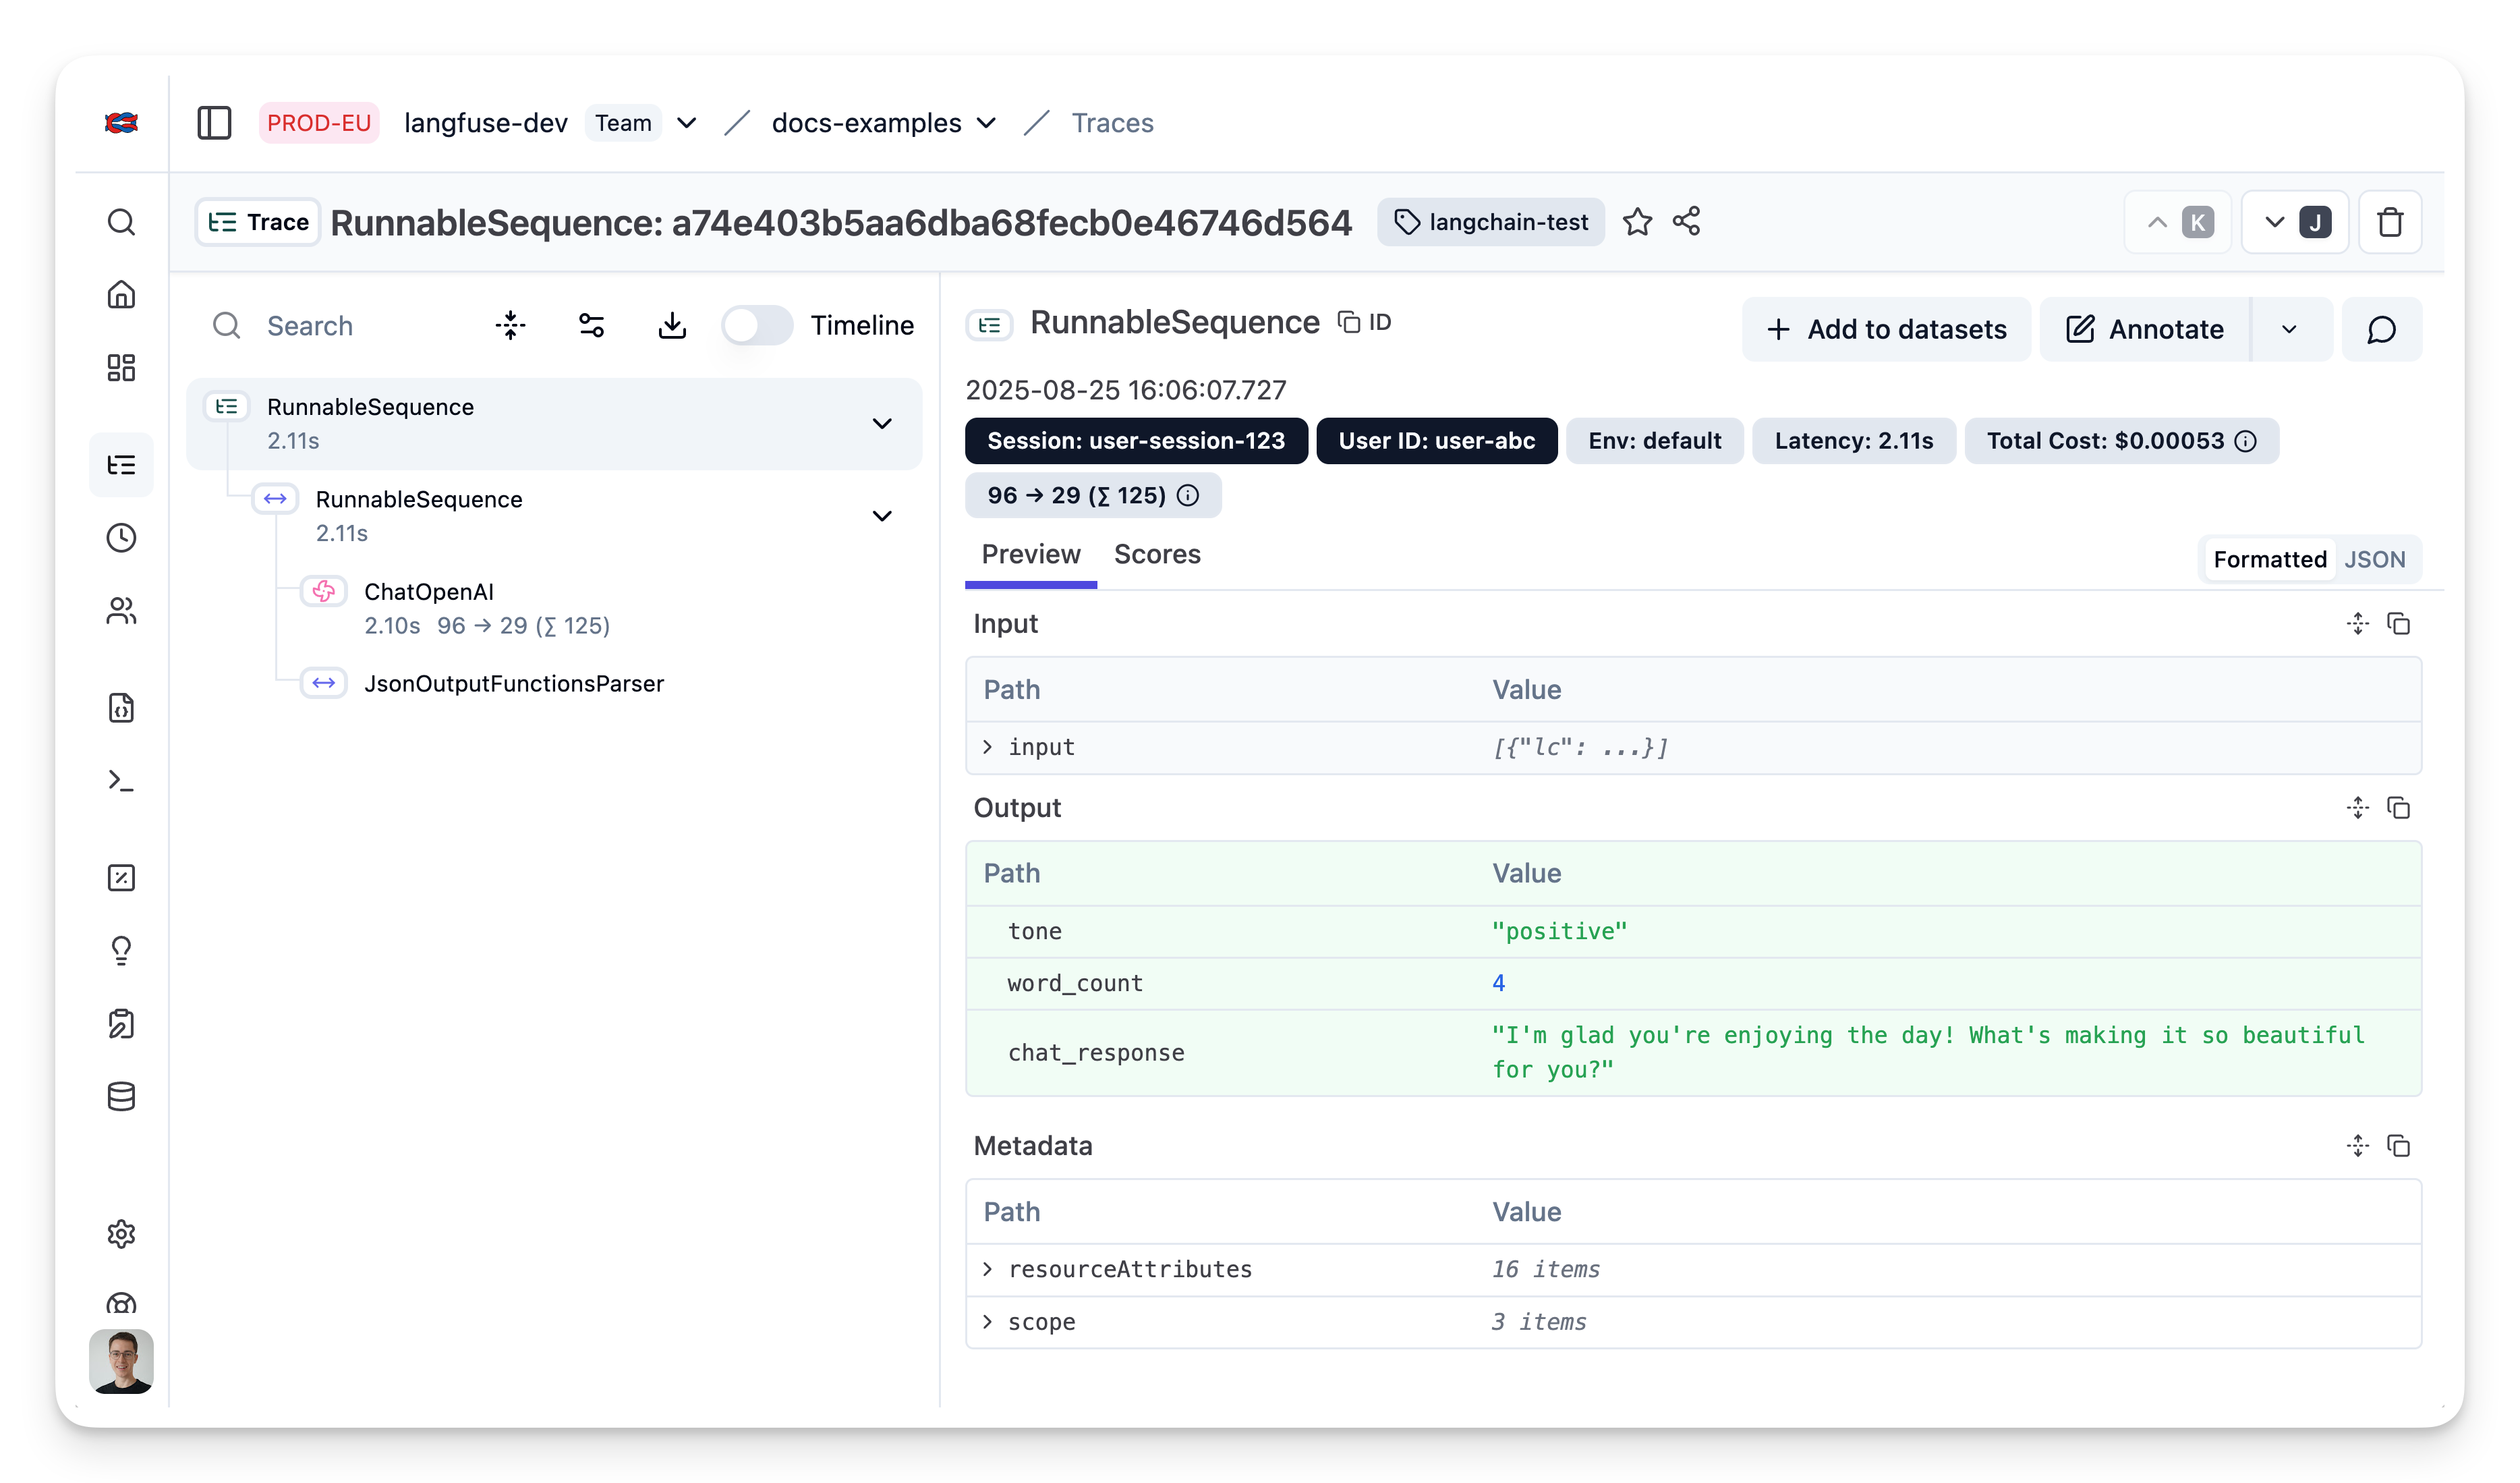
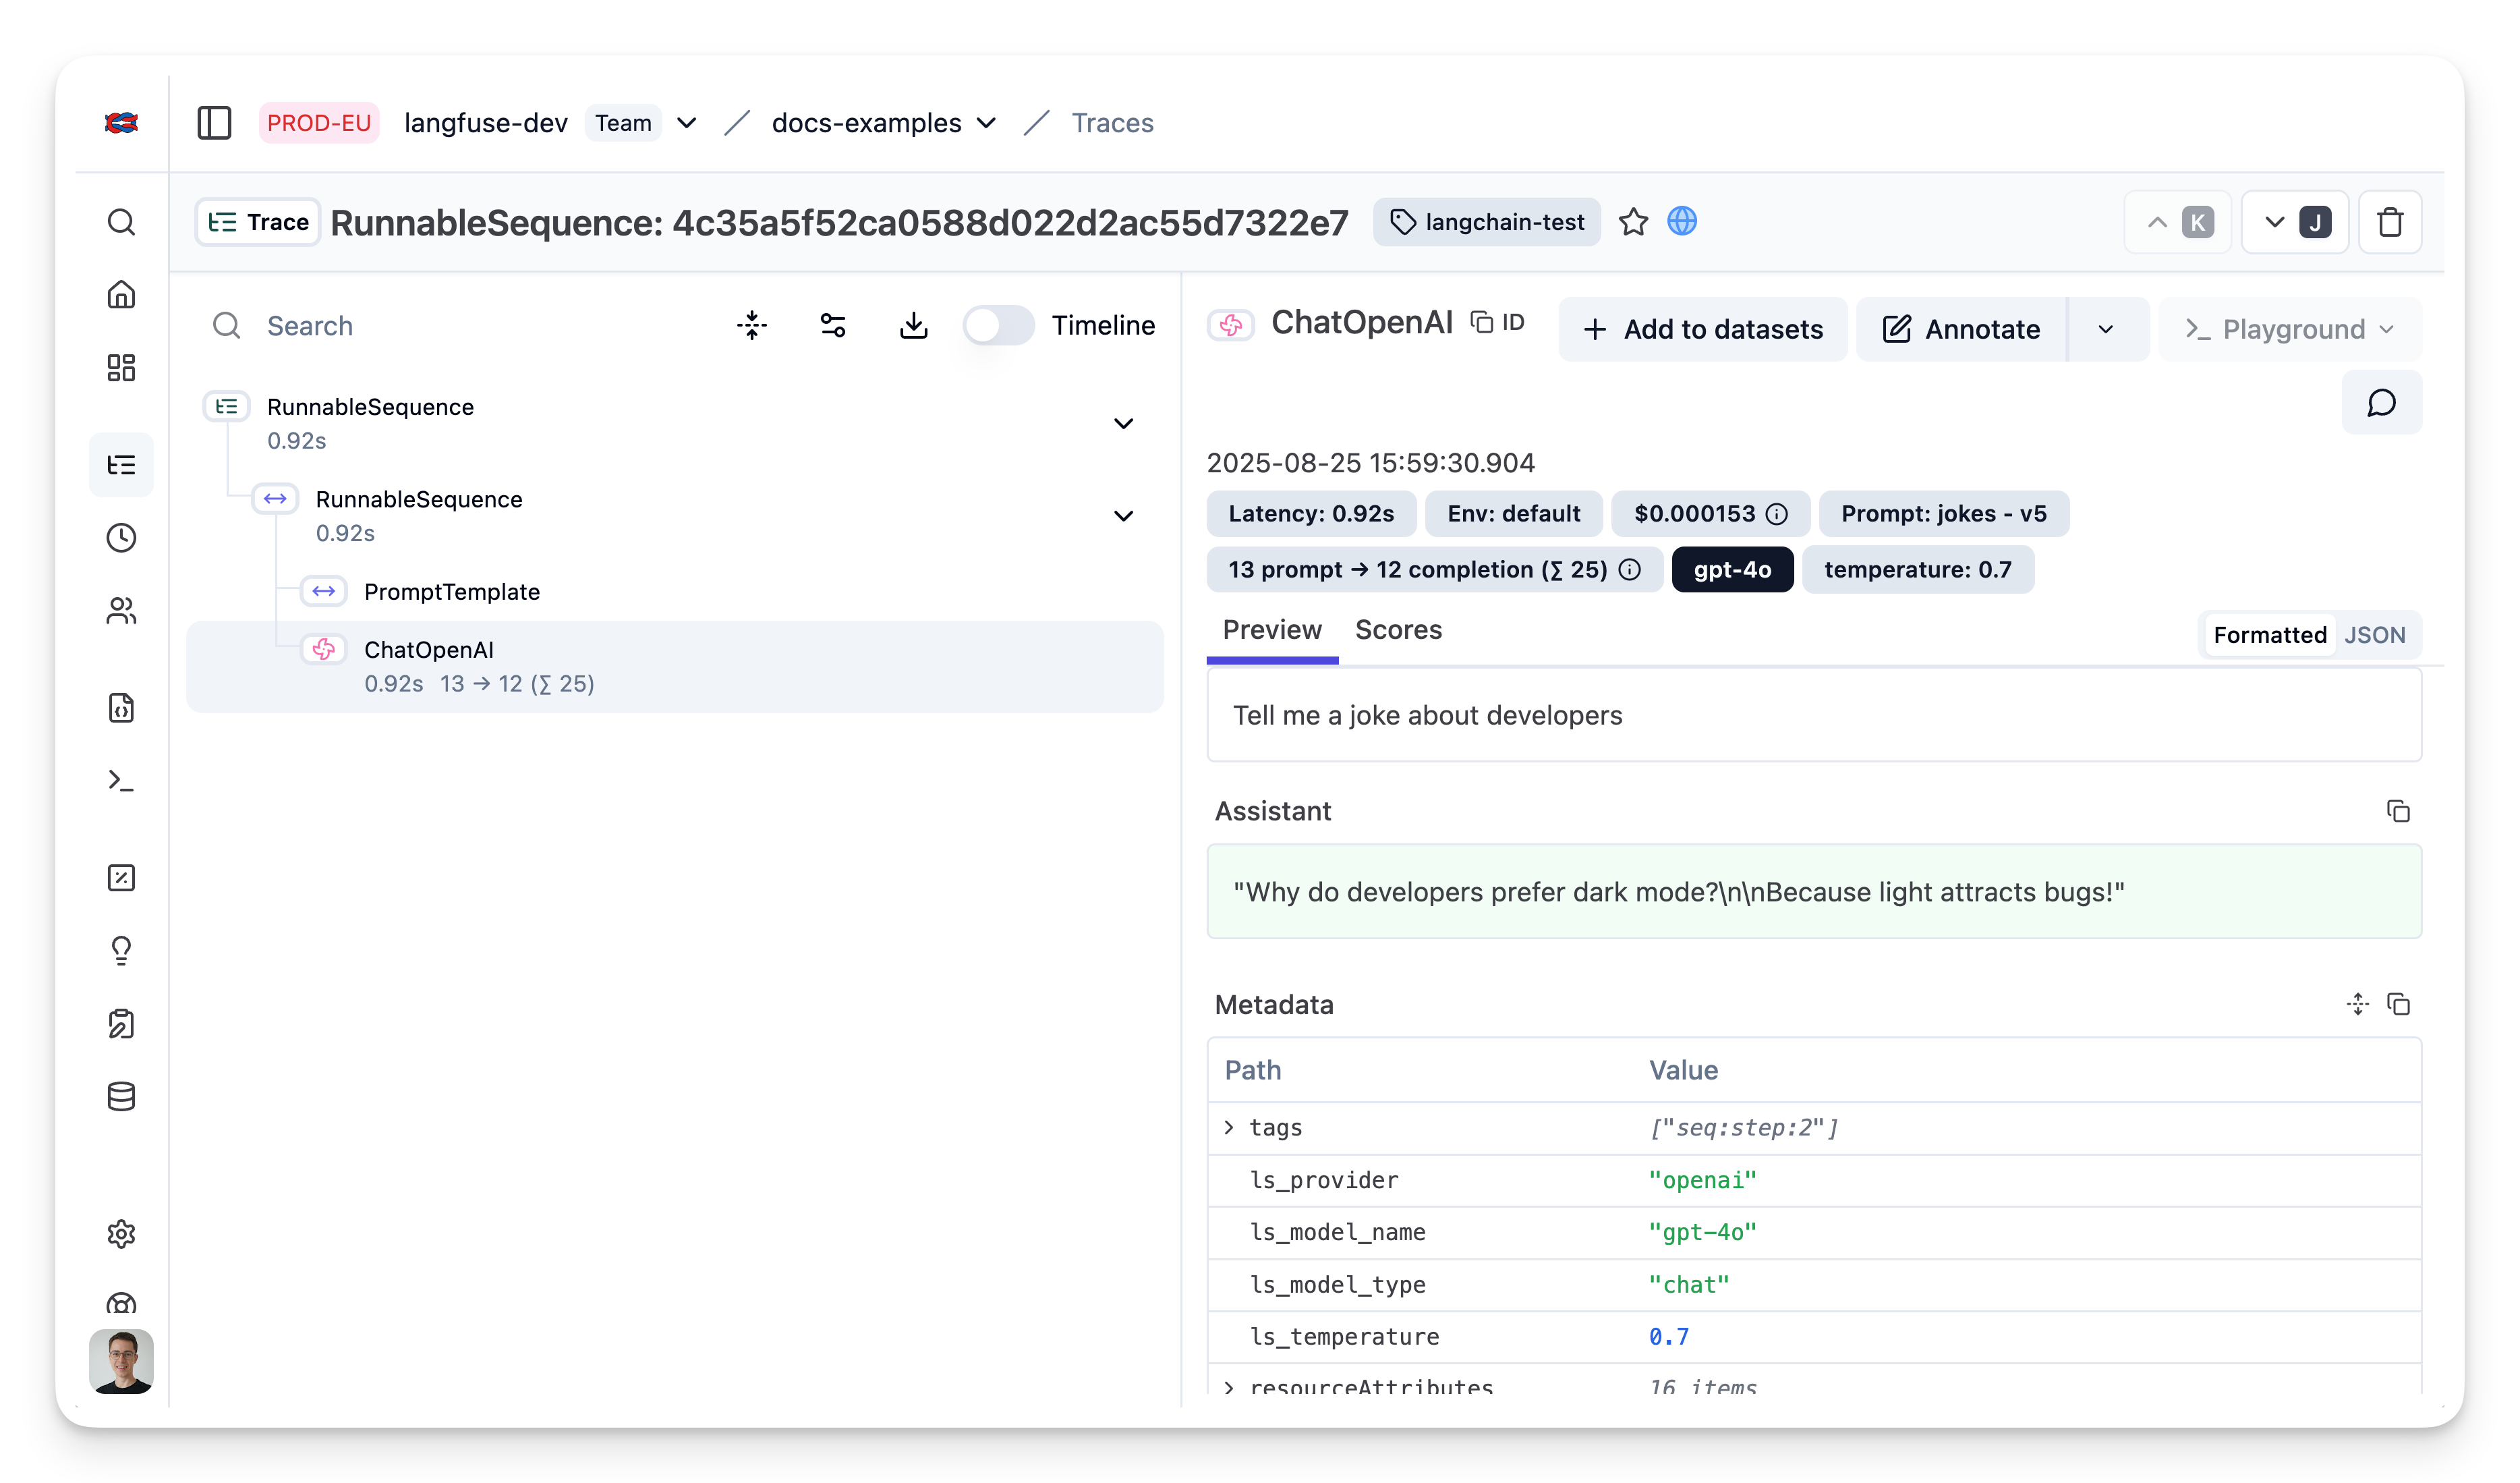
);在 Litefuse 中查看 trace
由于我们传入了 litefuse callback handler,可以在 Litefuse 中查看本次执行的 trace。
示例 1:OpenAI 函数调用与 JsonOutputFunctionsParser
向 Litefuse 添加 prompt
await langfuse.prompt.create({
    name: "extractor",
    prompt: "Extracts fields from the input.",
    config: {
      modelName: "gpt-4o",
      temperature: 0,
      schema: {
        type: "object",
        properties: {
          tone: {
            type: "string",
            enum: ["positive", "negative"],
            description: "The overall tone of the input",
          },
          word_count: {
            type: "number",
            description: "The number of words in the input",
          },
          chat_response: {
            type: "string",
            description: "A response to the human's input",
          },
        },
        required: ["tone", "word_count", "chat_response"],
      }
    }, // optionally, add configs (e.g. model parameters or model tools)
    labels: ["production"] // directly promote to production
});
Litefuse 中的 prompt
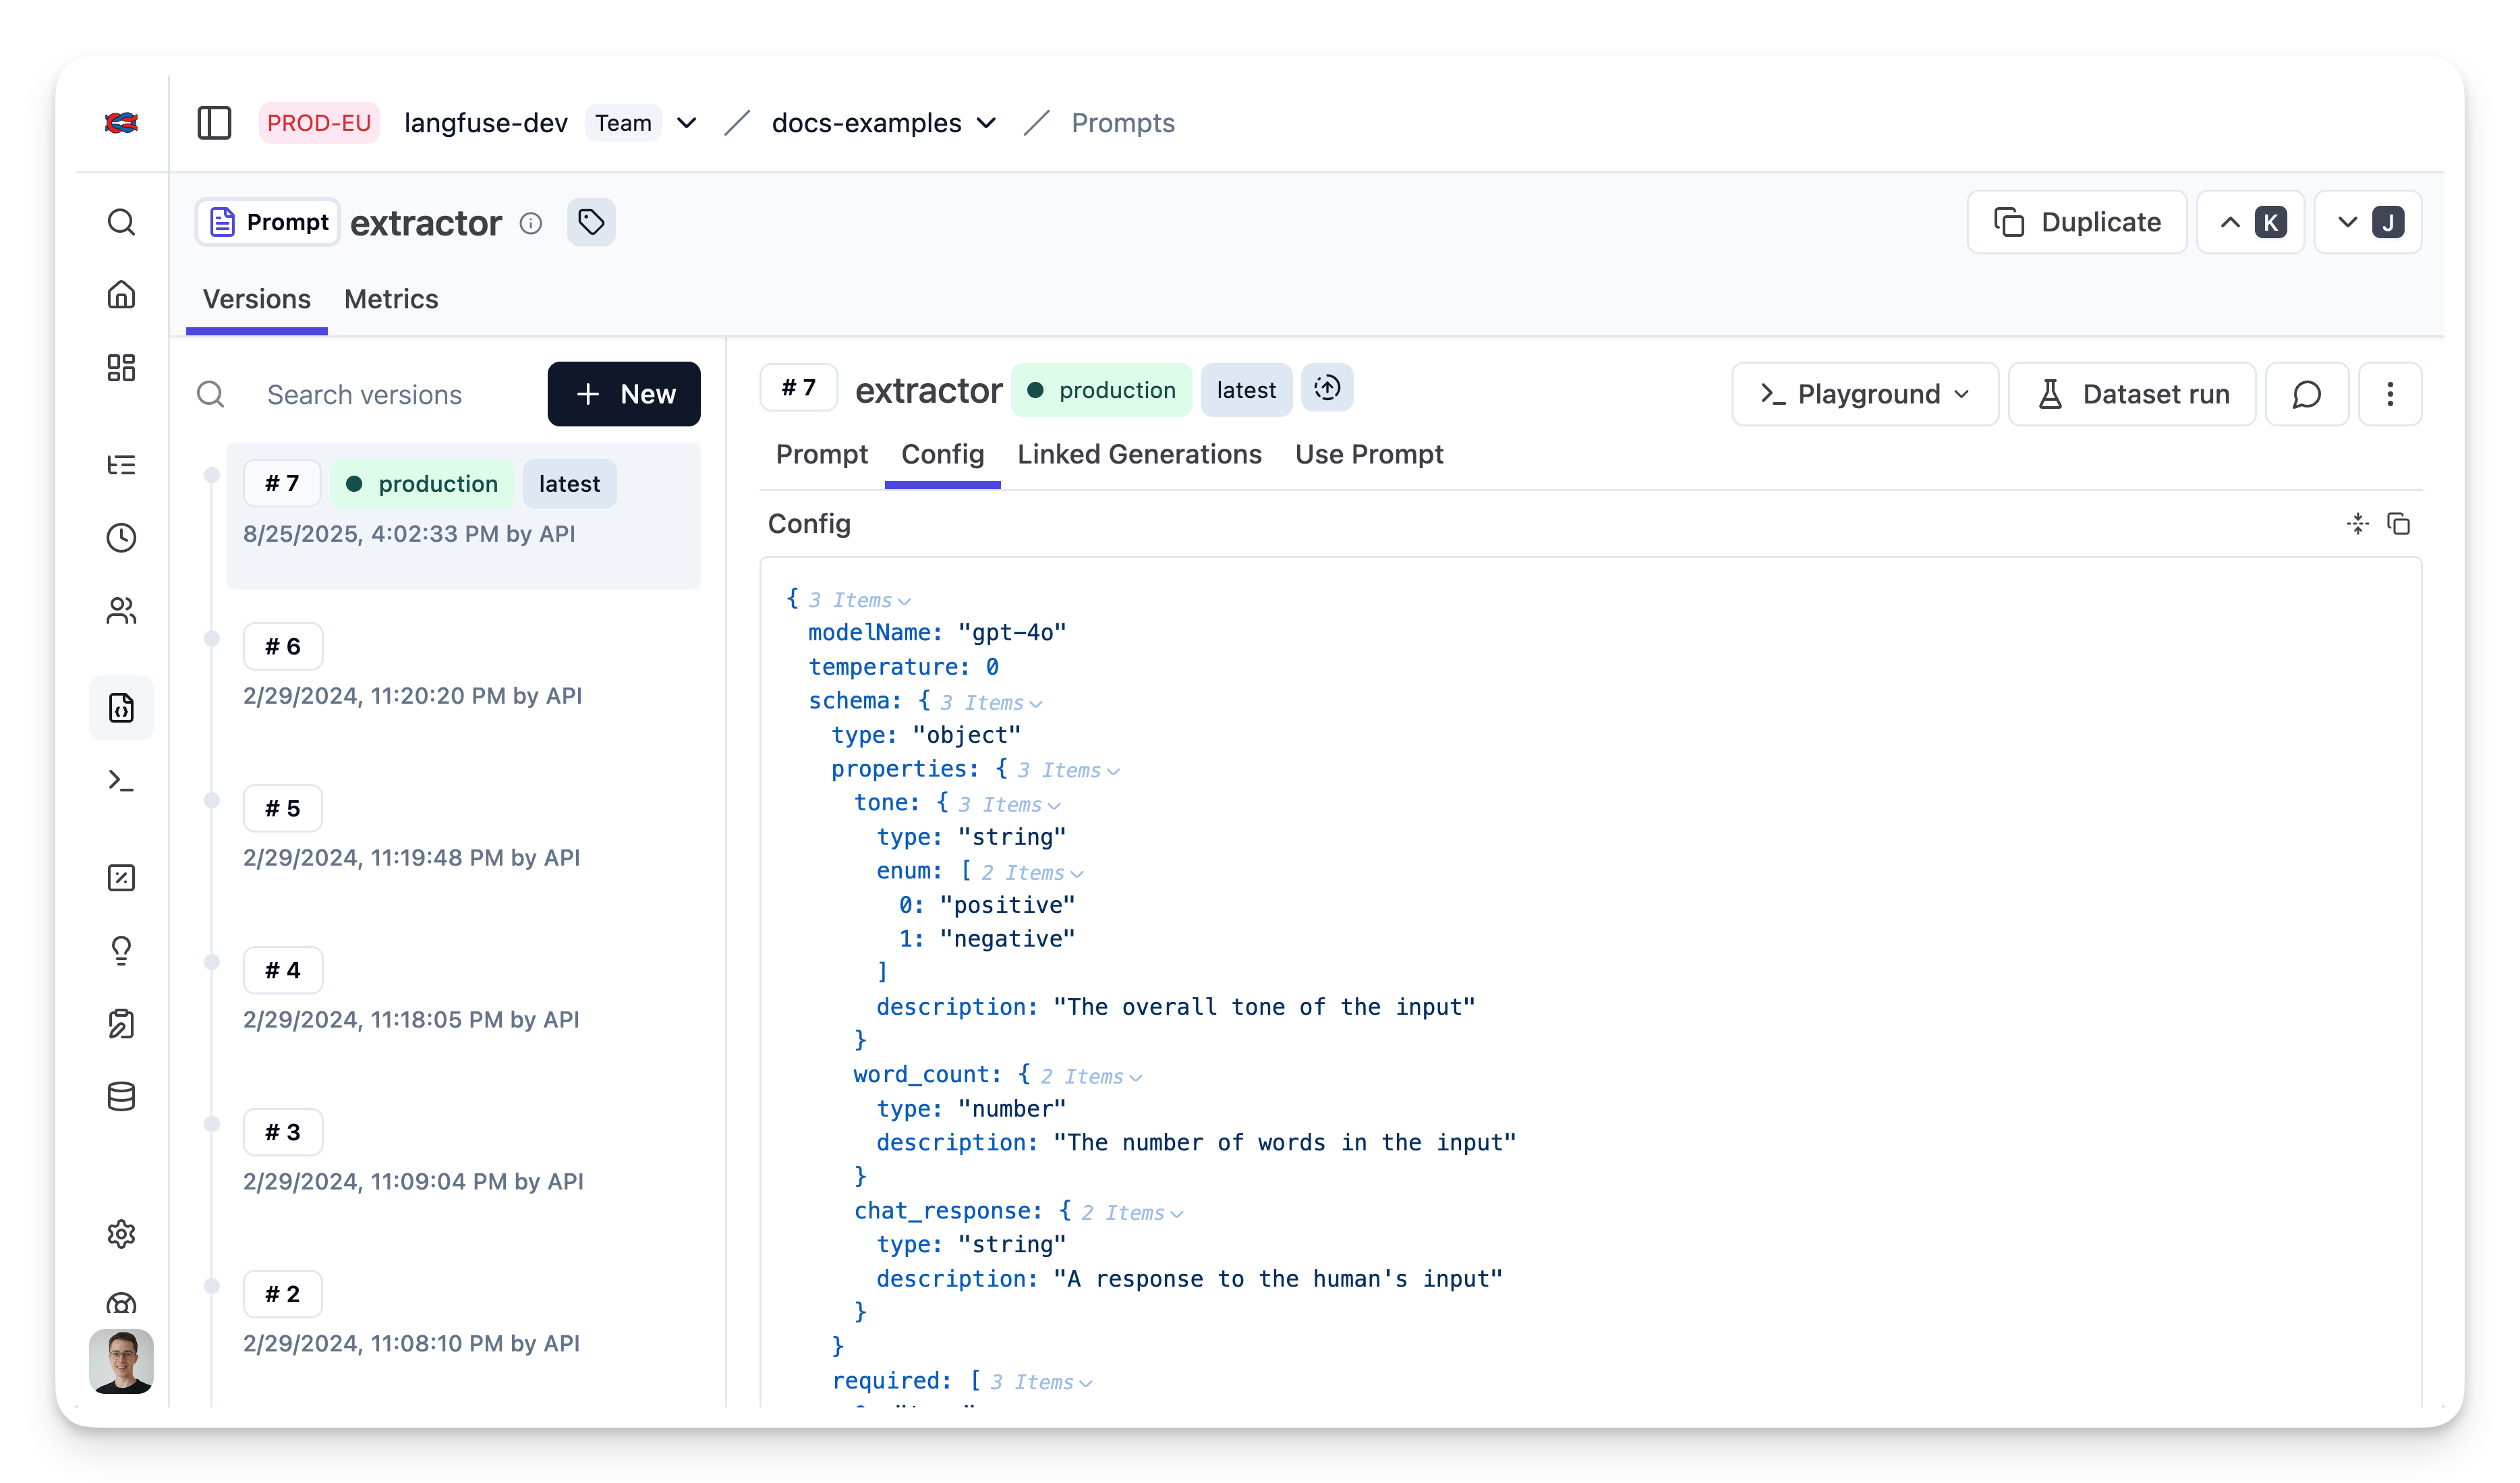
获取 prompt
const extractorPrompt = await langfuse.prompt.get("extractor")转换为 schema
const extractionFunctionSchema = {
    name: "extractor",
    description: extractorPrompt.prompt,
    parameters: extractorPrompt.config.schema,
}
构建 chain
import { ChatOpenAI } from "npm:@langchain/openai";
import { JsonOutputFunctionsParser } from "npm:langchain/output_parsers";

// Instantiate the parser
const parser = new JsonOutputFunctionsParser();

// Instantiate the ChatOpenAI class
const model = new ChatOpenAI({
    modelName: extractorPrompt.config.modelName,
    temperature: extractorPrompt.config.temperature
});

// Create a new runnable, bind the function to the model, and pipe the output through the parser
const runnable = model
  .bind({
    functions: [extractionFunctionSchema],
    function_call: { name: "extractor" },
  })
  .pipe(parser);
调用 chain
import { HumanMessage } from "npm:@langchain/core/messages";

// Invoke the runnable with an input
const result = await runnable.invoke(
    [new HumanMessage("What a beautiful day!")],
    { callbacks: [langfuseHandler] }
);
在 Litefuse 中查看 trace