Cookbook:LangGraph 集成
什么是 LangGraph?
LangGraph 是 LangChain 团队推出的开源框架,用于使用大语言模型(LLM)构建复杂的、有状态的多 agent 应用。LangGraph 内置了持久化能力,可以保存和恢复状态,从而支持错误恢复和 human-in-the-loop 工作流。
本 Cookbook 的目标
本 cookbook 演示了 Litefuse 如何通过 LangChain 集成 帮助你调试、分析并迭代 LangGraph 应用。
读完本 cookbook 后,你将能够:
- 通过 Litefuse 集成自动 trace LangGraph 应用
- 监控更复杂的多 agent 场景
- 添加 score(例如用户反馈)
- 使用 Litefuse 管理 LangGraph 中用到的 prompt
初始化 Litefuse
使用 Litefuse UI 中项目设置里的 API key 初始化 Langfuse 客户端,并将其加入环境变量。
注意: 你至少需要使用 Python 3.11(GitHub Issue)。
%pip install langfuse langchain langgraph langchain_openai langchain_communityimport os
# Get keys for your project from the project settings page: https://litefuse.cloud
os.environ["LANGFUSE_PUBLIC_KEY"] = "pk-lf-..."
os.environ["LANGFUSE_SECRET_KEY"] = "sk-lf-..."
os.environ["LANGFUSE_BASE_URL"] = "https://litefuse.cloud"
# Your openai key
os.environ["OPENAI_API_KEY"] = "sk-proj-..."设置好环境变量后,就可以初始化 Langfuse 客户端了。get_client() 会使用环境变量中的凭据来初始化 Langfuse 客户端。
from langfuse import get_client

langfuse = get_client()

# Verify connection
if langfuse.auth_check():
    print("Langfuse client is authenticated and ready!")
else:
    print("Authentication failed. Please check your credentials and host.")
示例 1:基于 LangGraph 的简单聊天应用
本节我们将做的事:
- 在 LangGraph 中构建一个能回答常见问题的客服聊天机器人
- 使用 Litefuse trace 这个机器人的输入和输出
我们先从一个简单的聊天机器人开始,下一节再构建更复杂的多 agent 设置,过程中逐步介绍 LangGraph 的核心概念。
创建 Agent
先创建一个 StateGraph。StateGraph 对象把我们的聊天机器人结构定义成一个状态机。我们会通过添加 node 来表示 LLM 和机器人可调用的函数,并通过添加 edge 来描述机器人在这些函数之间如何转移。
from typing import Annotated

from langchain_openai import ChatOpenAI
from langchain_core.messages import HumanMessage
from typing_extensions import TypedDict

from langgraph.graph import StateGraph
from langgraph.graph.message import add_messages

class State(TypedDict):
    # Messages have the type "list". The `add_messages` function in the annotation defines how this state key should be updated
    # (in this case, it appends messages to the list, rather than overwriting them)
    messages: Annotated[list, add_messages]

graph_builder = StateGraph(State)

llm = ChatOpenAI(model = "gpt-4o", temperature = 0.2)

# The chatbot node function takes the current State as input and returns an updated messages list. This is the basic pattern for all LangGraph node functions.
def chatbot(state: State):
    return {"messages": [llm.invoke(state["messages"])]}

# Add a "chatbot" node. Nodes represent units of work. They are typically regular python functions.
graph_builder.add_node("chatbot", chatbot)

# Add an entry point. This tells our graph where to start its work each time we run it.
graph_builder.set_entry_point("chatbot")

# Set a finish point. This instructs the graph "any time this node is run, you can exit."
graph_builder.set_finish_point("chatbot")

# To be able to run our graph, call "compile()" on the graph builder. This creates a "CompiledGraph" we can use invoke on our state.
graph = graph_builder.compile()
把 Litefuse 作为 callback 加到调用中
现在我们把 Litefuse 的 LangChain callback handler 加进去,用来 trace 应用的执行步骤:config={"callbacks": [langfuse_handler]}
from langfuse.langchain import CallbackHandler

# Initialize Langfuse CallbackHandler for Langchain (tracing)
langfuse_handler = CallbackHandler()

for s in graph.stream({"messages": [HumanMessage(content = "What is Litefuse?")]},
                      config={"callbacks": [langfuse_handler]}):
    print(s)
在 Litefuse 中查看 trace
Litefuse 中的示例 trace:https://litefuse.cloud/project/cloramnkj0002jz088vzn1ja4/traces/85b0c53c4414f22ed8bfc9eb35f917c4
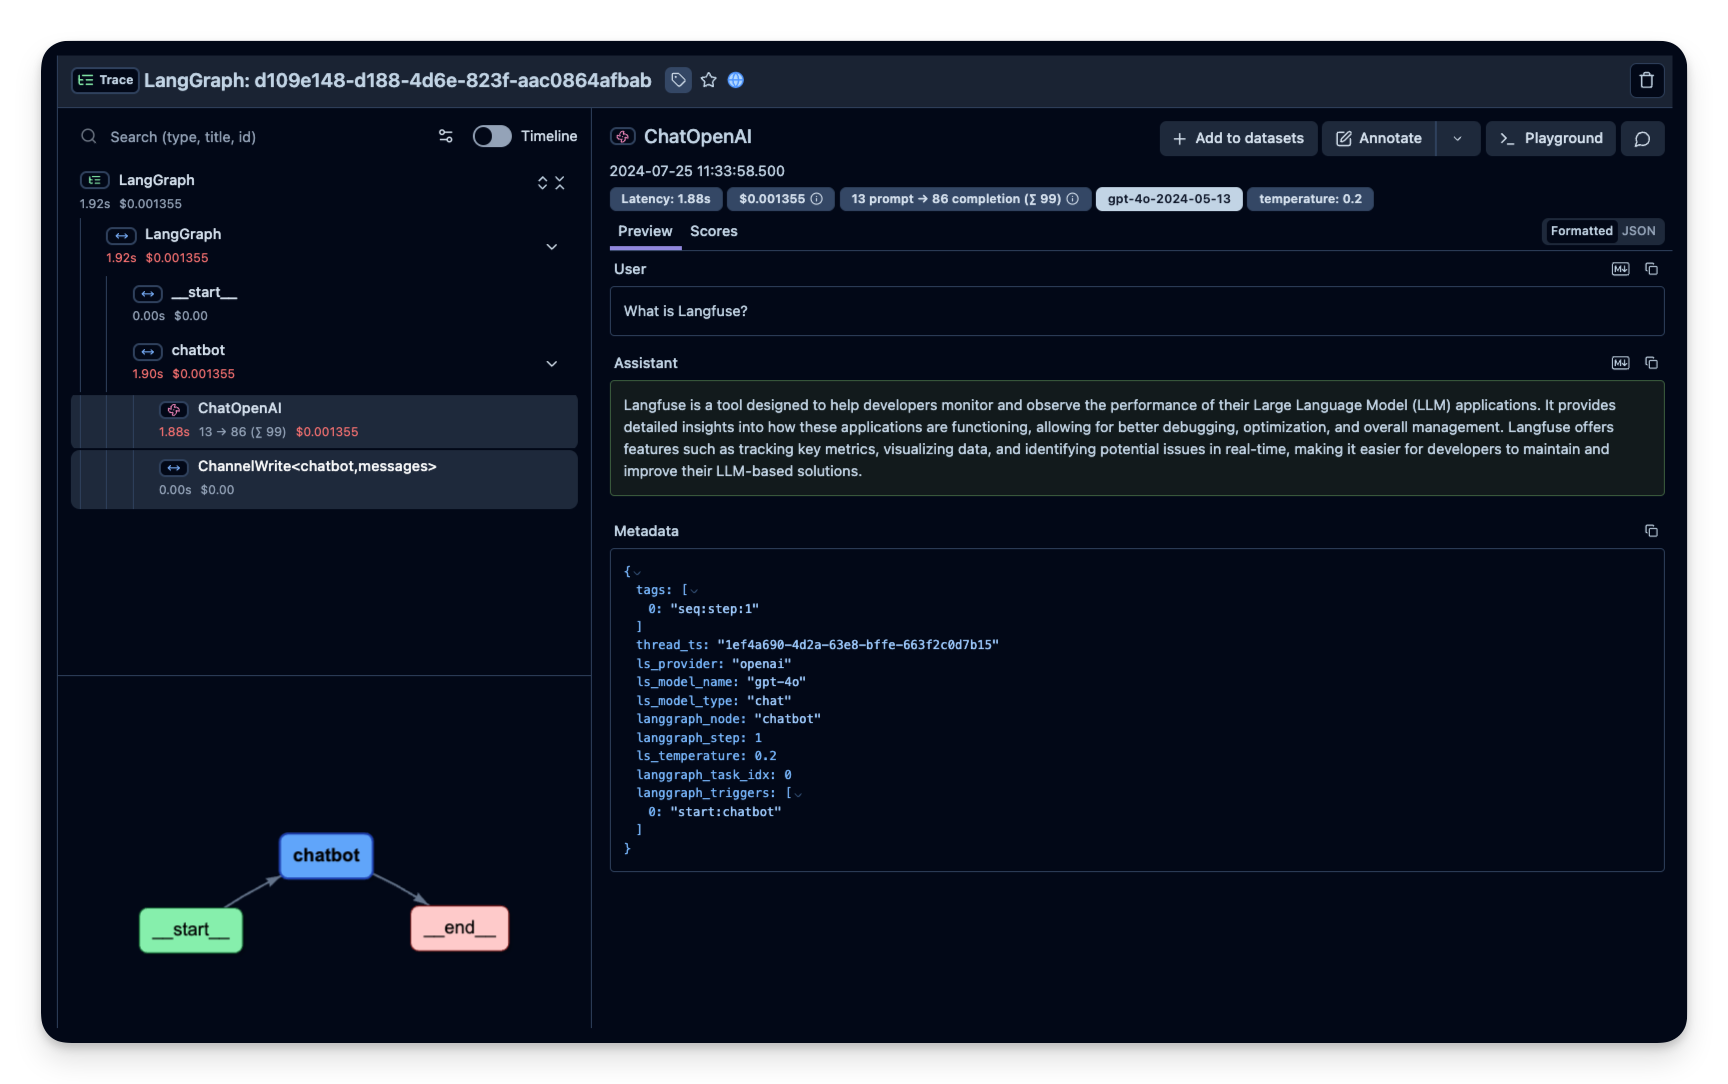
可视化聊天应用
你可以通过 get_graph 方法配合一个 “draw” 方法把图可视化出来。
from IPython.display import Image, display
display(Image(graph.get_graph().draw_mermaid_png()))
在 LangGraph Server 中使用 Litefuse
使用 LangGraph Server 时,你也可以把 Litefuse 加为 callback。
使用 LangGraph Server 时,调用 graph 是由 server 自动完成的,因此你应当在声明 graph 的时候就把 Litefuse callback 加上。
from typing import Annotated

from langchain_openai import ChatOpenAI
from typing_extensions import TypedDict

from langgraph.graph import StateGraph
from langgraph.graph.message import add_messages

from langfuse.langchain import CallbackHandler

class State(TypedDict):
  messages: Annotated[list, add_messages]

graph_builder = StateGraph(State)

llm = ChatOpenAI(model = "gpt-4o", temperature = 0.2)

def chatbot(state: State):
  return {"messages": [llm.invoke(state["messages"])]}

graph_builder.add_node("chatbot", chatbot)
graph_builder.set_entry_point("chatbot")
graph_builder.set_finish_point("chatbot")

# Initialize Langfuse CallbackHandler for Langchain (tracing)
langfuse_handler = CallbackHandler()

# Call "with_config" from the compiled graph.
# It returns a "CompiledGraph", similar to "compile", but with callbacks included.
# This enables automatic graph tracing without needing to add callbacks manually every time.
graph = graph_builder.compile().with_config({"callbacks": [langfuse_handler]})
示例 2:基于 LangGraph 的多 agent 应用
本节我们将做的事:
- 构建两个执行 agent:一个研究 agent,使用 LangChain 的 WikipediaAPIWrapper 搜索维基百科;另一个使用自定义工具获取当前时间。
- 构建一个 agent supervisor,把用户问题分派给这两个 agent 之一。
- 把 Litefuse handler 作为 callback 添加进来,trace supervisor 和各执行 agent 的步骤。
%pip install langfuse langgraph langchain langchain_openai langchain_experimental pandas wikipedia创建工具
在这个示例里,你将构建一个用于查询维基百科的 agent 和一个用于告诉你当前时间的 agent。下面定义它们将使用的工具:
from typing import Annotated

from langchain_community.tools import WikipediaQueryRun
from langchain_community.utilities import WikipediaAPIWrapper
from datetime import datetime
from langchain.tools import Tool

# Define a tools that searches Wikipedia
wikipedia_tool = WikipediaQueryRun(api_wrapper=WikipediaAPIWrapper())

# Define a new tool that returns the current datetime
datetime_tool = Tool(
    name="Datetime",
    func = lambda x: datetime.now().isoformat(),
    description="Returns the current datetime",
)
工具函数
下面定义一个工具函数,方便添加新的 agent worker node。
from langchain.agents import AgentExecutor, create_openai_tools_agent
from langchain_core.messages import BaseMessage, HumanMessage
from langchain_openai import ChatOpenAI

def create_agent(llm: ChatOpenAI, system_prompt: str, tools: list):
    # Each worker node will be given a name and some tools.
    prompt = ChatPromptTemplate.from_messages(
        [
            (
                "system",
                system_prompt,
            ),
            MessagesPlaceholder(variable_name="messages"),
            MessagesPlaceholder(variable_name="agent_scratchpad"),
        ]
    )
    agent = create_openai_tools_agent(llm, tools, prompt)
    executor = AgentExecutor(agent=agent, tools=tools)
    return executor

def agent_node(state, agent, name):
    result = agent.invoke(state)
    return {"messages": [HumanMessage(content=result["output"], name=name)]}
创建 agent supervisor
它会通过 function calling 选择下一个要执行的 worker node,或者结束处理。
from langchain_core.output_parsers.openai_functions import JsonOutputFunctionsParser
from langchain_core.prompts import ChatPromptTemplate, MessagesPlaceholder

members = ["Researcher", "CurrentTime"]
system_prompt = (
    "You are a supervisor tasked with managing a conversation between the"
    " following workers:  {members}. Given the following user request,"
    " respond with the worker to act next. Each worker will perform a"
    " task and respond with their results and status. When finished,"
    " respond with FINISH."
)
# Our team supervisor is an LLM node. It just picks the next agent to process and decides when the work is completed
options = ["FINISH"] + members

# Using openai function calling can make output parsing easier for us
function_def = {
    "name": "route",
    "description": "Select the next role.",
    "parameters": {
        "title": "routeSchema",
        "type": "object",
        "properties": {
            "next": {
                "title": "Next",
                "anyOf": [
                    {"enum": options},
                ],
            }
        },
        "required": ["next"],
    },
}

# Create the prompt using ChatPromptTemplate
prompt = ChatPromptTemplate.from_messages(
    [
        ("system", system_prompt),
        MessagesPlaceholder(variable_name="messages"),
        (
            "system",
            "Given the conversation above, who should act next?"
            " Or should we FINISH? Select one of: {options}",
        ),
    ]
).partial(options=str(options), members=", ".join(members))

llm = ChatOpenAI(model="gpt-4o")

# Construction of the chain for the supervisor agent
supervisor_chain = (
    prompt
    | llm.bind_functions(functions=[function_def], function_call="route")
    | JsonOutputFunctionsParser()
)
构建 graph
现在我们准备开始构建 graph。下面利用刚才定义的函数来定义状态和各个 worker node,然后把图中所有的 edge 连接起来。
import functools
import operator
from typing import Sequence, TypedDict
from langchain_core.prompts import ChatPromptTemplate, MessagesPlaceholder
from langgraph.graph import END, StateGraph, START

# The agent state is the input to each node in the graph
class AgentState(TypedDict):
    # The annotation tells the graph that new messages will always be added to the current states
    messages: Annotated[Sequence[BaseMessage], operator.add]
    # The 'next' field indicates where to route to next
    next: str

# Add the research agent using the create_agent helper function
research_agent = create_agent(llm, "You are a web researcher.", [wikipedia_tool])
research_node = functools.partial(agent_node, agent=research_agent, name="Researcher")

# Add the time agent using the create_agent helper function
currenttime_agent = create_agent(llm, "You can tell the current time at", [datetime_tool])
currenttime_node = functools.partial(agent_node, agent=currenttime_agent, name = "CurrentTime")

workflow = StateGraph(AgentState)

# Add a "chatbot" node. Nodes represent units of work. They are typically regular python functions.
workflow.add_node("Researcher", research_node)
workflow.add_node("CurrentTime", currenttime_node)
workflow.add_node("supervisor", supervisor_chain)

# We want our workers to ALWAYS "report back" to the supervisor when done
for member in members:
    workflow.add_edge(member, "supervisor")

# Conditional edges usually contain "if" statements to route to different nodes depending on the current graph state.
# These functions receive the current graph state and return a string or list of strings indicating which node(s) to call next.
conditional_map = {k: k for k in members}
conditional_map["FINISH"] = END
workflow.add_conditional_edges("supervisor", lambda x: x["next"], conditional_map)

# Add an entry point. This tells our graph where to start its work each time we run it.
workflow.add_edge(START, "supervisor")

# To be able to run our graph, call "compile()" on the graph builder. This creates a "CompiledGraph" we can use invoke on our state.
graph_2 = workflow.compile()
把 Litefuse 作为 callback 加到调用中
把 Litefuse handler 作为 callback 加进去:config={"callbacks": [langfuse_handler]}
from langfuse.langchain import CallbackHandler

# Initialize Langfuse CallbackHandler for Langchain (tracing)
langfuse_handler = CallbackHandler()

# Add Langfuse handler as callback: config={"callbacks": [langfuse_handler]}
# You can also set an optional 'run_name' that will be used as the trace name in Langfuse
for s in graph_2.stream({"messages": [HumanMessage(content = "How does photosynthesis work?")]},
                      config={"callbacks": [langfuse_handler]}):
    print(s)
    print("----")
# Add Langfuse handler as callback: config={"callbacks": [langfuse_handler]}
for s in graph_2.stream({"messages": [HumanMessage(content = "What time is it?")]},
config={"callbacks": [langfuse_handler]}):
print(s)
print("----")在 Litefuse 中查看 trace
Litefuse 中的示例 trace:
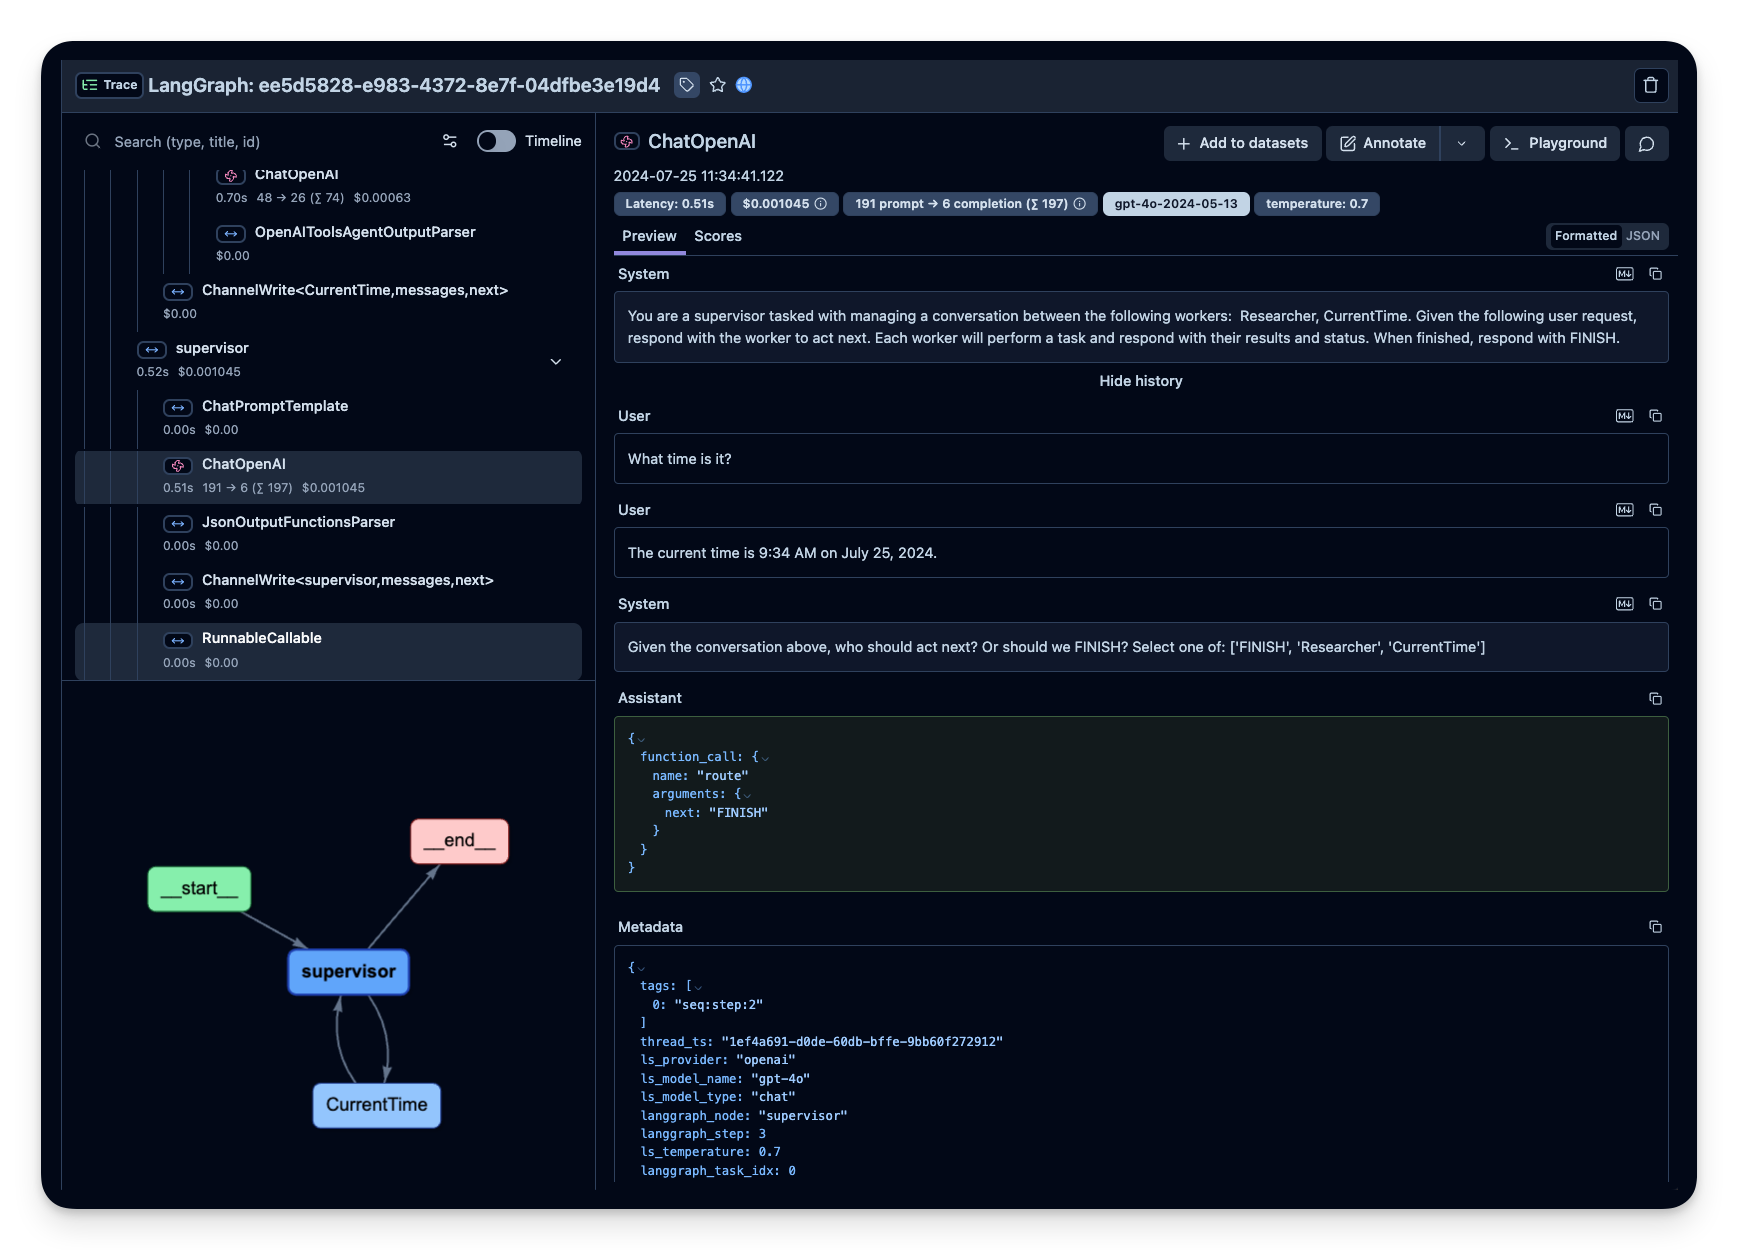
可视化 agent
你可以通过 get_graph 方法配合一个 “draw” 方法把图可视化出来。
from IPython.display import Image, display
display(Image(graph_2.get_graph().draw_mermaid_png()))
多个 LangGraph Agent
有些场景下,一个 LangGraph agent 会调用一个或多个其他的 LangGraph agent。为了把这种多 agent 执行的所有对应 span 合并到同一个 trace 里,我们可以传入一个自定义的 trace_id。
首先,我们生成一个 trace_id,让两个 agent 都使用它,从而把这次执行的多 agent 调用归到 Litefuse 的同一个 trace 中。
from langfuse import get_client, Langfuse
from langfuse.langchain import CallbackHandler

langfuse = get_client()

# Generate deterministic trace ID from external system
predefined_trace_id = Langfuse.create_trace_id()

# Initialize Langfuse CallbackHandler for Langchain (tracing)
langfuse_handler = CallbackHandler()
接下来,搭建子 agent。
from typing import Annotated
from langchain_openai import ChatOpenAI
from langchain_core.messages import HumanMessage
from typing_extensions import TypedDict
from langgraph.graph import StateGraph
from langgraph.graph.message import add_messages

class State(TypedDict):
    messages: Annotated[list, add_messages]

graph_builder = StateGraph(State)

llm = ChatOpenAI(model = "gpt-4o", temperature = 0.2)

def chatbot(state: State):
    return {"messages": [llm.invoke(state["messages"])]}

graph_builder.add_node("chatbot", chatbot)
graph_builder.set_entry_point("chatbot")
graph_builder.set_finish_point("chatbot")
sub_agent = graph_builder.compile()
然后我们定义一个工具,它会调用 research 子 agent 来回答问题。
from langchain_core.tools import tool

@tool
def langgraph_research(question):
  """Conducts research for various topics."""

  with langfuse.start_as_current_observation(
      name="🤖-sub-research-agent",
      trace_context={"trace_id": predefined_trace_id}
  ) as span:
      span.update(input=question)

      response = sub_agent.invoke({"messages": [HumanMessage(content = question)]},
                        config={"callbacks": [langfuse_handler]})

      span.update(output= response["messages"][1].content)

  return response["messages"][1].content
再搭建第二个简单的 LangGraph agent,它会使用新的 langgraph_research 工具。
from langgraph.prebuilt import create_react_agent
from langchain_openai import ChatOpenAI

llm = ChatOpenAI(model = "gpt-4o", temperature = 0.2)

main_agent = create_react_agent(
    model=llm,
    tools=[langgraph_research]
)
user_question = "What is Litefuse?"
# Use the predefined trace ID with trace_context
with langfuse.start_as_current_observation(
name="🤖-main-agent",
trace_context={"trace_id": predefined_trace_id}
) as span:
span.update(input=user_question)
# LangChain execution will be part of this trace
response = main_agent.invoke({"messages": [{"role": "user", "content": user_question}]},
config={"callbacks": [langfuse_handler]})
span.update(output=response["messages"][1].content)
print(f"Trace ID: {predefined_trace_id}") # Use this for scoring later在 Litefuse 中查看 trace
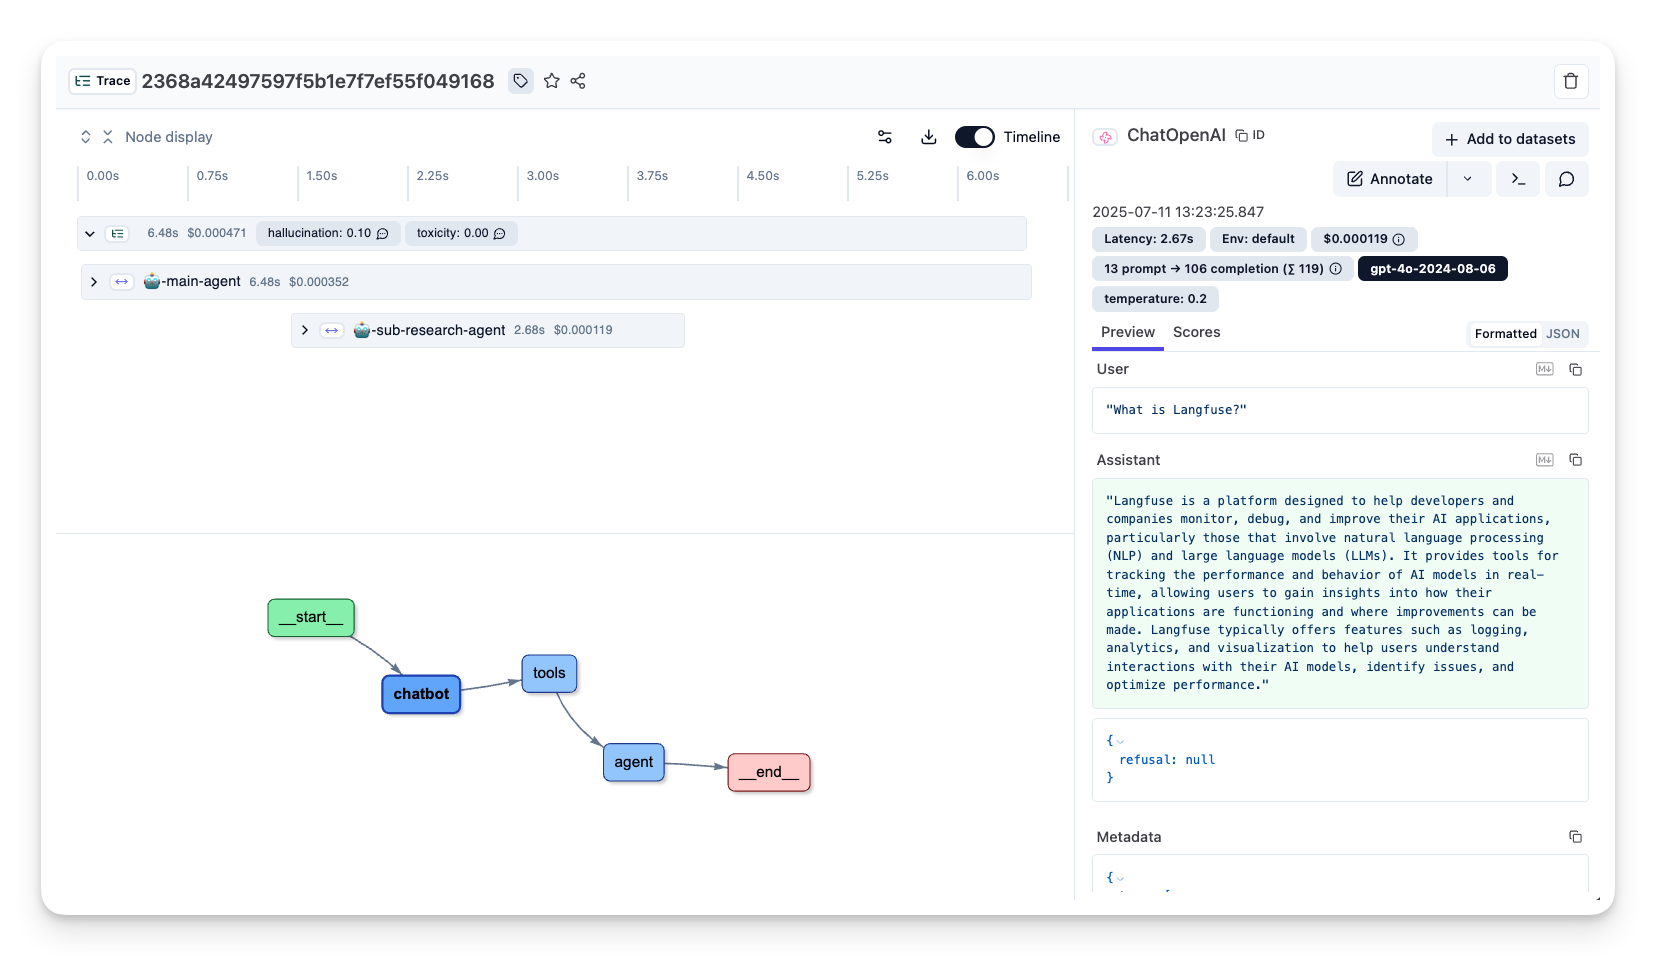
Litefuse 中的示例 trace:https://litefuse.cloud/project/cloramnkj0002jz088vzn1ja4/traces/85b0c53c4414f22ed8bfc9eb35f917c4
为 trace 添加 score
score 用于评估单个 observation 或整个 trace。借助它你可以在运行时实现自定义的质量检查,或支持 human-in-the-loop 的评估流程。
下面的示例演示了如何对某个特定 span 打 relevance(数值型 score),并对整个 trace 打 feedback(分类型 score)。这样能帮助你系统化地评估并改进你的应用。
→ 了解更多关于 Litefuse 中的自定义 score。
from langfuse import get_client

langfuse = get_client()

# Option 1: Use the yielded span object from the context manager
with langfuse.start_as_current_observation(
    as_type="span",
    name="langgraph-request") as span:
    # ... LangGraph execution ...

    # Score using the span object
    span.score_trace(
        name="user-feedback",
        value=1,
        data_type="NUMERIC",
        comment="This was correct, thank you"
    )

# Option 2: Use langfuse.score_current_trace() if still in context
with langfuse.start_as_current_observation(as_type="span", name="langgraph-request") as span:
    # ... LangGraph execution ...

    # Score using current context
    langfuse.score_current_trace(
        name="user-feedback",
        value=1,
        data_type="NUMERIC"
    )

# Option 3: Use create_score() with trace ID (when outside context)
langfuse.create_score(
    trace_id=predefined_trace_id,
    name="user-feedback",
    value=1,
    data_type="NUMERIC",
    comment="This was correct, thank you"
)
在 Litefuse 中查看带 score 的 trace
示例 trace:https://litefuse.cloud/project/cloramnkj0002jz088vzn1ja4/traces/e60a078b828d4fdc7ea22c73193b0fe4

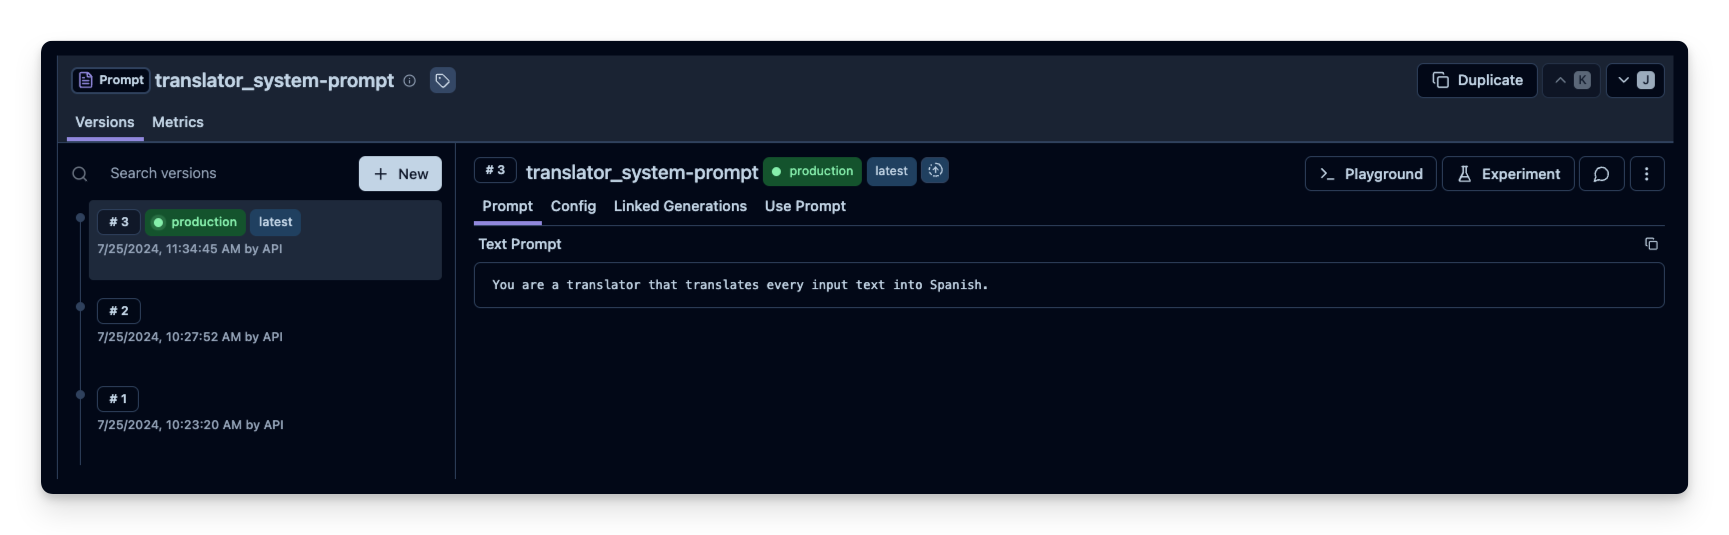
使用 Litefuse 管理 prompt
使用 Litefuse 的 prompt 管理 可以高效地管理 prompt 及其版本。在这个示例中我们通过 SDK 添加 prompt;但在生产环境中,用户通常是通过 Litefuse UI 而不是 SDK 来更新和管理 prompt。
Litefuse 的 prompt 管理本质上是一个 prompt CMS(内容管理系统)。当然你也可以在 Litefuse UI 中编辑和管理 prompt 的版本。
Name:在 Litefuse Prompt Management 中标识 prompt- prompt 内容,包含 prompt 模板和
{{input variables}} labels中带上production,可让该 prompt 立即作为默认版本生效
在这个示例中,我们创建一个 system prompt,用于让助手把每条用户消息翻译成西班牙语。
from langfuse import get_client

langfuse = get_client()

langfuse.create_prompt(
    name="translator_system-prompt",
    prompt="You are a translator that translates every input text into Spanish.",
    labels=["production"]
)
使用工具方法 .get_langchain_prompt() 把 Litefuse prompt 转换成可以在 Langchain 中使用的字符串。
背景说明: Litefuse 在 prompt 模板中使用双花括号({{input variable}})声明输入变量,而 Langchain 在 PromptTemplate 中使用单花括号({input variable})。工具方法 .get_langchain_prompt() 会把双花括号替换成单花括号。不过本示例的 prompt 里没有使用任何变量。
# Get current production version of prompt and transform the Langfuse prompt into a string that can be used in Langchain
langfuse_system_prompt = langfuse.get_prompt("translator_system-prompt")
langchain_system_prompt = langfuse_system_prompt.get_langchain_prompt()

print(langchain_system_prompt)
现在我们用这个新的 system prompt 字符串来更新助手。
from typing import Annotated
from langchain_openai import ChatOpenAI
from typing_extensions import TypedDict
from langgraph.graph import StateGraph
from langgraph.graph.message import add_messages

class State(TypedDict):
    messages: Annotated[list, add_messages]

graph_builder = StateGraph(State)

llm = ChatOpenAI(model = "gpt-4o", temperature = 0.2)

# Add the system prompt for our translator assistent
system_prompt = {
    "role": "system",
    "content": langchain_system_prompt
}

def chatbot(state: State):
    messages_with_system_prompt = [system_prompt] + state["messages"]
    response = llm.invoke(messages_with_system_prompt)
    return {"messages": [response]}

graph_builder.add_node("chatbot", chatbot)
graph_builder.set_entry_point("chatbot")
graph_builder.set_finish_point("chatbot")
graph = graph_builder.compile()
from langfuse.langchain import CallbackHandler
# Initialize Langfuse CallbackHandler for Langchain (tracing)
langfuse_handler = CallbackHandler()
# Add Langfuse handler as callback: config={"callbacks": [langfuse_handler]}
for s in graph.stream({"messages": [HumanMessage(content = "What is Litefuse?")]},
config={"callbacks": [langfuse_handler]}):
print(s)